
In my previous post, we saw how a blockchain technology keeps consistency and immutability to be reliably used in the decentralized manner. Not only for cryptocurrency, but, the decentralized technologies, in which there’s no centralized providers or servers, can be applied to many other business applications. One of such examples is identity technology.
Today the digital identities (such as, Microsoft account, Facebook account, Google account, so on and so forth) are owned and controlled by 3rd party providers (including Microsoft). As you can realize, the credentials, such as credit cards, driver’s license, so on and so forth are usually owned by users in the physical world. However, in the digital world, it belongs to each providers, then the topology will be complicated, when multiple services and providers are federated and related each other. It will also not be safe for privacy and compliance perspective.
With decentralized identity manners (verifiable credentials), all users can possess and control their own identity (there’s no centralized providers or platforms) with a help of practical decentralized technologies, such as a blockchain (or other replication mechanisms). It is expected that decentralized identity might address some of existing identity problems – such as, identity’s portability, compliance, preventing disclosure of a ton of sensitive information, so on and so forth – in the future.
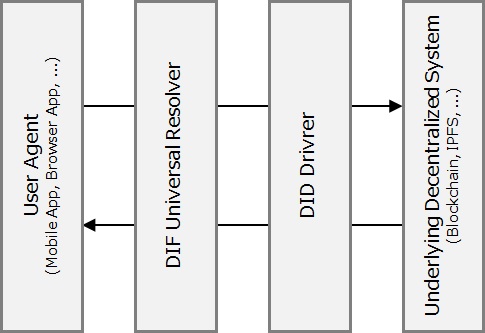
Here I don’t go so far about DID (decentralized identifier) network architecture’s details, but DID network has a following layered architecture.
First, DID Driver works for underlying each decentralized systems, such as Bitcoin, Ethereum, and so on.
DIF Universal Resolver (which works with DID drivers) resolves how to communicate with the entity represented by identifier (i.e, user, application, and DID Identity Hub).
Finally, User Agent (which is the front-end for users) communicates with this Universal Resolver. User Agent is like a wallet in blockchain network, and this holds (possesses) the user’s key.
It’s not necessarily implemented as browser-based application. Of course, it doesn’t also depend on some specific Web service.
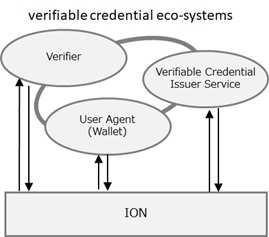
Microsoft provides a preview of DID network implementation as open source, called ION (Identity Overlay Network), for reference implementation.
Here I don’t go so far about ION implementation, but see my post “Run ION (Sidetree)” for the technical details about ION (Sidetree).
[Modified on June 2020]
Microsoft now started running the service for verifiable credential (VC) issuance (called “Verifiable Credential Issuer Service”) and shipping related SDKs. These are based on ION and runs on Bitcoin’s mainnet (not, testnet).
Using this pre-configured service on Azure AD, you don’t need to run Bitcoin node and install ION for real production by yourself.
It’s now in private preview, and features are limited. (such as, it’s only available on the user agent in Microsoft Authenticator, and it doesn’t include Identity Hubs.)
I notice that this old post shows you how DID network will work using “test” network on Dec 2019 (not current VC service), which is running on the internet for only the purpose of trying DID experience.
For the latest verifiable credentials (VC), see the post “Verifiable Credential Technical Overview“.
Note : The W3C specification for verification credentials (VCs) standard describes how to interact with user’s owning credentials between issuers, holders (users), and verifiers.
In that specification, W3C decentralized identifier (DID) and W3C verifiable credential (VC) doesn’t rely on each other (i.e, the “id” property used in VC shouldn’t be necessarily a DID), however, it is expected that many verifiable credentials (VCs) will use and resolve DIDs in its real implementations.
For the purpose of your test experience, currently (on Dec 2019) Microsoft is hosting the following 2 method based on ION protocol on the internet. Then you can soon experiment with these DID network using HTTP-based transactions without ION installation. (Each methods has different drivers and supported algorithms as follows.)
ion-test : This network uses ION and uses Bitcoin testnet for underlying blockchain. This is real ION implementation, but several features are not available now.test : On the other hand, the “test” network is another hosted network for trying DID experience. To be precise, this doesn’t use any decentralized system on the bottom and it’s for only DID experience. (The registered data is also removed by a week.) You can use this network using Decentralized Identity chrome extension (a front-end user agent for only test purpose) without writing any codes.
In this post, I show you how DID network will work, using “test” network running on Dec 2019 (which is only for the purpose of your experience and testing).
I note that this is just one of installation and you can run network node (ION) anywhere by decentralized manners. (As I mentioned above, DID doesn’t rely on a specific providers.)
I also note that it might be changed in the future release, since the decentralized identifier is now working on draft in DIF.
DID Registration (Issuance)
Almost all operations for decentralized identifier (DID), including DID creation, will be acted by some component (application) called a user agent, which is the same like a wallet application in blockchain technology.
However, in this post, I’ll focus on the communications between a user agent and DID network in order to help you understand how each transactions are verified.
First of all, you (the user) should create your own identifier (DID) in the network.
To do this, a user agent should generate the user’s key pair, i.e, a private key and a public key.
Note : Here we use test network which supports RSA (RS256) algorithm. If you run on ion-test (or install-based ION), you should use Secp256k1 (ES256K) for algorithm, since it runs on Bitcoin.
# Generate private.pem and public.pemopenssl genrsa -out private.pem 2048openssl rsa -in ./private.pem -outform PEM -pubout -out public.pemAs you will see later, a public key will be exposed for all users through underlying decentralized system, such as blockchain and content addressable store (CAS).
On the other hand, a private key should be securely managed and protected by a user. To make things clear, a private key is an identification for a user. If someone else gets your private key, he will be able to impersonate you in this network, unless you revoke this private key.
Note : Test extension (which is a test user agent as Chrome extension) will save this key on localStorage in the browser for test purpose. (Secure Storage module uses localStorage, when it runs on the browser platform.)
Now you request for issuing a new identifier in the network.
But, before requesting your identifier, you should understand the secure string format, JWT (Json Web Token).
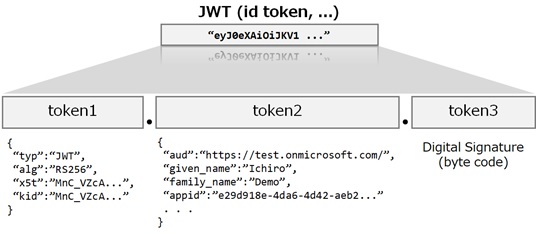
As I explained in Azure AD authentication (see here), JWT has the following format. (Here I show you again.)
- JWT has 3 string tokens delimited by the dot (.) character.
- Each delimited tokens (each 3 tokens) consists of :
- Information about certificate :
e.g, the type of key, key id, X.509 Thumbprint, and so on. - Attributes :
e.g, user principal, user name, scope, tenant id, token expiration, and so on. (It depends on the application.) - Digital signature :
Here’s attached signed signature with a private key. This is a byte code, not UTF string.
- Information about certificate :
- Each delimited tokens should be encodes by Base64 URL encoding (encoded by RFC 4686), which is the Base64 string replaced with : “+” to “-“, “/” to “_”, and removed all “=” characters in termination.
For requesting a new identifier in DID network, you should post the following JWT into the network. :
First, you should generate the following token1 and token2 string. Each tokens include :
- Token1 is your certificate’s information. The “kid” should be the same as one in Token2 (below).
- Token2 describes the following attributes’ information.
- The value of “didMethod” tells that DID network is “test” network.
- The value of “hubUri” indicates your Identity Hub instance. Later I’ll explain details about DIF Identity Hub.
- The value of “publicKey” is your public key’s information, which is generated from public.pem file (see above). This also includes “kid” (key id).
This key’s format is called JSON Web Key (JWK), which is defined in RFC 7517.
Token1
{ "alg":"RS256", "kid":"testKey"}Token2
{ "didMethod": "test", "hubUri": "https://beta.personal.hub.microsoft.com", "publicKey": [{ "kty": "RSA", "n": "r8yeOe5nmHWdmst...", "e": "AQAB", "kid": "testKey"} ]}Note : In ion-test network, the payload (Token2) should be as follows. (As I explained above, Secp256k1 should be used instead of RSA.)
{ "@context": "https://w3id.org/did/v1", "publicKey": [{ "id": "#key-1", "type": "Secp256k1VerificationKey2018", "publicKeyJwk": {"kty": "EC","kid": "#key-1","crv": "P-256K","x": "RijlnRaQtp2qNQf...","y": "194CTRoBR_2yrbx...","use": "verify","defaultEncryptionAlgorithm": "none","defaultSignAlgorithm": "ES256K" }} ], "service": [{ "id": "IdentityHub", "type": "IdentityHub", "serviceEndpoint": {"@context": "schema.identity.foundation/hub","@type": "UserServiceEndpoint","instance": [ "did:test:hub.id"] }} ]}
As I described above, you should encode each token1 and token2 by Base64 URL Encoding (RFC 4684).
Next, sign for this payload “{encoded token1}.{encoded token2}” with a private key (private.pem file). The signature is also encoded as {token3}, and finally you’ll get a JWT string “{encoded token1}.{encoded token2}.{encoded token3}” .
Here we assume that this JWT string is “eyJhbGciOiJSUzI…”.
Now you can send the following HTTP request into DID network for issuing your new identifier.
The returned “did” value (did:test:a78c80ed-4a34-4e40-8f1f-d988195b4c6d) is your decentralized identifier (DID).
POST https://beta.register.did.microsoft.com/api/v1.1Content-Type: application/jwteyJhbGciOiJSUzI...HTTP/1.1 200 OKcontent-type: application/json; charset=utf-8{ "did": "did:test:a78c80ed-4a34-4e40-8f1f-d988195b4c6d", "status": "in-progress"}On the bottom of this request’s submission, DID network will proceed the following :
First, DID network will verify this JWT. If someone else adds one character (even a space, a period, and so on) to the request’s payload (i.e, the string of “{token1}.{token2}”), the signature (i.e, the string of {token3}) will be totally different. If the payload is tampered, the signature must be re-generated by the user who has a corresponding private key. By verifying JWT, DID network ensures that this payload is surely generated by one who has a corresponding private key.
Once JWT is verified, DID network will register this request on underlying decentralized system, such as blockchain and content addressable store (CAS).
If it’s on ion-test network, DID document (containing a public key) is saved in IPFS (content addressable store) and the hash of this content is recorded in Bitcoin. Eventually it’s mined in Bitcoin network, registered into a chain, and shared for all participants in this network. See “Run ION (Sidetree)” for details about this underlying process. (For this reason, it will take approximately 2 minutes – 30 minutes, when using iot-test network. See my previous post “Consensus in Blockchain“.)
On the contrary, when you’re using test network (which doesn’t use underlying decentralized platform) for DID network, it will be immediately registered and confirmed.
To see whether your DID is correctly registered in DID network, you send HTTP GET request to the DID discovery endpoint as follows. (If it’s not registered, HTTP 404 will be returned by this ION endpoint.)
With this universal directory endpoint, every users or applications can also extract your DID related information, called DID Document Object (DDO), such as, your public key, or the reference for your Identity Hub instance. (Later I’ll explain about Identity Hub.)
GET https://beta.discover.did.microsoft.com/1.0/identifiers/did:test:a78c80ed-4a34-4e40-8f1f-d988195b4c6dHTTP/1.1 200 OKcontent-type: application/json; charset=utf-8{ "document": {"@context": "https://w3id.org/did/v1","id": "did:test:a78c80ed-4a34-4e40-8f1f-d988195b4c6d","created": "2019-12-17T23:42:58.467Z","publicKey": [ {"id": "did:test:a78c80ed-4a34-4e40-8f1f-d988195b4c6d#testKey","type": "RsaVerificationKey2018","publicKeyJwk": { "kty": "RSA", "n": "r8yeOe5nmHWdmst...", "e": "AQAB", "kid": "did:test:a78c80ed-4a34-4e40-8f1f-d988195b4c6d#testKey"},"owner": "did:test:a78c80ed-4a34-4e40-8f1f-d988195b4c6d" }],"service": [ {"type": "IdentityHub","publicKey": "did:test:a78c80ed-4a34-4e40-8f1f-d988195b4c6d#testKey","serviceEndpoint": { "@context": "schema.identity.foundation/hub", "@type": "UserServiceEndpoint", "instances": ["did:test:hub.id" ]} }] }, "resolverMetadata": {"driverId": "did:test","driver": "HttpDriver","retrieved": "2019-12-17T23:46:54.805Z","duration": "224.3028ms" }}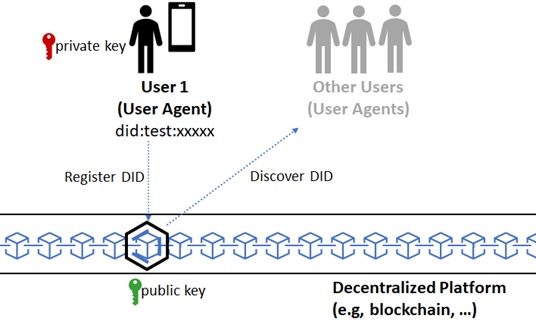
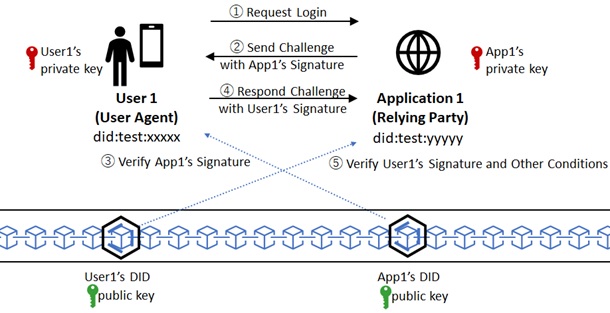
Authentication (Verification)
Once your DID is registered, you can sign-in to the application connected with this DID network.
Now let’s see how the authentication is proceeded in DID network. (In this example, we also use test network.)
Before processing the authentication, the application (relying party) should also be registered in DID network. This registration process is almost the same as user’s DID registration. (See above for registration steps.)
Here we assume that application’s DID is did:test:93163c8d-eb4d-48c5-a87f-2bf4ea21ceaa .
When the user (you) tries to login to this application, first the application sends a challenge to the user. In order for the successful login, the user should appropriately respond against this challenge (i.e, should complete a handshake).
Here we assume that the user pushes the login button and send “/login” request (HTTP GET request) to the application in the server side. In this case, the following body in the HTTP response (which is returned to the user) is a challenge message.
Note : Here we assume that we’re using a web application and a user agent which runs on web browser. However, a challenge message might be proactively sent into your mobile application, such like today’s Authenticator application. (In this case, the user agent might be a mobile application.)
GET https://localhost:8080/loginHTTP/1.1 200 OKContent-Type: application/jwt; charset=utf-8eyJhbGciOiJSUzI...As you’ve probably noticed, this challenge message (response body) starts with “eyJ…”. That’s it. This is also JWT.
This JWT has the following tokens signed by the application’s private key. (The value of Token3 is the digital signature.)
As you can see, the value of “nonce” is included in this challenge message. This “nonce” value is an arbitrary string and used for matching between a challenge message and a corresponding user’s response. The user should respond the same “nonce” value for a handshake.
The “client_id” value indicates where the user must submit the challenge response to.
Token1
{ "alg":"RS256", "kid":"did:test:93163c8d-eb4d-48c5-a87f-2bf4ea21ceaa#testKey"}Token2
{ "iss": "did:test:93163c8d-eb4d-48c5-a87f-2bf4ea21ceaa", "response_type": "id_token", "client_id": "https://localhost:8080/auth-response", "scope": "openid", "nonce": "DL_5kwJen8EVbwjs1LEa5FXWXAsq-Z93"}Now it’s user’s turn.
The user verifies the signature of this JWT in order to ensure that the response is generated by this application and not tampered.
Once it’s correct JWT, the user agent retrieves the value of “nonce” and generates the JWT response for this challenges.
This JWT should be as follows.
Token1
{ "iat":"1576470234", "exp":"1576470534", "alg":"RS256", "kid":"did:test:a78c80ed-4a34-4e40-8f1f-d988195b4c6d#testKey"}Token2
{ "iss": "https://self-issued.me", "sub": "did:test:a78c80ed-4a34-4e40-8f1f-d988195b4c6d", "aud": "https://localhost:8080/auth-response", "nonce": "DL_5kwJen8EVbwjs1LEa5FXWXAsq-Z93", "exp": 1576470534, "iat": 1576470234, "sub_jwk": {"kty": "RSA","kid": "did:test:a78c80ed-4a34-4e40-8f1f-d988195b4c6d#testKey","e": "AQAB","n": "r8yeOe5nmHWdmst..." }, "did": "did:test:a78c80ed-4a34-4e40-8f1f-d988195b4c6d"}Finally the user agent signs for this payload (string of “{encoded Token1}.{encoded Token2}”) using user’s private key and submits the final JWT string as follows.
POST https://localhost:8080/auth-responseContent-Type: application/jwteyJpYXQiOiIxNTc.....Now the application verifies JWT and check if the nonce is correct (exact same value as one the application passed) in turn.
Also there might be other application-specific verification – such as “it’s a licensed user ?”, “the response time is expired ?” … – for each applications. (These depend on each applications.)
Once all verification is succeeded, the application will proceed the login, such as cookie setting, session setting, so on and so forth.
DIF Identity Hub
In DID network implementation, underlying decentralized system should be used for only identifiers or DDO (including public keys) to route and authenticate. The sensitive information, such as PII, should not be saved in a chain and should be saved off-chain. These must be controlled by only owners (users).
This is the reason why DIF Identity Hub has come. (Now it’s working on draft in DIF.)
Identity Hub is not provider-dependent and is handled in user-side, regardless of where it’s located. It might be on cloud or on edge, but the data should be synced among multiple Hubs (without master) for keeping decentralized manners.
A user may have one or more instances of Identity Hub.
Let’s see the discovery’s response again. In this example, a single instance “did:test:hub.id” is used for this user’s hub instances. (See the following “UserServiceEndpoint” descriptor.)
HTTP/1.1 200 OKcontent-type: application/json; charset=utf-8{ "document": {"@context": "https://w3id.org/did/v1","id": "did:test:a78c80ed-4a34-4e40-8f1f-d988195b4c6d","created": "2019-12-17T23:42:58.467Z","publicKey": [ {"id": "did:test:a78c80ed-4a34-4e40-8f1f-d988195b4c6d#testKey","type": "RsaVerificationKey2018","publicKeyJwk": { "kty": "RSA", "n": "r8yeOe5nmHWdmst...", "e": "AQAB", "kid": "did:test:a78c80ed-4a34-4e40-8f1f-d988195b4c6d#testKey"},"owner": "did:test:a78c80ed-4a34-4e40-8f1f-d988195b4c6d" }],"service": [ {"type": "IdentityHub","publicKey": "did:test:a78c80ed-4a34-4e40-8f1f-d988195b4c6d#testKey","serviceEndpoint": { "@context": "schema.identity.foundation/hub", "@type": "UserServiceEndpoint", "instances": ["did:test:hub.id" ]} }] }, "resolverMetadata": {"driverId": "did:test","driver": "HttpDriver","retrieved": "2019-12-17T23:46:54.805Z","duration": "224.3028ms" }}By asking the discovery endpoint for this hub’s DID, you can get the location URL and public key for this Identity Hub instance. (See below.)
GET https://beta.discover.did.microsoft.com/1.0/identifiers/did:test:hub.idHTTP/1.1 200 OKcontent-type: application/json; charset=utf-8{ "document": {"@context": "https://w3id.org/did/v1","id": "did:test:hub.id","created": "2019-07-15T22:36:00.881Z","publicKey": [ {"id": "did:test:hub.id#HubSigningKey-RSA?9a1142b622c342f38d41b20b09960467","type": "RsaVerificationKey2018","owner": "did:test:hub.id","publicKeyJwk": { "kty": "RSA", "kid": "did:test:hub.id#HubSigningKey-RSA?9a1142b622c342f38d41b20b09960467", "defaultEncryptionAlgorithm": "RSA-OAEP", "keyOps": ["sign","verify","wrapKey","unwrapKey","encrypt","decrypt" ], "n": "uG76CgQGPSTx0Zu...", "e": "AQAB", "defaultSignAlgorithm": "RS256"} }],"service": [ {"type": "IdentityHub","publicKey": "did:test:hub.id#HubSigningKey-RSA?9a1142b622c342f38d41b20b09960467","serviceEndpoint": { "@context": "schema.identity.foundation/hub", "@type": "HostServiceEndpoint", "locations": ["https://beta.hub.microsoft.com/" ]} }] }, "resolverMetadata": {"driverId": "did:test","driver": "HttpDriver","retrieved": "2019-12-18T03:17:10.956Z","duration": "11.3531ms" }}When running on today’s OpenID / OAuth, user’s claims can be sent by an identity provider and extracted from a token. (See my early post “How to verify id token in Azure AD v2.0 endpoint” for OpenID / OAuth claims.)
On the contrary, in a scenario with DID network, the user’s data is owned by users, and the application (replying party, RP) requests the user for accessing certain types of user’s data.
Identity Hub provides permission’s schema. Once it’s granted, the application can access the user’s data in Identity Hub instance.
Here I show you this flow in the following picture. (The several implementations are now in development.)
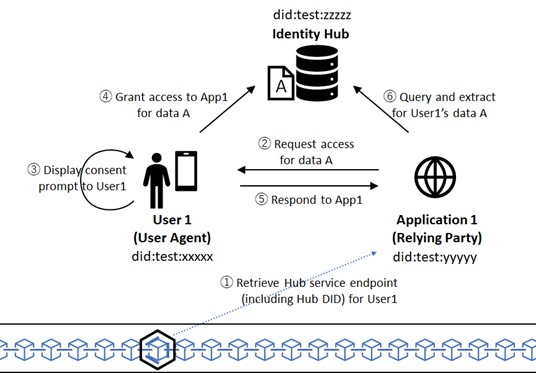
The underlying storage can be any platforms, such as NoSQL (e.g, MongoDB, Azure Cosmos DB, …) with replications, IPFS, so on and so forth. (See reference implementation by MongoDB.) However, the protocol (the interaction) is defined by DIF (now, working on draft) in order to run on any open source server technology.
The transactions for Identity Hub (including reading and writing) are done through HTTP-based requests (with JWT), but, you can also use NodeJS Identity Hub SDK. (Here I don’t describe about this SDK and programming, but please see “Microsoft Decentralized Identity – Identity hub tutorial” for SDK tutorial.)
The data should also be encrypted by owner’s key, however the details about data encryption (such as “how to encrypt data in a hub”, “how to handle while hub provider cannot access it”, so on and so forth) are now on the roadmap.
Note : In the hub in current Microsoft DID preview, data encryption is also still in development. (For now, the data at rest is encrypted by underlying data storage, and the data in transit is encrypted by hub’s key.)
(Dec 2019)
Reference :
Microsoft – Own your digital identity (Decentralized identity)
https://microsoft.com/ownyouridentity
Microsoft – Verifiable Credentials Document
https://didproject.azurewebsites.net/
W3C – Decentralized Identifiers (DIDs) Core Data Model and Syntaxes
https://www.w3.org/TR/did-core/
W3C – Verifiable Credential Data Model
https://www.w3.org/TR/vc-data-model/
Categories: Uncategorized

4 replies»