
.NET Framework 4.5 (WIF 4.5) を使用した Active Authentication については、「.NET 4.5 で Active Authentication を実装する」に記載しました。環境 : Microsoft Online Services サインイン ツール, Windows PowerShell 用 Microsoft Online Services モジュール, Microsoft Online Services ディレクトリ 同期ツール (DirSync), AD FS 2.0 (Active Directory Federation Services 2.0), Visual Studio 2010, WIF SDK 3.5 (Windows Identity Foundation SDK 3.5)
AD FS 2.0 フェデレーションを処理する Client Programming
- Windows Azure Active Directory – ACS 編
- Office 365 – Microsoft Federation Gateway 編
こんにちは。
前回の続きとして、今回は、Office 365 / ADFS 連携における Active Authentication のサンプル コードを紹介します。
補足 : なお、Microsoft Online Services アカウントを使ったサンプル コード (AD FS フェデレーションを使わない Active Authentication のサンプル コード) は、以前紹介した SharePoint Online (Office 365) 接続のサンプル コード からダウンロードできます。(下記と同様に、WIF を使って extSTS.srf を呼び出します。)
補足 : SharePoint 2010 (On-Premise) においても AD FS v2.0 を使ったクレーム ベース認証の設定が可能ですが、この場合も、プログラミングによって Active 認証を処理できます。(この場合、STS をホップしないため、むしろ、下記よりも簡単なコードで実現できます。)
このプログラミングについては、「ダウンロード センター: Implementing Claims-Based Authentication with SharePoint Server 2010」に掲載されています。
事前設定 – AD FS / Office 365 のセットアップ
まず、Office 365、AD (Active Directory)、AD FS 2.0 のセットアップをおこないます。
ここでは、この手順の詳細は省略しますが、インストール / セットアップの手順は、以下のドキュメントに記載されていますので参考にしてください。(なお、AD FS とのフェデレーションを構成する際には、Office 365 へのドメイン追加が必要になるので注意してください。)
[ダウンロード センター] Microsoft Office 365 自習書 : AD FS によるシングル サインオン環境構築 (日本語)
http://www.microsoft.com/downloads/ja-jp/details.aspx?familyid=42ef7a9d-3bf8-4bb3-b00f-0120763f5d74
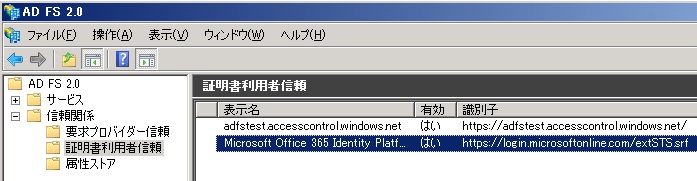
セットアップをおこなうと、AD FS 2.0 管理画面には、下図の通り Office 365 用の STS (https://login.microsoftonline.com/extSTS.srf) が Relying Party (RP) として設定されます。つまり、この STS (Microsoft Federation Gateway) に対してプログラミングをおこなうことで、前回 と同様の方法で Active Authentication が可能です。(後述します。)
事前設定 – エンドポイントの有効化
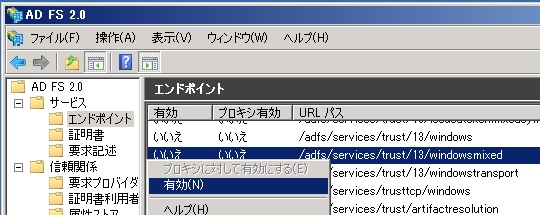
基本的なインストールと設定が完了したら、前回 同様、AD FS 上で、Active Authentication で使用するエンドポイントを有効にします。
AD FS 2.0 のサーバーにログインし、[AD FS 2.0 の管理] 画面を開いて、下図の通り、以降で使用する <AD FS 2.0 サーバー>/adfs/services/trust/13/windowsmixed のエンドポイントを有効 (Enabled) に設定します。
設定が完了したら、[AD FS 2.0 Windows サービス] を再起動します。
プログラミング
今回のサンプル コードでは、コンソール アプリケーションから接続をおこない、AD FS のフェデレーション認証を処理して、SharePoint Online 上の REST Api を呼び出します。
前回 同様、セキュリティーに関する SOAP エンベロープの処理など、面倒な処理は、Windows Identity Foundation (WIF) のライブラリー (Microsoft.IdentityModel.dll) を使って実現します。
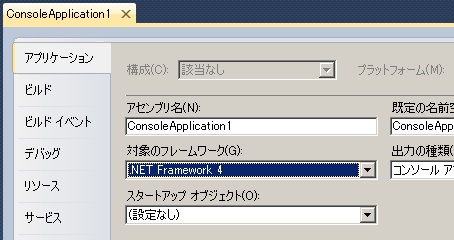
まず、Visual Studio を起動し、コンソール アプリケーションのプロジェクトを新規作成します。
作成したコンソール アプリケーションの対象フレームワークを [.NET Framework 4 Client Profile] から [.NET Framework 4] に変更して (下図)、プロジェクトに、System.ServiceModel.dll、System.Runtime.Serialization.dll、System.IdentityModel.dll、%programfiles%\Reference Assemblies\Microsoft\Windows Identity Foundation\v3.5\Microsoft.IdentityModel.dll のアセンブリ参照を追加します。
AD FS サーバーに接続して、トークン (Assertion) を取得するコードを作成します。Program.cs に、下記 (太字) の通りコードを記述します。
下記のコードでは WCF を使用していますが、WS-Trust 用のバインド構成など複雑な処理は、WIF (Windows Identity Foundation) が提供するクラスを使用しています。また、AD FS サーバーに渡す SOAP のエンベロープ (WCF の Message) についても、提供されている RequestSecurityToken クラスを使うことで (内部で) 作成してくれます。(ここまでは、前回 と同様です。)
. . .using System.Net;using System.ServiceModel;using Microsoft.IdentityModel.Protocols.WSTrust;using Microsoft.IdentityModel.Protocols.WSTrust.Bindings;. . .static void Main(string[] args){ // // get SAML token from AD FS // WSTrustChannelFactory idpFactory = new WSTrustChannelFactory( new WindowsWSTrustBinding(SecurityMode.TransportWithMessageCredential), new EndpointAddress(new Uri(@"https://adfsserver.testdomain.com/adfs/services/trust/13/windowsmixed"), EndpointIdentity.CreateSpnIdentity(@"host/kkdeveva01.testdomain.com"))); idpFactory.TrustVersion = System.ServiceModel.Security.TrustVersion.WSTrust13; idpFactory.Credentials.Windows.ClientCredential = CredentialCache.DefaultNetworkCredentials; RequestSecurityToken reqToken1 = new RequestSecurityToken( WSTrust13Constants.RequestTypes.Issue, WSTrust13Constants.KeyTypes.Bearer); reqToken1.AppliesTo = new EndpointAddress("urn:federation:MicrosoftOnline"); reqToken1.TokenType = Microsoft.IdentityModel.Tokens.SecurityTokenTypes.Saml11TokenProfile11; WSTrustChannel idpProxy = (WSTrustChannel)idpFactory.CreateChannel(); System.IdentityModel.Tokens.SecurityToken issuedToken1 = idpProxy.Issue(reqToken1); idpFactory.Close(); // we'll describe the following programs below . . .}. . .補足 : 上記は、AD FS Proxy を使わず 、AD FS のみを構成し、ドメイン内のクライアントから Windows 統合認証を使って接続するサンプル コードです。(外部からプロキシーに要求する場合は、UserName の Credential を要求することになるでしょう。)
このため、SPN Identity を使って、WCF を使った SSPI による認証をおこなっています。
補足 : デバッグに際し、AD FS サーバー側で発生したエラーは、イベント ビューアー (eventvwr) で確認できます。
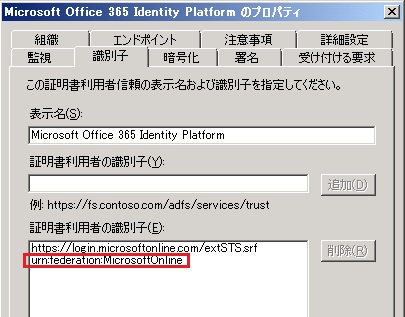
上記で、AppliesTo には、識別子「urn:federation:MicrosoftOnline」を設定します。この識別子は、AD FS 2.0 管理画面で確認できます (下図参照)。
補足 : 識別子などの情報は、もともと、MFG (Microsoft Federation Gateway) のメタデータ (https://nexus.microsoftonline-p.com/FederationMetadata/2006-12/FederationMetadata.xml) に記載されています。
つぎに、上記で受け取った AD FS のトークン (issuedToken1) を使って、Office 365 の STS (extSTS.srf) にトークンを要求します。Program.cs に、下記 (太字) の通りコードを追加します。(下記で、https://o365demos.sharepoint.com には、皆さんが接続する SharePoint Online サイトの URL を設定してください。)
前述と似た処理ですが、ここでは、IssuedTokenWSTrustBinding を使用している点に注意してください。IssuedTokenWSTrustBinding では、BearerKey も処理できるように、下記の通り KeyType プロパティを設定します。
また、下記の通り、idpFactory.Credentials.SupportInteractive = false とすることで、Windows CardSpace (旧バージョンのクレーム ベース処理) の UI を抑制しています。(UI を表示せずに、プログラム コードでトークンを処理しています。)
. . .using System.Xml.Linq;. . .static void Main(string[] args){ // // get SAML token from AD FS // . . . // // get wss binary token from Office 365 STS (extSTS.srf) // IssuedTokenWSTrustBinding o365Binding = new IssuedTokenWSTrustBinding() { SecurityMode = SecurityMode.TransportWithMessageCredential, KeyType = System.IdentityModel.Tokens.SecurityKeyType.BearerKey, EnableRsaProofKeys = true, TrustVersion = System.ServiceModel.Security.TrustVersion.WSTrustFeb2005 }; WSTrustChannelFactory o365Factory = new WSTrustChannelFactory( o365Binding, new EndpointAddress(new Uri(@"https://login.microsoftonline.com/extSTS.srf"))); o365Factory.TrustVersion = System.ServiceModel.Security.TrustVersion.WSTrustFeb2005; o365Factory.Credentials.SupportInteractive = false; RequestSecurityToken reqToken2 = new RequestSecurityToken( WSTrustFeb2005Constants.RequestTypes.Issue, WSTrustFeb2005Constants.KeyTypes.Bearer); reqToken2.AppliesTo = new EndpointAddress(@"https://o365demos.sharepoint.com/_forms/default.aspx?wa=wsignin1.0"); reqToken2.TokenType = Microsoft.IdentityModel.Tokens.SecurityTokenTypes.Saml11TokenProfile11; o365Factory.ConfigureChannelFactory(); WSTrustChannel o365Proxy = (WSTrustChannel)o365Factory.CreateChannelWithIssuedToken(issuedToken1); RequestSecurityTokenResponse securityTokenResponse2; o365Proxy.Issue(reqToken2, out securityTokenResponse2); XDocument binToken2 = XDocument.Parse(securityTokenResponse2.RequestedSecurityToken.SecurityTokenXml.OuterXml); // we'll describe the following programs below . . .}. . .補足 : ここでは、有効期限に関する処理は省略しますが、発行されるトークンは、既定で 1 日間の有効期限があります。有効期限は、securityTokenResponse2.Lifetime.Expires で取得できます。
STS は、認証に成功すると、以下のフォーマットのトークン (上記の securityTokenResponse2.RequestedSecurityToken.SecurityTokenXml.OuterXml) を返します。
<wsse:BinarySecurityToken Id="Compact0" xmlns:wsse="http://docs.oasis-open.org/wss/2004/01/oasis-200401-wss-wssecurity-secext-1.0.xsd">t=返されるトークン&p=</wsse:BinarySecurityToken>つぎに、上記で受け取ったトークンを使って、SharePoint Online に認証をおこないます。(下記 太字を参照。)
認証に成功すると、認証用の Cookie (FedAuth, rtFA) を取得します。
. . .using System.IO;. . .static void Main(string[] args){ // // get SAML token from AD FS // . . . // // get wss binary token from Office 365 STS (extSTS.srf) // . . . // // login to SharePoint Online (and, get FedAuth cookie) // Cookie FedAuth, rtFA; var tokenValue = from c in binToken2.Descendants() where c.Name == XName.Get("BinarySecurityToken", "http://docs.oasis-open.org/wss/2004/01/oasis-200401-wss-wssecurity-secext-1.0.xsd") select c; HttpWebRequest webRequest = HttpWebRequest.Create(@"https://o365demos.sharepoint.com/_forms/default.aspx?wa=wsignin1.0") as HttpWebRequest; webRequest.Method = "POST"; webRequest.ContentType = "application/x-www-form-urlencoded"; webRequest.CookieContainer = new CookieContainer(); webRequest.AllowAutoRedirect = false; webRequest.UserAgent = @"Mozilla/5.0 (compatible; MSIE 9.0; Windows NT 6.1; WOW64; Trident/5.0)"; byte[] data = Encoding.UTF8.GetBytes(tokenValue.FirstOrDefault().Value); using (Stream stream = webRequest.GetRequestStream()) { stream.Write(data, 0, data.Length); stream.Close(); } using (HttpWebResponse webResponse = webRequest.GetResponse() as HttpWebResponse) { FedAuth = new Cookie("FedAuth", webResponse.Cookies["FedAuth"].Value) { Path = "/", Secure = true, HttpOnly = true, Domain = webRequest.RequestUri.Host }; rtFA = new Cookie("rtFA", webResponse.Cookies["rtFa"].Value) { Path = "/", Secure = true, HttpOnly = true, Domain = webRequest.RequestUri.Host }; } // we'll describe the following programs below . . .}. . .では、上記で受け取った Cookie を使って、SharePoint Online の REST サービスを呼び出してみましょう。
下記 太字の通りコードを記載します。(result に、結果文字列が返されます。)
. . .static void Main(string[] args){ // // get SAML token from AD FS // . . . // // get wss binary token from Office 365 STS (extSTS.srf) // . . . // // login to SharePoint Online (and, get FedAuth cookie) // . . . // // Call test // string result = string.Empty; CookieContainer cc = new CookieContainer(); cc.Add(FedAuth); cc.Add(rtFA); HttpWebRequest webRequest2 = HttpWebRequest.Create("https://o365demos.sharepoint.com/_vti_bin/listdata.svc") as HttpWebRequest; webRequest2.Method = "GET"; webRequest2.CookieContainer = cc; using (HttpWebResponse webResponse2 = webRequest2.GetResponse() as HttpWebResponse) { using (StreamReader resReader2 = new StreamReader(webResponse2.GetResponseStream())) { result = resReader2.ReadToEnd(); resReader2.Close(); } }}. . .
Categories: Uncategorized

3 replies»