
In this post, I’ll show you how Azure IoT Edge module works and how to build it for Azure IoT beginners.
For your essential understanding, I’ll build and deploy custom modules from scratch without using Visual Studio Code template. (For building your custom module in Visual Studio Code, see this tutorial.)
If you are new to Azure IoT, you might not be familiar with IoT Edge module. Shortly, “module” is a jargon for “docker container”. (Strictly “module image” is a docker image and “module instance” is a docker container.)
First of all, I describe the brief outline for how to deploy and run your custom modules as follows.
- First, you must build a docker image and register into docker repository, such as, Docker Hub or Azure Container Registry.
You can also use existing images, such like, Azure Cognitive containers, which is provided by vendors (Microsoft, NVIDIA, etc). - Generate deployment manifest (JSON) which includes the definition for module structures in Edge device. This manifest includes what modules (and from where) are installed in device.
- Upload this manifest (JSON) into your Azure IoT Hub in cloud.
- The connected devices (in which, IoT Edge runtime should be installed) will pull and start (run) each modules (i.e, docker images) along with the uploaded manifest definitions (JSON).
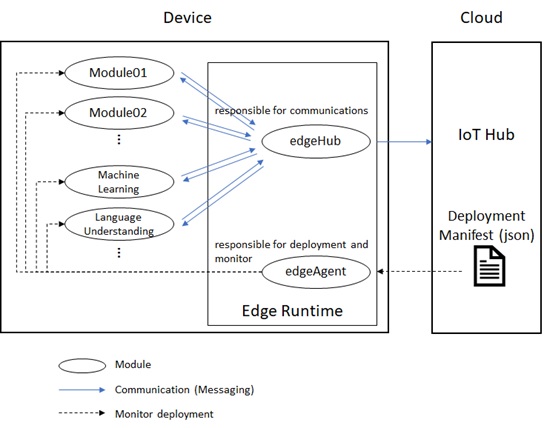
- Each modules can communicate with IoT Edge framework called “message routes”.
The built-in Edge Hub module (named “edgeHub”) is responsible for all communications, including both module-to-module and device-to-cloud.
Note (Added on Feb 2020) : Now you can use Event Grid on IoT Edge to trigger simple workflows between modules, between edge devices (cross-device subscriptions), and between edge and cloud.
See here for “Azure Event Grid on Azure IoT Edge” module.
Now let’s start with examples (source codes and commands).
Build and Register Container
For the first tutorial, I’ll create and install a primitive module, in which it just listens port 8081.
As you can see here, this code doesn’t depend on Azure IoT framework.
module01.py
from flask import Flaskapp = Flask(__name__)@app.route("/")def hello(): return "Hello"if __name__ == '__main__': app.run(host='0.0.0.0', port=8081)To build and run this code in docker image, I should create Dockerfile and requirements.txt as follows. (In this example, only Flask package is used.)
Dockerfile01
FROM python:3.7-slim-busterWORKDIR /appCOPY requirements01.txt ./RUN pip install -r requirements01.txtCOPY . .EXPOSE 8081CMD [ "python3", "-u", "./module01.py", "-p 8081" ]requirements01.txt
Flask>=0.9Now let’s build a docker image and register into Azure Container Registry (ACR). (You can also register into Docker Hub.)
Before running the following command, please login to your ACR with “docker login” or “az acr login” command.
docker build --rm -f ./Dockerfile01 -t iottest01.azurecr.io/module01:0.0.1 ./docker push iottest01.azurecr.io/module01:0.0.1Deploy and Run Edge Modules
Before deploying your custom module, you must create IoT Hub resource in Azure Portal, and set up all devices as edge-enabled devices (IoT Edge devices) connected to IoT Hub.
- Prepare and run Edge device.
If you don’t have any portable physical devices, you can also use Azure VM (virtual machine) for Edge device. (Run Ubuntu VM and install IoT Edge runtime. Or deploy this template on Azure.) - Go to Azure Portal and add an IoT Edge device in your IoT Hub resource.
- Get connection string in the generated IoT Edge device.
- Set this connection string in the file
/etc/iotedge/config.yamlon Edge device.
And restart IoT Edge runtime. (Run “sudo systemctl restart iotedge“.)
Here I assume that all these setup is done beforehand.
As I mentioned in the previous outline (see above), you must generate deployment manifest (JSON) for deploying IoT edge modules.
Here our sample manifest (deployment.json) is as follows.
- This manifest defines 3 modules – edgeAgent (system module), edgeHub (system module), and Module01 (our custom module).
- 2 system modules, called IoT Agent (edgeAgent) and IoT Hub (edgeHub), are mandatory. The former one is used for module’s deployment and monitoring, and the latter one is used for communications.
IoT Hub module (edgeHub) requires one of port 8883 (MQTT), 5671 (AMQT), and 443 (HTTPS) for communicating with IoT Hub in the cloud. - As you saw before, our custom module (module01.py) uses port 8081. I then set the port binding with “
HostConfig” in “createOptions” section. - My docker repository (ACR) is not public and protected by credentials. Here I set this credential by “
registryCredentials” setting.
deployment.json
{ "modulesContent": {"$edgeAgent": { "properties.desired": {"schemaVersion": "1.0","runtime": { "type": "docker", "settings": {"minDockerVersion": "v1.25","loggingOptions": "","registryCredentials": { "iottest01": {"username": "user01","password": "VvuzIwQ88a...","address": "iottest01.azurecr.io" }} }},"systemModules": { "edgeAgent": {"type": "docker","settings": { "image": "mcr.microsoft.com/azureiotedge-agent:1.0", "createOptions": "{}"} }, "edgeHub": {"type": "docker","status": "running","restartPolicy": "always","settings": { "image": "mcr.microsoft.com/azureiotedge-hub:1.0", "createOptions": "{\"HostConfig\":{\"PortBindings\":{\"5671/tcp\":[{\"HostPort\":\"5671\"}],\"8883/tcp\":[{\"HostPort\":\"8883\"}],\"443/tcp\":[{\"HostPort\":\"443\"}]}}}"} }},"modules": { "Module01": {"version": "1.0","type": "docker","status": "running","restartPolicy": "always","settings": { "image": "iottest01.azurecr.io/module01:0.0.1", "createOptions": "{\"HostConfig\":{\"PortBindings\":{\"8081/tcp\":[{\"HostPort\":\"8081\"}]}}}"} }} }},"$edgeHub": { "properties.desired": {"schemaVersion": "1.0","routes": {},"storeAndForwardConfiguration": { "timeToLiveSecs": 7200} }} }}Note : You can use pre-built same image tsmatz/iot-module-sample01:1.0.0 in docker hub.
Replaceiottest01.azurecr.io/module01:0.0.1withtsmatz/iot-module-sample01:1.0.0in above deployment.json.
Now we start to deploy modules in Edge device with this deployment manifest (JSON). Here I use Azure CLI (see below), but you can also use Azure Portal UI, REST, SDK, or VS Code for deployment.
# First, install IoT extension for using "az iot edge" commandaz extension add --name azure-iot# set modules with deployment manifest to a single deviceaz iot edge set-modules --hub-name {YOUR IOT HUB NAME} --device-id {YOUR DEVICE ID} --content ./deployment.jsonNote : You can use Cloud Shell in Azure Portal with your browser. (Upload your manifest (JSON file) into your Cloud Shell.)
I note that this command (“az iot edge set-modules” command) doesn’t push the deployment definition into the connected devices. This command just set definitions in IoT Hub in cloud, and the connected devices then extract this definition and start to install.
Even when the device is not running, the modules will be deployed after it starts.
After a while, all 3 modules are deployed and started in your Edge device.
You can see whether each modules are running in Azure Portal (cloud). Or, run “iotedge list” command for seeing each module’s status in your Edge device. If there’re any troubles, please see the container logs with “iotedge logs {YOUR MODULE NAME}” command. (Or use docker command to see container logs.)
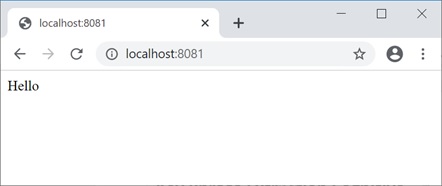
Now let’s connect HTTP port 8081 and see if your module is correctly running.
To do this, run “curl http://127.0.0.1:8081/” in your Edge device, or connect your device with SSH tunnel (port forwarding) and access http://localhost:8081/ with your browser. (See below.)
If it’s succeeded, you can see “Hello” in your output.
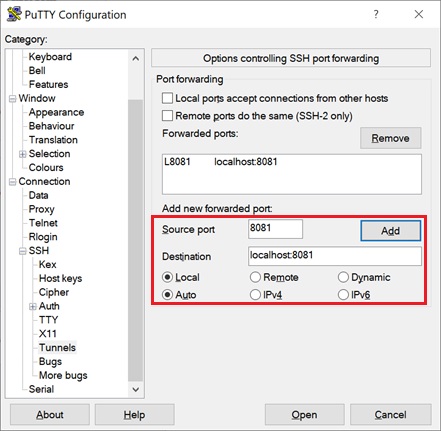
Note : The setting for SSH tunnel (port forwarding) differs from each terminal software.
The following is the setting in PuTTY.
Message Routing – module-to-module communications
When your container is running in IoT Edge runtime, you can use “message routing” in Azure IoT for communications between modules. By using message routing mechanism, your module (docker container) doesn’t depend on other modules. The module dependency can be written separately in deployment manifest (JSON).
Furthermore, with message routing, you can also handle the device-to-cloud messaging (as well as module-to-module messaging) in a same manner.
Now we start to build a sample with message routing.
First, see the following illustration for routing architecture (topology). In this example, I’ll pass the message into Module01 using port 8081. The message will then be passed into Module02, and finally the message will be written in logs in Module02.

Now we change Module01 to be able to receive messages from outside. Here we simply defined get_message() as Flask methods as follows.
When this module has received the message, it should pass this message into message routing framework in IoT Edge. To do this, you can use Azure IoT Device SDK and just call send_message_to_output() as follows.
module01.py (Modified)
from flask import Flaskfrom azure.iot.device import IoTHubModuleClientapp = Flask(__name__)module_client = IoTHubModuleClient.create_from_edge_environment()# module_client.connect()@app.route("/")def hello(): return "Hello"@app.route('<message>')def get_message(message): module_client.send_message_to_output(message, "output1") return "Proceeded - {}!".format(message)if __name__ == '__main__': app.run(host='0.0.0.0', port=8081)Note : In this post we use a synchronous call, but you can also use asynchronous invoking with
azure.iot.device.aio.IoTHubModuleClientclass, instead of usingazure.iot.device.IoTHubModuleClientclass.
To use SDK, make sure to include azure-iot-device package in requirements.txt.
requirements01.txt (Modified)
Flask>=0.9azure-iot-device~=2.5.0Next we receive the message in Module02.
This is also done by using receive_message_on_input() function in Azure IoT Device SDK. The following will be the source code for Module02.
module02.py
from azure.iot.device import IoTHubModuleClientmodule_client = IoTHubModuleClient.create_from_edge_environment()# module_client.connect()if __name__ == '__main__': while True:message = module_client.receive_message_on_input("input1") # block till message arrivesprint("Received - {}!".format(message))requirements02.txt
azure-iot-device~=2.5.0Dockerfile02
FROM python:3.7-slim-busterWORKDIR /appCOPY requirements02.txt ./RUN pip install -r requirements02.txtCOPY . .CMD [ "python3", "-u", "./module02.py" ]After you’ve completed, please register your module (both Module01 and Module02) into repository.
# register (update) existing Module01 again. . .# register new Module02docker build --rm -f ./Dockerfile02 -t iottest01.azurecr.io/module02:0.0.1 ./docker push iottest01.azurecr.io/module02:0.0.1Now we modify deployment manifest (deployment.json) with the routing definition.
See the following “routes” property in the “$edgeHub” section. In order to define this message routing, you can use “FROM {SOURCE} INTO {DESTINATION}” clause as follows.
Of course, you can define multiple routes (more complex routing) in this section.
{ "modulesContent": {"$edgeAgent": { "properties.desired": {"schemaVersion": "1.0","runtime": { "type": "docker", "settings": {"minDockerVersion": "v1.25","loggingOptions": "","registryCredentials": { "iottest01": {"username": "iottest01","password": "VvuzIwQ88a...","address": "iottest01.azurecr.io" }} }},"systemModules": { "edgeAgent": {"type": "docker","settings": { "image": "mcr.microsoft.com/azureiotedge-agent:1.0", "createOptions": "{}"} }, "edgeHub": {"type": "docker","status": "running","restartPolicy": "always","settings": { "image": "mcr.microsoft.com/azureiotedge-hub:1.0", "createOptions": "{\"HostConfig\":{\"PortBindings\":{\"5671/tcp\":[{\"HostPort\":\"5671\"}],\"8883/tcp\":[{\"HostPort\":\"8883\"}],\"443/tcp\":[{\"HostPort\":\"443\"}]}}}"} }},"modules": { "Module01": {"version": "1.0","type": "docker","status": "running","restartPolicy": "always","settings": { "image": "iottest01.azurecr.io/module01:0.0.1", "createOptions": "{\"HostConfig\":{\"PortBindings\":{\"8081/tcp\":[{\"HostPort\":\"8081\"}]}}}"} }, "Module02": {"version": "1.0","type": "docker","status": "running","restartPolicy": "always","settings": { "image": "iottest01.azurecr.io/module02:0.0.1", "createOptions": "{}"} }} }},"$edgeHub": { "properties.desired": {"schemaVersion": "1.0","routes": { "SampleModuleToModule": "FROM /messages/modules/Module01/outputs/output1 INTO BrokeredEndpoint(\"/modules/Module02/inputs/input1\")"},"storeAndForwardConfiguration": { "timeToLiveSecs": 7200} }} }}Note : You can use pre-built same image tsmatz/iot-module-sample01:1.0.0 and tsmatz/iot-module-sample02:1.0.0 in docker hub.
Replaceiottest01.azurecr.io/module01:0.0.1andiottest01.azurecr.io/module02:0.0.1withtsmatz/iot-module-sample01:1.0.0andtsmatz/iot-module-sample02:1.0.0respectively in above deployment.json.
After you have deployed this manifest, let’s connect HTTP port 8081 with message string as follows.
http://localhost:8081/This%20is%20testWhen you run “iotedge logs Module02” command in your Edge device, you will be able to see the following log outputs.
As you will see, this message is passed from Module01 through edge hub.
iotedge logs Module02Received - b'This is test'!Note : If you want to pass large data, please save data in storage (such like, blob, SQL database edge, and so on) and pass the signal thru message routing.
Message Routing – device-to-cloud
With message routing, you can also route messages into cloud IoT Hub in the same manner.
Here I have added the following 1 line (bold font) in our deployment manifest.
As you can see below, just use $upstream for destination for passing messages into the cloud (IoT Hub).
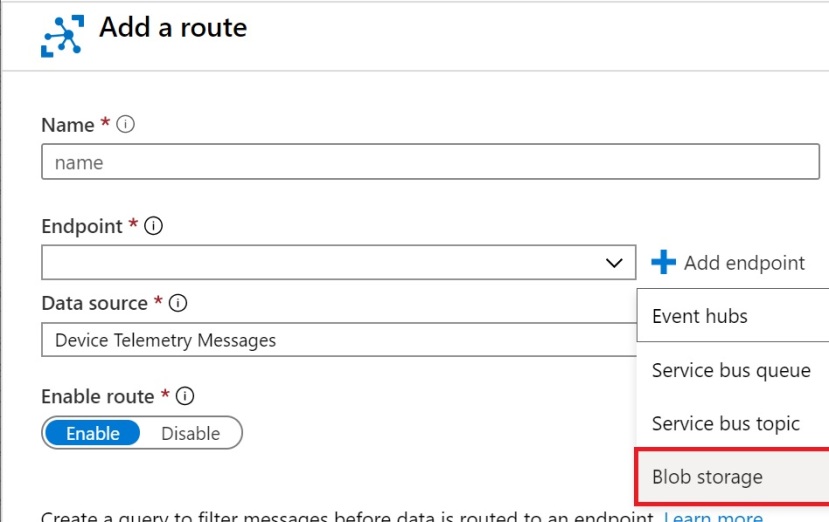
..."$edgeHub": { "properties.desired": {"schemaVersion": "1.0","routes": { "SampleModuleToModule": "FROM /messages/modules/Module01/outputs/output1 INTO BrokeredEndpoint(\"/modules/Module02/inputs/input1\")", "SampleModuleToIoTHub": "FROM /messages/modules/Module01/outputs/* INTO $upstream"},"storeAndForwardConfiguration": { "timeToLiveSecs": 7200} }} }}Upstream messages can be routed to a variety of cloud resources, such like, Event Hub (built-in endpoint), Event Grid, Stream Analytics, Blob storage, Functions, so on and so forth.
For instance, you can store all telemetry in blob (Azure Data Lake Storage) and analyze with Azure Databricks (Spark cluster). You might send telemetry into Kafka cluster (Azure HDInsight) with your custom code and process streaming in cloud with a distributed manner.

In this post, I have configured the routing to the blob storage. (In Azure Portal, select “Message Routing” menu in IoT Hub and add a custom route.)
Let’s post the same message as follows.
http://localhost:8081/This%20is%20testAfter a while, you will find a file with the following content in your blob storage.
{ "EnqueuedTimeUtc": "2019-10-17T00:48:50.8680000Z", "Properties": { }, "SystemProperties": {"connectionDeviceId": "device01","connectionModuleId": "Module01","connectionAuthMethod": "{\"scope\":\"module\",\"type\":\"sas\",\"issuer\":\"iothub\",\"acceptingIpFilterRule\":null}","connectionDeviceGenerationId": "637068684277498838","contentType": "application/json","contentEncoding": "utf-8","enqueuedTime": "2019-10-17T00:48:50.8680000Z" }, "Body": This is test}This routing mechanism is also tolerant.
What if your device (or network) has some troubles and cannot connect to the cloud ? In this case, the built-in IoT Hub module (edgeHub) keeps your messages for the duration specified in storeAndForwardConfiguration.timeToLiveSecs in your deployment manifest. Once it’s connected, this message will be passed into the cloud.
Reference :
Azure IoT Device SDK for Python – IoTHubModuleClient class
https://docs.microsoft.com/en-us/python/api/azure-iot-device/azure.iot.device.iothubmoduleclient
Categories: Uncategorized

Hi, Im trying to run these two modules in Jetson Nano edge device, http://localhost:8080/ is returning “hello”, but http://localhost:8080/This%20is%20test
is returning 404 error. and the log in module2 is :
MQTTTransportStage: disconnection was unexpected
transport.connect raised error
Traceback (most recent call last):
File “/usr/local/lib/python3.7/site-packages/azure/iot/device/common/mqtt_transport.py”, line 340, in connect
host=self._hostname, port=8883, keepalive=DEFAULT_KEEPALIVE
Why is it
LikeLike
ALso, In the edgeHub log, I see this, Error authenticating token for M2M/InterMod1 because the token did not match the primary or the secondary key. Error – The specified SAS token has an invalid signature. It does not match either the primary or secondary key.
How to resolve it, Plz support
LikeLike
Thank you for your feedback. I have updated my post to use azure-iot-device v2.1.1 (Azure IoT Device Library for Python version 2.1.1) which has improved connection resiliency for MQTT protocol.
LikeLike
Did you ever solve the did not match error? We are getting it as well and have tried everything and read through endless documentation. We need to generate a token from a React-Native app and can’t use the Node SDKs for token generation, so really struggling with this.
LikeLike
Hey Tsuyoshi,
a thousand times: Thank you for sharing this!! I already started to give up with the very VS/VS Code and C# centric official docs from MS! Your article helped me a lot.
I found one typo in it, though:
You write to install the az extension “azure-cli-iot-ex”; in fact, this is called “azure-cli-iot-ext”.
Keep on that great work; you just earned another RSS subscriber 😉
Best regards,
Marc
LikeLike
Thank you for your kind feedback, Marc-san. I have now fixed my typo.
LikeLike