
10/14/2020 : Azure Dev Spaces will retire on October 2023. See here for details.
With Azure Dev Spaces, you can build and debug microservices or complicated N-tier applications in Kubernetes without installing entire system in your local desktop.
In this post I introduce Azure Dev Spaces using command-line utility, and see how it works.
(Now Azure Dev Spaces has reached public preview. Azure Dev Spaces has reached generally available !)
Setup Your Environment
Before explaining value props for Azure Dev Spaces, we prepare a resource of Azure Kubernetes Service (AKS) in Azure and just build our application.
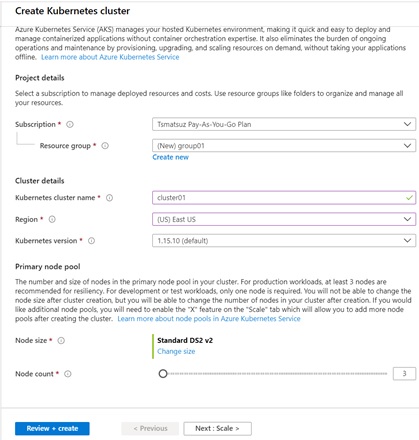
First we create a resource of Azure Kubernetes Service (AKS) using Azure Portal.
Notice that you should select a region, in which Azure Dev Space is supported. See here for supported regions for Azure Dev Spaces.
After you’ve created your AKS cluster in Azure, next we setup our local development environment to connect into AKS cluster.
In this post, we build simple 2 Node.js applications – one is a Web front-end (UI) application “test01” and another is a Web API application “test02”. Then each application should be generated in different working environments, such as, different machines or different folders.
If you create applications in different machines, please set up the following Azure Dev Spaces configuration in both machines.
Note : Unfortunately you cannot use a bash console in Azure Cloud Shell, because
azdscannot be installed in Azure Cloud Shell.
Please use Azure virtual machines (Ubuntu, Windows, …).
First you should install Azure CLI, and then login to Azure with the following CLI command.
az loginNext you should create a current controller for your dev space with the following command.
This command generates both a Azure Dev Space workspace with “default” namespace in your AKS cluster “cluster01” (this is needed once in your namespace) and a Azure Dev Spaces controller in your working environment. (The setting is written in your ~/.azds directory.)
This command also installs Azure Dev Spaces CLI command utility (i.e, azds commands) in your environment, if it’s not installed.
az aks use-dev-spaces --resource-group group01 --name cluster01Note : You can see available controllers in your environment with “
azds controller list“.
Build Your Application
Next we build our application in our local working environment.
Install Node.js and npm, and create the following 2 applications (.js files) – test01 and test02 – in each working environments.
As you can see in this code, a front-end application “test01” connects to a HTTP back-end application “test02”.
test01 application (javascript)
var http = require('http');var request = require('request');var port = process.env.PORT || 80;http.createServer(function (req, res) { request({uri: 'http://test02' }, function (error, response, body) {res.end('api result: ' + body); });}).listen(port);test02 application (javascript)
var http = require('http');var port = process.env.PORT || 80;http.createServer(function (req, res) { res.writeHead(200, {'Content-Type': 'application/json'}); res.write('{ text : \'Hello\' }'); res.end();}).listen(port);In test01, you should install “request” module. (In test02, not needed to install any extra modules.)
npm install requestAfter you’ve built applications, run the following command and create package.json (which describes your application behaviors) in each working environment (both “test01” and “test02”).
npm initIn a package.json, make sure to add “start” (added with bold fonts in below) in “scripts” section.
{ "name": "test01", "version": "1.0.0", "description": "", "main": "server.js", "scripts": {"test": "echo \"Error: no test specified\" && exit 1","start": "node server.js" }, "author": "", "license": "ISC"}Finally, please check whether there’s no errors by running “npm start” in your local environment.
sudo npm startConnect to Your Dev Space
Now let’s connect and deploy your application into a dev space (in AKS cluster).
First you should generate configuration files for registering your application in AKS cluster by running the following command.
This command generates both a Dockerfile and Helm chart assets for running in AKS.
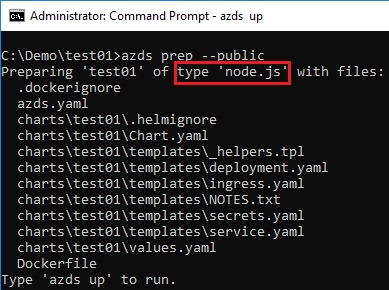
azds prep --enable-ingressThe type of a generated configuration differs with programming languages (such as, Node.js, .NET Core, Java, Python, …).
Today the programming language is automatically detected for 3 of languages, .NET Core, Java, and Node.js. For these 3 languages, the corresponding Dockerfile is automatically generated.
In our case, we have package.json in our working directory, then Node.js image is used for a container. (See below.)
You can also customize your generated Dockerfile.
Note : For other languages, you should prepare a Dockerfile by yourself.
As you can see in generated yaml files in “charts/{your app name}/templates” folder, the default configuration consists of single deployment, service, ingress, and secret in Kubernetes.
Please modify the generated files if you need additional setup.
Notice that the name of current working directory is used as logical name for your deployment by default. For instance, when your working directory is “test01”, the name of your deployment is also “test01”.
As you can see later, this name is very important, because it’s used for the endpoint communication for your multiple services.
If you want to change (specify) logical name by your own, please run command with --name option as follows.
azds prep --name test01 --enable-ingressNow let’s deploy your application in your AKS cluster with the following command.
As I saw in above code, our “test01” application connects to our “test02” application. Then please deploy both test01 and test02 for debugging for now.
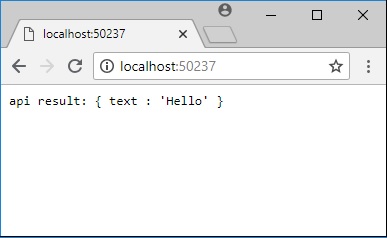
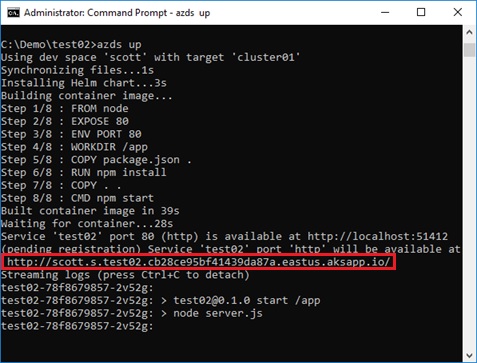
azds upNow you can access your application using web browser with a public DNS address (*****.aksapp.io).
Azure Dev Spaces creates not only public DNS but also a temporary SSH tunnel for your remote container (see below).
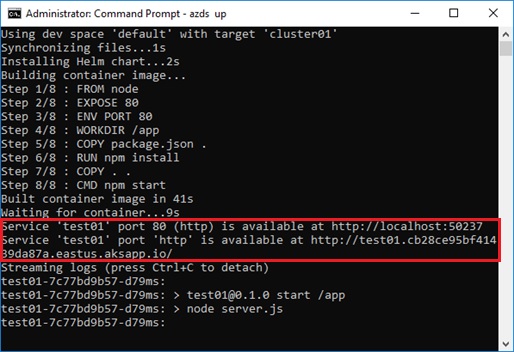
Thus, if you configure a SSH tunnel, you can also access your remote application using “localhost” from your desktop.
Above “azds up” command keeps running and it watches the file modification.
If your code is changed, it automatically syncs into your running application in pod. Therefore you can quickly see your modification in web browser, if the compilation is not needed.
Note : If the compilation is needed, build and restart (stop and start) with “
azds up” command.
If you have some errors in pod (or container), you can see the detailed events and logs using kubectl.
(You can run this on Azure Cloud Shell in web browser.)
# Connect to your AKS clusteraz aks get-credentials --resource-group group01 \ --name cluster01 \ --subscription xxxxxxxx-xxxx-xxxx-xxxx-xxxxxxxxxxxx# Get all pods and status in "default" namespacekubectl -n default get pods# Get detailed events in corresponding podkubectl -n default describe pod test01-fff95669-l5jh7# Get logs in a container in corresponding podkubectl logs test01-fff95669-l5jh7 test01Note : It takes several minutes to be able to use public DNS address. (You can see the provisioning status using
azds list-uriscommand.)
You can use a tunneled “localhost” while the public DNS is not available.
The Value-Prop for Azure Dev Spaces
The value of Azure Dev Spaces is not just deployment, but you can easily collaborate with multiple deployments in your team !
Let’s see the following example.
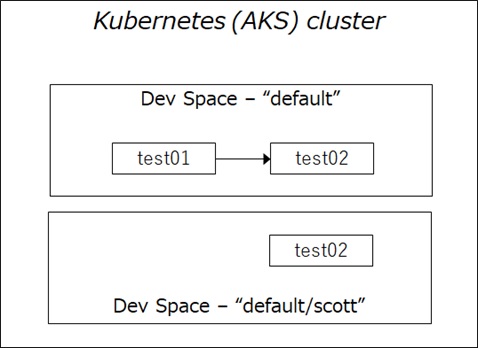
Now we assume that there’s another environment (say, Scott’s desktop) and create a sub dev space named “scott” using the following command. (We assume that Scott runs this command on his working desktop.)
In the wizard of the following “azds space select” command, please select “default” (which is a default dev space used in our previous example) as a parent dev space. Then Scott’s dev space will become a child (sub) dev space of “default” dev space.
# select existing dev space controllerazds controller select --resource-group group01 --name cluster01# create and select sub space named "scott"azds space select --name scottNow a dev space named “default/scott” is generated in AKS, and set as active dev space in Scott’s desktop.
Next let’s change the source code of test02 as follows and save on Scott’s desktop.
As you saw in the previous example, generate package.json by running “npm init” on Scott’s desktop. (Also make sure to add “start” scripts in package.json as above.)
test02 (javascript)
var http = require('http');var port = process.env.PORT || 80;http.createServer(function (req, res) { res.writeHead(200, {'Content-Type': 'application/json'}); res.write('{ text : \'Hello. This is Scott\' }'); res.end();}).listen(port);Deploy this modified test02 on Scott’s desktop as follows.
Here we deploy this application as “test02”, but notice that here is a “default/scott” sub dev space.
azds prep --name test02 --enable-ingressazds upAs you see in the following output, you can access this modified application using the public DNS name with “scott.s” prefix.
For now, we’ve just generated 2 dev spaces (“default” and “default/scott”) and deployed another modified version of test02 in “default/scott” dev space. (See below.)
The magic is from here !
Let’s change “test01” code as follows on original “default” (parent) dev space. As you can see, here we’ve just added a HTTP header (“azds-route-as” header) for a remote test02 API request.
Now, deploy using “azds up” again.
test01 (javascript)
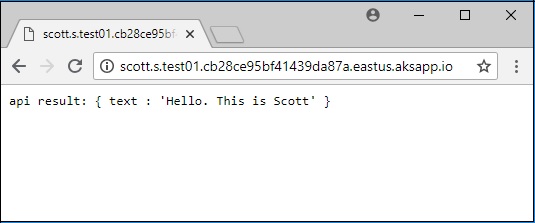
var http = require('http');var request = require('request');var port = process.env.PORT || 80;http.createServer(function (req, res) { request({uri: 'http://test02',headers: { 'azds-route-as': req.headers['azds-route-as']} }, function (error, response, body) {res.end('api result: ' + body); });}).listen(port);Now let’s access original test01 application with “scott.s” prefix (i.e, “http://scott.s.default.test01.xxxxxxxxxx.eastus.aksapp.io/”).
Then you can find to see the output result with modified Scott’s API as follows ! (Please compare the output results with “scott.s” and without “scott.s”.)
What’s going under the hood ?
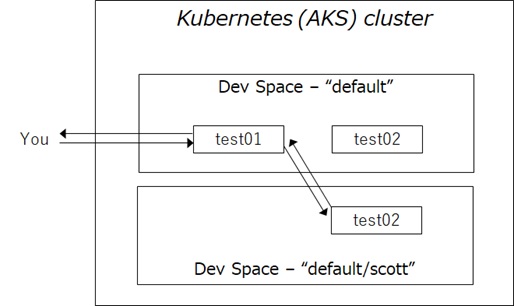
First, when you access test01 with “scott.s” prefix with your web browser, the inbound proxy for test01 automatically adds a HTTP header “azds-route-as : scott“.
As you saw in my previous code, our test01 application will add a “azds-route-as : scott” in an outbound call for test02.
When the outbound proxy finds “azds-route-as : scott” header in the request, it retargets the request by adding “scott.s” prefix in URL, i.e, a Scott’s version of test02 application.
This transformation is repeated (recurs) through HTTP call flows.
What happens if there’s no running Scott’s version ?
In this case, the request is automatically redirected to a parent’s dev space, but the code still adds the Scott’s header and recurs in the next request.
Eventually, with a chain of requests, you can insert your modified code into any level of tiers in applications. For instance, you can connect with : test01 “default” -> test02 “default” -> test03 “default/scott” -> test04 “default”, when only test03 has “default/scott” sub-version.

(From : “Microsoft Build 2018 – Iteratively Develop Microservices with Speed on Kubernetes“)
As you saw above, you can debug only your modified code working with other components without installing other components and even without exposing your modified code to others ! (With this mechanism, a DNS name with “scott.s” prefix might be only used by Scott.)
After you have completed a test, you can commit to a parent (root) dev space.
While preventing conflicts, your code is always connected with other team members.
IDE Integration
Azure Dev Spaces is also having the capabilities to integrate with IDE, such as Visual Studio or Visual Studio Code. With this integration (Azure Dev Spaces extension), you can quickly run dev space tasks, such as, preparing assets (azds prep), deployment (azds up) within IDE.
Furthermore you can soon attach your debugger into running code in a remote container on dev space.
Here I don’t describe details about this integration, but please see the official tutorial
(From “Microsoft Build 2018 : Iteratively Develop Microservices with Speed on Kubernetes“)
Clean-up
When your team has finished development, you can soon remove all the components. (See below.)
When you want to remove sub space “default/scott” before clean-up, run “azds space remove --name default/scott“.
# Delete this release (incl. associated services, deployments, and ingress) in AKS clusterazds down# Remove azure dev space from AKSaz aks remove-dev-spaces --resource-group group01 --name cluster01Note : If your controller remains with “failed” state (ProvisioningState) and cannot be removed, remove a resource group containing AKS cluster. (You can see the state with “
azds controller list” command.)
[Reference]
Azure Dev Spaces (Quickstarts, Tutorials, How-to)
https://docs.microsoft.com/en-us/azure/dev-spaces/azure-dev-spaces
Microsoft Build 2018 – Iteratively Develop Microservices with Speed on Kubernetes
https://channel9.msdn.com/Events/Build/2018/BRK3809
Update history :
03/27/2020 Replaced “azds prep --public” (deprecated) into “azds prep --enable-ingress” (recommended)
Categories: Uncategorized

1 reply»