
Skype for Business API 開発
- UCWA (Unified Communications Web API) 開発入門
- Skype Web SDK 紹介
- Skype Web SDK の Audio / Video プログラミング
- Skype Meeting (Online Meeting) を使った処理
- Skype for Business App SDK 紹介
こんにちは。
今回は、Skype for Business (旧 Lync) の REST API である UCWA (Unified Communications Web API) 開発について解説します。
この API は Skype for Business User API とも呼ばれ、後述の通り、Presence、Instant Messaging (Text Messaging) などを REST ベースで処理できます。
UCWA 概要
これまでの Skype for Business (旧 Lync) 開発では、主に、クライアント サイドの Lync SDK とサーバー サイドの UCMA (Unified Communications Managed API) が提供されてきました。
ここで紹介する UCWA (Unified Communications Web API) は、Skype for Business Server 2015 以降 (Lync の場合は Lync Server 2013 CU1 以降) から提供される 3 番目の開発プラットフォーム (API) になります。
この UCWA (Unified Communications Web API) は、その名の通り、REST ベースの Web API として提供されていて、HTTP を扱えるあらゆるプラットフォームから使用できます。
Skype for Business Server に直接接続するため、Skype for Business クライアントも不要です。
なお、2015 年 05 月に UCWA 2.0 Preview が提供されましたが、現 Preview 段階では Skype for Business Server のみ対応しています。まもなく Skype for Business Online (Office 365) に対応予定です。(2015/05 変更)
なお、Skype for Business Online (Office 365) にも対応しましたので、以下に、Office 365 の Skype for Business Online のケースも記載しました。(2016/04 変更)
環境の事前準備と、ざっと全体の概要を説明します。
Preparation (Skype for Business Server)
まず、あらかじめ Skype for Business Server をインストールします。
この際、下記の 2 点を必ず設定してください。
まず、後述する Autodiscover (自動検出) が有効になるよう、「Install Skype for Business Server – Create DNS」で紹介しているように、ドメインの DNS 管理コンソールを開き、ドメインの CNAME として「lyncdiscoverinternal」または「lyncdiscover」を追加してください。(lyncdiscover として、Skype for Business Server のマシンを参照するように設定しておきます。)
なお、DNS の設定完了後、UCWA を使用するマシン (クライアント マシン) で以下のコマンドを管理者権限で実行します。
ipconfig /flushdnsつぎに、後述する Cross-Domain の対策として、Skype for Business Server に、下記の通り、Skype Server Management Shell (Windows PowerShell) を使って Allowed List (Cross-Domain Authorization List, Whitelist) のドメインを登録します。(既定の設定では、Cross-Domain 接続の Allowed List には何も登録されていません。)
$org = New-CsWebOrigin -Url "http://kkdeveva01.example.com:82"$ops = @{Add=$org}Set-CsWebServiceConfiguration -Identity "Global" -CrossDomainAuthorizationList $opsなお、上記の -Identity オプションは、上記コマンドで取得できます。(下記の Identity 属性を参照。)
PS> Get-CsWebServiceConfigurationIdentity : GlobalTrustedCACerts : {}CrossDomainAuthorizationList : {}MaxGroupSizeToExpand : 100EnableGroupExpansion : TrueUseWindowsAuth : NegotiateUseCertificateAuth : TrueUsePinAuth : TrueAllowAnonymousAccessToLWAConference : TrueEnableCertChainDownload : TrueInferCertChainFromSSL : TrueCASigningKeyLength : 2048MaxCSRKeySize : 16384MinCSRKeySize : 1024MaxValidityPeriodHours : 8760MinValidityPeriodHours : 8DefaultValidityPeriodHours : 4320MACResolverUrl :SecondaryLocationSourceUrl :ShowJoinUsingLegacyClientLink : FalseShowDownloadCommunicatorAttendeeLink : FalseAutoLaunchLyncWebAccess : TrueShowAlternateJoinOptionsExpanded : FalseUseWsFedPassiveAuth : FalseWsFedPassiveMetadataUri :AllowExternalAuthentication : True
Preparation (Skype for Business Online)
Skype for Business Online の場合は、「Office 365 API 入門」で解説したように、Office 365 の License を取得 (Service 購読) している Azure AD テナントを用意し、この Azure AD に Application 登録をおこないます。
以下に登録手順を解説します。
Azure Portal (Classic) にログインして、Azure Active Directory の管理画面を表示します。
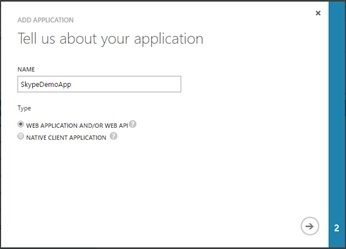
[Applications] (アプリケーション) のタブをクリックして、[ADD] ボタンを押します。

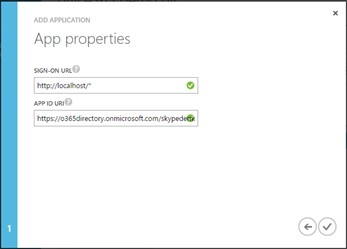
表示される画面で、[Add an application my organization is developing] (組織で開発中のアプリケーション) を選択し、[WEB APPLICATION AND/OR WEB API] を選択して、[SIGN-ON URL]、[APP ID URI] に適当な URI を入力します。([SIGN-ON URL] は、OAuth の処理後に Redirect する Uri になるので、実際に Application を配置する場所を指定します。)
補足 :「Azure AD の Common Consent Framework (Client 側)」で解説したように、ISV 企業などが構築する製品 Application の場合、[APP ID URI] は https://{your-domain-prefix}.onmicrosoft.com/{app-unique-id} を設定し、Application を Multi-Tenant として構成します。(今回、この手順についての解説はしません。)
登録された Application の Configure (構成) 画面を表示して、Client Id を取得します。(今回、205de2e9-6fbc-40ec-aed9-9da7b48bee21 と仮定します。)
また、下図の通り、[keys] (キー) の作成をおこなって、作成された key の文字列もコピーしておきます。(この値は、このあと、Client Secret として使用します。)

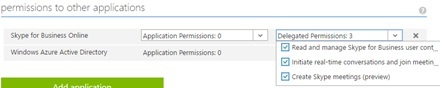
[permissions to other applications] (他のアプリケーションに対するアクセス許可) で [Add application] (アプリケーションの追加) ボタンをクリックして、[Skype for Business Online] を追加します。
今回は、追加した [Skype for Business Online] に、下図の通り、[Read and manage Skype for Business user content]、[Initiate real-time conversations and join meetings]、[Create Skype Meetings] の Delegated Permission を追加して保存します。
補足 : Office 365 の License が紐づいていない Azure AD テナントでは [Skype for Business Online] は表示されません。(上述の通り、Office 365 の License と紐づいた Azure AD テナントを使用してください。)
上記の設定で、最終的に、Redirect Uri、Client Id、Client Secret が取得できているはずです。
これらは、このあと使用します。
Authentication Flow (Skype for Business Server)
環境の準備が完了したら、認証をおこない、UCWA の REST API を呼び出します。以降は、この Web API による処理の流れを、Http の Request / Response の生データで簡単します。
今回は、認証をおこなって、IM (Instant Messaging) を送信するまでの処理 (流れ) を簡略化して紹介します。
最初に、下記の通り Request をおこなって、OAuth を使った認証 (Authentication) をおこないます。(grant_type を変更することで、Windows 統合認証など、その他の認証方法も使用できます。grant_type に指定可能な内容については「MSDN : Authentication in UCWA」を参照してください。)
POST https://skypesv01.example.com/webticket/oauthtokenAccept: application/jsonContent-Type: application/x-www-form-urlencodedgrant_type=password&username=demouser1%40example.com&password=XXXXXXX認証に成功すると、サーバーは下記の HTTP Response を返します。
このあと解説する REST API では、ここで返される access_token (下記は、文字列を省略しています) と token_type を Authorization ヘッダーに設定します。(これにより、REST API が許可されます。)
HTTP/1.1 200 OKContent-Type: application/json{ "access_token":"cwt=AAEBHAEFAAA...", "expires_in":27849, "ms_rtc_identityscope":"local", "token_type":"Bearer"}
Authentication Flow (Skype for Business Online)
Skype for Business Online の Authentication では Azure AD を使用します。
なお、以下は基本的な Code Flow を例に解説しますが、利用シナリオによってさまざまな Flow が可能であり、詳細は Azure AD の開発関連の投稿 の OAuth の内容 (目次の最後に「OAuth」と書かれている投稿) に記載していますので参照してください。
まず、Web Browser (Mobile Application の場合は Browser Component など) を使用して下記の URL にアクセスします。
ここで指定している client id や redirect uri は、上述の準備の際に作成した内容です。(皆さんの内容にあわせて変更してくださいい。) resource には、必ず、https://webdir.online.lync.com を指定してください。
補足 : 下記の通り、API の利用開始の際は、Admin Consent が必要です。Office 365 テナントの一般ユーザーで使用する際は、必ず最初に管理者アカウントを使って Admin Consent をおこない、そのあとで一般ユーザーで使用します。(Admin Consent については「Azure Active Directory の Common Consent Framework (Client 側)」を参照してください。)
https://login.microsoftonline.com/common/oauth2/authorize?response_type=code&client_id=205de2e9-6fbc-40ec-aed9-9da7b48bee21&resource=https%3a%2f%2fwebdir.online.lync.com&redirect_uri=http%3a%2f%2flocalhost%2ftest.php&prompt=admin_consent上記の URL にアクセスすると、下図の通り、Office 365 (Azure AD) の Login UI が表示されるのでログインをおこないます。(上述の通り、テナントで最初にログインして使用する際は、管理者アカウントでログインしてください。)

ログインに成功すると、Web Browser は下記 URL に Redirect します。
Application では、ここで返される code を取得します。
http://localhost/test.php?code=AAABAAAAiL...&session_state=...&admin_consent=True取得した code を使って、Server Side などから下記の HTTP POST メソッドを呼び出します。
ここでも、上述の準備の際に取得した client id、client secret、redirect uri を使用します。
POST https://login.microsoftonline.com/common/oauth2/tokenContent-Type: application/x-www-form-urlencodedgrant_type=authorization_code&code=AAABAAAAiL...&client_id=205de2e9-6fbc-40ec-aed9-9da7b48bee21&client_secret=WaBfOMLgHG...&redirect_uri=http%3a%2f%2flocalhost%2ftest.phpこの POST 要求の応答 (HTTP Response) として、下記が返されます。
下記の access token は、このあとの REST の呼び出しで必要になるので、Application で取得しておきます。
HTTP/1.1 200 OKContent-Type: application/json; charset=utf-8{ "token_type": "Bearer", "scope": "Contacts.ReadWrite Conversations.Initiate Meetings.ReadWrite", "expires_in": "3599", "expires_on": "1459851535", "not_before": "1459847635", "resource": "https://webdir.online.lync.com", "access_token": "eyJ0eXAiOi...", "refresh_token": "AAABAAAAiL...", "id_token": "eyJ0eXAiOi..."}
Autodiscover (Skype for Business Server)
以降では、上記で取得した access token を使って、Endpoint に対して REST の呼び出しをおこないますが、この Endpoint の情報は、User Name (例: demouser1@example.com など) から動的に取得できます。(これを Autodiscover と呼びます。)
いずれ解説する Skype Web SDK (JavaScript ライブラリー) でも、内部で、この方法を使って自動取得しています。
まずは、Skype for Business Server の場合の Autodiscover のフローを解説します。
例えば、User Name が demouser1@example.com だった場合、まず、lyncdiscover.example.com、lyncdiscoverinternal.example.com に下記の HTTP の GET 要求を出して、Endpoint の情報を取得します。(なお、JavaScript から呼び出す場合、この要求自体も、https://lyncdiscoverinternal.example.com/xframe という iframe を使って後述の通り cross domain 呼び出しをおこないます。)
GET https://lyncdiscoverinternal.example.com/HTTP/1.1 200 OKContent-Type: application/json{ "_links": { "self": { "href": "https://skypesv01.example.com/Autodiscover/AutodiscoverService.svc/root?originalDomain=example.com" }, "user": { "href": "https://skypesv01.example.com/Autodiscover/AutodiscoverService.svc/root/oauth/user?originalDomain=example.com" }, "xframe": { "href": "https://skypesv01.example.com/Autodiscover/XFrame/XFrame.html" } }}application の endpoint が取得できるまで、この Autodiscover の処理を繰り返します。
例えば、上記の user endpoint を使って、下記の通り HTTP Request をします。
GET https://skypesv01.example.com/Autodiscover/AutodiscoverService.svc/root/oauth/user?originalDomain=example.comAccept: */*Authorization: Bearer cwt=AAEBHAEFAAA...HTTP/1.1 200 OKContent-Type: application/json{ "_links": { "self": { "href": "https://skypesv01.example.com/Autodiscover/AutodiscoverService.svc/root/oauth/user" }, "applications": { "href": "https://skypesv01.example.com/ucwa/oauth/v1/applications" }, "xframe": { "href": "https://skypesv01.example.com/Autodiscover/XFrame/XFrame.html" } }}
Autodiscover (Skype for Business Online)
Skype for Business Online における Autodiscover も、基本的な概念は上述と同様ですが、URL や認証方法などが異なってきます。
まず最初に、下記の https://webdir.online.lync.com/autodiscover/autodiscoverservice.svc/root に対して HTTP GET 要求をおこないます。
GET https://webdir.online.lync.com/autodiscover/autodiscoverservice.svc/rootHTTP/1.1 200 OKContent-Type: application/json{ "_links": {"self": { "href": "https://webdir0f.online.lync.com/Autodiscover/AutodiscoverService.svc/root"},"user": { "href": "https://webdir0f.online.lync.com/Autodiscover/AutodiscoverService.svc/root/oauth/user"},"xframe": { "href": "https://webdir0f.online.lync.com/Autodiscover/XFrame/XFrame.html"} }}つぎに、取得した https://webdir0f.online.lync.com に対する access token を取得するため、下記の通り要求します。
なお、下記は「JavaScript による Azure AD 連携」で解説した OAuth Implicit Grant を使用して hidden iframe で取得する場合の HTTP GET の例ですが、その他の方法で取得しても構いません。
GET https://login.windows.net/common/oauth2/authorize?response_type=token&client_id=205de2e9-6fbc-40ec-aed9-9da7b48bee21&redirect_uri=http%3a%2f%2flocalhost%2ftest.php&resource=https%3A%2F%2Fwebdir0f.online.lync.com上記の結果として、下記の通り Redirect されるので、ここで返される access token を取得します。
http://localhost/test.php#access_token=eyJ0eXAiOi...&token_type=Bearer&expires_in=3599&session_state=...取得した access token を使って、下記の通り、HTTP GET 要求をおこないます。
GET https://webdir0f.online.lync.com/Autodiscover/AutodiscoverService.svc/root/oauth/userAuthorization: Bearer eyJ0eXAiOi...Accept: application/jsonHTTP/1.1 200 OKContent-Type: application/json{ "_links": {"self": { "href": "https://webdirjp1.online.lync.com/Autodiscover/AutodiscoverService.svc/root"},"user": { "href": "https://webdirjp1.online.lync.com/Autodiscover/AutodiscoverService.svc/root/oauth/user"},"xframe": { "href": "https://webdirjp1.online.lync.com/Autodiscover/XFrame/XFrame.html"} }}つぎに、取得した https://webdirjp1.online.lync.com/Autodiscover/AutodiscoverService.svc/root/oauth/user に対して同様の処理 (Access Token の取得、Endpoint の取得) をおこないます。
これを、下記の通り Application Endpoint が返されるまで繰り返します。
HTTP/1.1 200 OKContent-Type: application/json{ "_links": {"self": { "href": "https://webpoolos2jp104.infra.lync.com/Autodiscover/AutodiscoverService.svc/root/oauth/user"},"applications": { "href": "https://webpoolos2jp104.infra.lync.com/ucwa/oauth/v1/applications", "revision": "2"},"xframe": { "href": "https://webpoolos2jp104.infra.lync.com/Autodiscover/XFrame/XFrame.html"} }}
REST API (UCWA) の呼び出し
以降の REST の呼び出しは、Skype for Business Server の場合も、Office 365 (Skype for Business Online) の場合も同様です。
Authentication で取得した access token と、Autodiscover で取得した application endpoint を使って、UCWA の REST の呼び出しをおこないます。
まず最初に、HTTP POST メソッドを使って application resource と呼ばれる instance を作成し、この instance の Uri を使って以降の呼び出しをおこないます。
以下が、この処理のための HTTP Request です。(なお、今回は固定のアドレスを設定していますが、下記の endpoint アドレス自体も、後述する Autodiscover で解決できます。)
Authorization ヘッダーには、上記で取得したトークンの情報を設定している点に注意してください。
補足 : Skype for Business Online の場合は、Authorization: Bearer {access token} となります。
POST https://skypesv01.example.com/ucwa/oauth/v1/applicationsAccept: application/jsonAuthorization: Bearer cwt=AAEBHAEFAAA...Content-Type: application/json; charset=utf-8{ "culture": "ja-JP", "endpointId": "123456", "userAgent": "Test App"}上記の呼び出しをおこなうと、下記の通り endpoint に関する情報 (URI など) の一覧が返ってきます。
以降の処理では、下記太字の application resource instance の URI を使って、必要な Path (Postfix) を付与して接続できます。例えば、Instant Messaging の開始であれば https://skypesv01.example.com/ucwa/oauth/v1/applications/103980173171/communication/messagingInvitations といった具合です。
あるいは、下記では省略していますが、後半部分に IM (Instant Messaging)、Online Meeting などの各操作に対応するエンドポイント URI が記載されているので、この情報を使って接続しても構いません。
なお、下記で、events の URI (太字) は、このあと使用するので、おぼえておいてください。
HTTP/1.1 200 OKContent-Type: application/json; charset=utf-8Set-Cookie: cwt_ucwa=AAEBHAEFAAAA...; path=/ucwa/oauth/v1/applications/103980173171/photos; secure; HttpOnly{ "culture":"ja-JP", "userAgent":"Test App", "_links": { "self": { "href":"/ucwa/oauth/v1/applications/103980173171" }, "policies": { "href":"/ucwa/oauth/v1/applications/103980173171/policies" }, "batch": { "href":"/ucwa/oauth/v1/applications/103980173171/batch" }, "events": { "href":"/ucwa/oauth/v1/applications/103980173171/events?ack=2" } }, "_embedded": { "me": { . . . }, "people": { . . . }, "onlineMeetings": { . . . }, "communication": { . . . } }, "rel":"application"}例えば、Instant Messaging (IM) を開始 (ユーザーを招待) する場合には、下記の通り、/communication/messagingInvitations に接続します。(下記では、demouser2@example.com に対して IM を開始しています。)
ここでは、IM を作成 (Create) しているため、POST の Verb を使用しています。また、成功すると、Status 201 (Created) が返ってきます。
なお、下記の sessionContext、operationId は、クライアント側で一意な UUID を生成して設定します。
POST https://skypesv01.example.com/ucwa/oauth/v1/applications/103980173171/communication/messagingInvitations HTTP/1.1Accept: application/jsonAuthorization: Bearer cwt=AAEBHAEFAAA...Content-Type: application/json; charset=utf-8{ "importance": "Normal", "sessionContext": "4fad23c9-bd35-492b-a029-d13bb48beceb", "subject": "Test IM", "telemetryId": null, "to": "sip:demouser2@example.com", "operationId": "4ff0d63b-b321-455f-97f3-888c0368c731"}IM の開始後は、相手が受信して接続が確立されるまで、メッセージの送信を待機する必要があります。こうしたイベント処理をおこなうには、上述の events の URI を使用します。
GET https://skypesv01.example.com/ucwa/oauth/v1/applications/103980173171/events?ack=2 HTTP/1.1Accept: application/jsonAuthorization: Bearer cwt=AAEBHAEFAAA...上記の Request をおこなうと、event の情報が返ってきます。
event は下記の通り、sender と events の 2 次元の配列 (ネストされた配列) であり、各 event の内容を調べて、目的の event が到着しているか確認をおこないます。もし、まだ目的の event が発生していなかった場合は、下記の next (太字) の URI を使って、次の event を取り出します。(以降、目的の event が見つかるまで、この処理を繰り返します。)
HTTP/1.1 200 OKContent-Type: application/vnd.microsoft.com.ucwa+json; charset=utf-8{ "_links": { "self": { "href":"/ucwa/oauth/v1/applications/103980173171/events?ack=2" }, "next": { "href":"/ucwa/oauth/v1/applications/103980173171/events?ack=4" } }, "sender": [ { "rel":"communication", "href":"/ucwa/oauth/v1/applications/103980173171/communication", "events": [ { "link": { "rel":"conversation", "href":"/ucwa/oauth/v1/applications/103980173171/communication/conversations/f9991e08-ae4c-4d45-9130-dfe26104c3fa" }, "_embedded": { "conversation": { "state":"Connected", "threadId":"8891cf3143a54ac586f5e15170f400d8", "subject":"Test IM", . . . } }, "type":"updated" }, { . . . }, { . . . }, . . . ] }, { . . . }, { . . . }, { . . . }, . . . ]}Conversation が Connected になったら、Conversation の URI (href) を取得して (上記の event から取得できます)、Message を作成 (Create) します。
下記では、Conversation に対して、「Hello, my friends !」の Message を作成しています。(demouser2 には、この IM のメッセージが表示されます。成功すると、Status 201 の Response が返されます。)
POST https://skypesv01.example.com/ucwa/oauth/v1/applications/103980173171/communication/conversations/55b89ee6-c07a-456d-83c0-797a5f03ce85/messaging/messages?OperationContext=c5f5237e-4380-48f4-afad-ca1b462325af HTTP/1.1Accept: application/jsonAuthorization: Bearer cwt=AAEBHAEFAAA...Content-Type: text/plain; charset=utf-8Hello, my friends !例えば、上記の流れを C# を使ってプログラミングすると下記の通りになります。(System.Net.Http.dll、System.Net.Http.Formatting.dll を参照追加し、NuGet で Json.NET を取得してください。なお、Autodiscover の処理は省略しています。)
. . .using System.Net.Http;using System.Net.Http.Formatting;using Newtonsoft.Json.Linq;. . .static void Main(string[] args){ // // Attention : // 1. please do status and error check ! // (This sample skips these validation ...) // 2. plese use async and await ! // (This sample always waits and wastes resources ...) // string eventPath = string.Empty; HttpClient cl = new HttpClient(); cl.DefaultRequestHeaders.Add("Accept", "application/json"); var ucwaFormatter = new JsonMediaTypeFormatter(); ucwaFormatter.SupportedMediaTypes.Add( new System.Net.Http.Headers.MediaTypeHeaderValue("application/vnd.microsoft.com.ucwa+json")); // Autodiscover string authUrl = string.Empty; // like https://skypesv01.example.com/webticket/oauthtoken ... this time skip this code ... (get authUrl) // Authenticate var authDic = new Dictionary<string, string>(); authDic.Add("grant_type", "password"); authDic.Add("username", "demouser1@example.com"); authDic.Add("password", "XXXXXXX"); HttpResponseMessage res1 = cl.PostAsync( authUrl, new FormUrlEncodedContent(authDic)).Result; JObject resObj1 = res1.Content.ReadAsAsync<JObject>( new[] { ucwaFormatter }).Result; string tokenStr = (resObj1["access_token"] as JValue).Value as string; string tokenTyp = (resObj1["token_type"] as JValue).Value as string; // Set authorization header cl.DefaultRequestHeaders.Add("Authorization", tokenTyp + " " + tokenStr); // Get application url string appDomain = string.Empty; // like https://skypesv01.example.com string appPath = string.Empty; // like /ucwa/oauth/v1/applications ... this time skip this code ... (get appDomain, appPath) // Create application resource instance // (and get uri of instance) HttpResponseMessage res2 = cl.PostAsync( appDomain + appPath, new StringContent(new JObject( new JProperty("culture", "ja-JP"), new JProperty("endpointId", "123456"), new JProperty("userAgent", "Test App") ).ToString(), Encoding.UTF8, "application/json")).Result; JObject resObj2 = res2.Content.ReadAsAsync<JObject>( new[] { ucwaFormatter }).Result; string resourcePath = (((resObj2["_links"] as JObject)["self"] as JObject)["href"] as JValue).Value as string; eventPath = (((resObj2["_links"] as JObject)["events"] as JObject)["href"] as JValue).Value as string; // Create conversation invitation // (status 201 is returned if succeed) string sessionContext = Guid.NewGuid().ToString(); string operationId = Guid.NewGuid().ToString(); HttpResponseMessage res3 = cl.PostAsync( appDomain + resourcePath + "/communication/messagingInvitations", new StringContent(new JObject( new JProperty("importance", "Normal"), new JProperty("sessionContext", sessionContext), new JProperty("subject", "Test IM"), new JProperty("telemetryId", null), new JProperty("to", "sip:demouser2@example.com"), new JProperty("operationId", operationId) ).ToString(), Encoding.UTF8, "application/json")).Result; // // Wait untill connected, // and get conversation uri // (Checking event chain . . .) // string conversationPath = string.Empty; string threadId = string.Empty; while (string.IsNullOrEmpty(conversationPath)) { // Get events from Web API // ("sender" and "events" nested array is returned) HttpResponseMessage res4 = cl.GetAsync(appDomain + eventPath).Result; JObject resObj4 = res4.Content.ReadAsAsync<JObject>( new[] { ucwaFormatter }).Result; // Get conversation's threadId // from messagingInvitation's operationId JArray sndArr = resObj4["sender"] as JArray; foreach (JObject sndObj in sndArr) { if (!string.IsNullOrEmpty(threadId)) break; string sndRel = (sndObj["rel"] as JValue).Value as string; if (string.Compare(sndRel, "communication", true) != 0) continue; JArray evtArr = sndObj["events"] as JArray; foreach (JObject evtObj in evtArr) { string evtRel = ((evtObj["link"] as JObject)["rel"] as JValue).Value as string; if (string.Compare(evtRel, "messagingInvitation", true) != 0) continue; string evtOpId = (((evtObj["_embedded"] as JObject)["messagingInvitation"] as JObject)["operationId"] as JValue).Value as string; if (string.Compare(evtOpId, operationId, true) != 0) continue; threadId = (((evtObj["_embedded"] as JObject)["messagingInvitation"] as JObject)["threadId"] as JValue).Value as string; Console.WriteLine( "Conversation thread is {0}", threadId); break; } } // Check conversation state // from conversation's threadId if (!string.IsNullOrEmpty(threadId)) { foreach (JObject sndObj in sndArr) { if (!string.IsNullOrEmpty(conversationPath)) break; string sndRel = (sndObj["rel"] as JValue).Value as string; if (string.Compare(sndRel, "communication", true) != 0) continue; JArray evtArr = sndObj["events"] as JArray; foreach (JObject evtObj in evtArr) { string evtRel = ((evtObj["link"] as JObject)["rel"] as JValue).Value as string; if (string.Compare(evtRel, "conversation", true) != 0) continue; if (evtObj["_embedded"] == null) continue; string convState = (((evtObj["_embedded"] as JObject)["conversation"] as JObject)["state"] as JValue).Value as string; if (string.Compare(convState, "Connected", true) != 0) continue; string evtThreadId = (((evtObj["_embedded"] as JObject)["conversation"] as JObject)["threadId"] as JValue).Value as string; if (string.Compare(evtThreadId, threadId, true) == 0) { conversationPath = ((evtObj["link"] as JObject)["href"] as JValue).Value as string; Console.WriteLine("Conversation is connected !"); break; } } } } // Set next eventPath eventPath = (((resObj4["_links"] as JObject)["next"] as JObject)["href"] as JValue).Value as string; // Wait 3 seconds System.Threading.Thread.Sleep(3000); } // Create message ! string operationContext = Guid.NewGuid().ToString(); HttpResponseMessage res5 = cl.PostAsync( appDomain + conversationPath + "/messaging/messages?" + "OperationContext=" + operationContext, new StringContent("Hello, my friends !", Encoding.UTF8, "text/plain")).Result; Console.WriteLine("IM Message was sent !"); Console.ReadLine();}. . .
JavaScript からの使用と Cross Domain 対応 (Skype for Business Server)
JavaScript から UCWA を呼び出す場合には、Cross-domain の制約を解決する必要があります。
Skype for Business Server における UCWA では、「クロス ドメイン (Cross-Domain) 接続と諸注意」で解説した iframe を使用した方式 (Cross Document Messaging, xdm) でこの制約を解決しています。
なお、UCWA 2.0 と同時に提供された JavaScript ライブラリーである Skype Web SDK では、ライブラリー内部でこの方式を使用しています (2015 年 05 月 追記)。
この方法では、Skyep for Business Server と同じドメイン (上記の場合、https://skypesv01.example.com) の Web ページを hidden の iframe (inline frame) として挿入し、HTML 5 の postMessage を使って挿入されたフレームとの間で通信をおこない、この iframe のページの中からサーバー側の Web API (UCWA) を呼び出します。

なお、この hidden iframe の挿入は、どんなクライアント (ドメイン) からも自由にできるわけではありません。上述の「準備」(Preparation) で解説した通り、あらかじめ Skype for Business Server の Allowed List (Cross-Domain Authorization List) に登録された Domain のみから呼び出しが可能です。
内部では、呼び出し元の Domain の情報が X-Ms-Origin ヘッダーを使って Server に送信され、Server 側は Allowed List (Cross-Domain Authorization List) を参照して、アクセス不可の場合に 403 エラーを返します。
この処理をプログラムで記述すると、下記の通りになります。今回は、サンプルとして、Cross-domain 呼び出しを使って、認証処理 (Authentication) のみをおこなっています。
(上述の通り、Skkype Web SDK を使用すれば、下記のようなコードを自前で実装する必要はありません。)
<!DOCTYPE html><html> <head> <meta charset="UTF-8" /> <meta http-equiv="X-UA-Compatible" content="IE=Edge"/> <title>ucwa rest sample</title> <script src="https://ajax.aspnetcdn.com/ajax/jquery/jquery-1.9.0.min.js"></script> <script> // These addressed are also resolved by discovery steps. // (This time, we set fixed addresses ...) var authUrl = 'https://skypesv01.example.com/webticket/oauthtoken'; var frmUrl = 'https://skypesv01.example.com/Autodiscover/XFrame/XFrame.html'; var frmWin = null; $(document).ready(function () { // Autodiscover (get authUrl and frmUrl) //(this time skip this code ...) // Set cross-domain iframe var frame = $('<iframe id="crsfrm"></iframe>').load(function () { frmWin = frame[0].contentWindow; }).attr('src', frmUrl); $('#framearea').html(frame); // Authenticate $('#exeBtn').click(function () { var reqdata = { accepts: 'application/json', cache: false, contentType: 'application/x-www-form-urlencoded; charset=UTF-8', data: 'grant_type=password&username=' + $('#logTxt').val() + '&password=' + $('#PasTxt').val(), headers: {}, //Authorization: (This time not needed) //processData: false, type: 'post', url: authUrl, xhrFiedlds: '', messageId: CreateUUID() }; frmWin.postMessage(JSON.stringify(reqdata), '*'); }); // click $('#msgline').html('initialized'); }); // ready function CreateUUID() { // This function is from UCWA samples ... return 'xxxxxxxx-xxxx-4xxx-yxxx-xxxxxxxxxxxx'.replace(/[xy]/g, function (c) { var r = Math.random() * 16 | 0, v = c == 'x' ? r : r & 0x3 | 0x8; return v.toString(16); } ); } // Receive message using "message" or "onmessage" event . . . skip this code </script> </head> <body> <div style="font-weight:bold">UCWA REST Sample</div> <div> <input type="button" id="exeBtn" value="Execute !" /><br /> <table> <tr> <td>Login</td> <td><input type="text" id="logTxt" value="" /></td> </tr> <tr> <td>Password</td> <td><input type="password" id="PasTxt" value="" /></td> </tr> </table> </div> <p id="msgline" style="background-color:gray;"></p> <div id="framearea" style="display:none"> </div> </body></html>上記の https://skypesv01.example.com/Autodiscover/XFrame/XFrame.html が iframe として挿入されるページになりますが、このページ自体も決められた手順で検出 (Discover) 可能です。
JavaScript からの使用と Cross Domain 対応 (Skype for Business Online)
一方、Skype for Business Online における UCWA では、「クロス ドメイン (Cross-Domain) 接続と諸注意」で解説した CORS (Cross Origin Resource Sharing) が使用できるため、上述の REST 呼び出しとほぼ同じ方法で JavaScript から処理できます。
CORS を使用するには、「JavaScript による Azure AD 連携 (OAuth Implicit Grant)」で紹介している手順で、oauth2AllowImplicitFlow を true に設定してください。
※ 参考資料 : Developing Applications with UCWA
https://msdn.microsoft.com/en-us/library/office/mt629181(v=office.16).aspx
※ 関連ナンバー
※ 変更履歴 :
2015/05 Skype for Business の UCWA 2.0 (Preview) にあわせて変更 (Lync -> Skype for Business への変更)
2016/04 Skype for Business Online の記述を追加
Categories: Uncategorized

9 replies»