
OAuth : App development working with Microsoft Entra ID (Azure AD)
- Build Standard Web or Native Application
- Build JavaScript Application
- For Backend Application (Daemon app, Service app)
- How to Verify Token
- Build Your Custom API Application
- Workload Identity Federation
Entra ID (Azure AD) runs and is built on open protocols, such as OpenID Connect / OAuth, SAML, or WS-Federation.
With Microsoft Identity Platform v2.0 endpoint (formerly, Azure AD v2.0 endpoint), you can generate a standard OpenID & OAuth compliant application for both organization account (i.e, Entra ID account) and consumer account (i.e, Microsoft Account).
In this post, for the beginning of identity development, I’ll show you end-to-end steps (from application’s registration to authentication) using a standard OAuth code grant flow.
Overview
If you’re not familiar with identity development, please remind a real application which can be used with other identity platform, such as Facebook account, Twitter account, or Google account.
For instance, you might login to SlideShare using your Facebook account. In this case, if your connected friend posted a nice slide and it was frequently referred by everyone, you might be notified that “XXX’s slide is trending !” from SlideShare. Otherwise, if you have posted your slide in SlideShare, it might be posted on Facebook and be notified for your friends.
In this scenario, there exist two applications, SlideShare and Facebook. Facebook always protects your resources, such as, your friend’s list or permission for posting, but a permitted application (SlideShare) can access these resources with your credential. This is realized by standard OAuth protocol.
Microsoft Identity Platform also provides same mechanism by standard OpenID and OAuth.
In a sample application of this post, we’ll generate client application (TestApp01) which provides login experience for Microsoft Identity Platform. Once the user has logged-in, the user can retrieve his e-mails (resources protected by Microsoft Graph).
Now we start to build this application without any SDK or libraries.
Register your Application (Client)
For OAuth 2.0 authentications, client application (SlideShare application in above example) and API application (Facebook API in above example) should both be registered in the identity platform. In our example, a client application is our custom application (TestApp01) and an API application is Microsoft Graph.
Microsoft Graph was already registered in Microsoft Identity Platform (Entra ID), then now we should register our client application (TestApp01) in Microsoft Identity Platform (Entra ID).
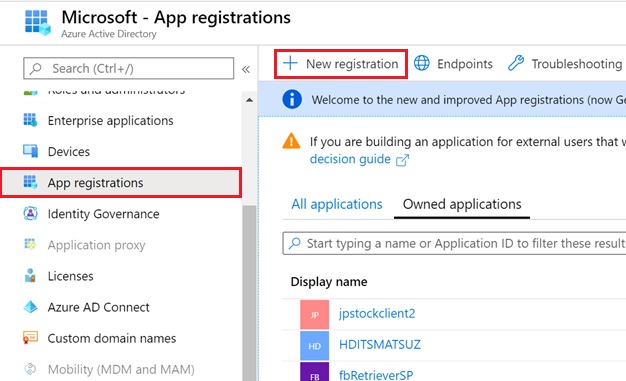
First, you login to Azure Portal and go to “Azure Active Directory”.
In Entra ID management, click “App registrations” in the navigation, and then push “New registration” to register your app.
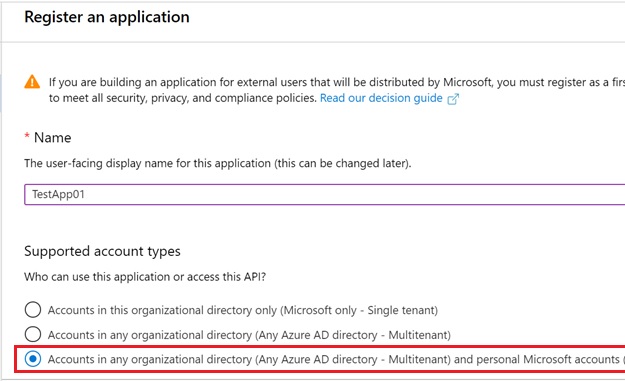
In app registration wizard, be sure to select an option “Accounts in any organizational directory (Any Azure AD directory – Multitenant) and personal Microsoft accounts (e.g. Skype, Xbox)“.
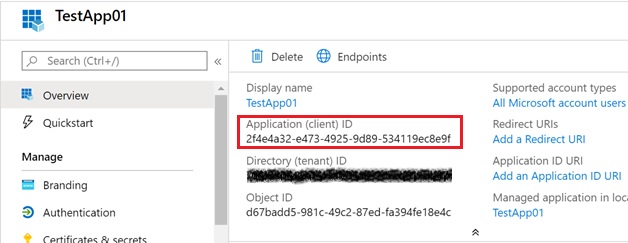
After your application is successfully registered, go to application page and copy application id (client id). (Later we use this value.)
Next please set redirect URI by clicking “Redirect URIs”. This url is also used for authentication flow.
In this post, we assume that the redirect URI is https://localhost/testapp01 .

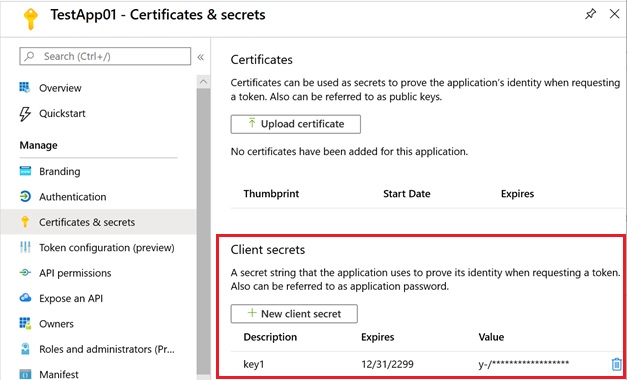
Finally, please create a client secret (i.e, application password) by selecting “Certificates & secrets” in the left-side navigation.
Now the registration and configuration is all done !
HTTP Flow – Web application (Confidential Client)
Now we can start to build our application with OAuth flow.
First, the application should go to the following URL using a web browser. (When you’re building a native application, you can use Web browser component instead of browser itself.)
Note that you can see /v2.0 in this URL.
Note : In this sample, we’re simply setting
response_type=codefor understanding the main flow, however you should useresponse_type=id_token+codein production and verify id token in order to ensure that the user has correctly logged-in. (For verifying token, please see “How to verify id token in Entra ID“.) In this case, also please specifyresponse_mode=form_post, instead ofresponse_mode=queryto protect token value.
(The following is only for debugging purpose.)
https://login.microsoftonline.com/common/oauth2/v2.0/authorize ?response_type=code &response_mode=query &client_id=2f4e4a32-e473-4925-9d89-534119ec8e9f &scope=https%3a%2f%2fgraph.microsoft.com%2fmail.read &redirect_uri=https%3a%2f%2flocalhost%2ftestapp01Please see “scope” value in above URL. In this case, we’re setting https://graph.microsoft.com/mail.read , which means “Please give us access token for reading my e-mails”.
If you want to specify multiple scopes, you can set multiple values delimited by space. For instance, the following is requesting access token for both reading my e-mails and reading my calendar.
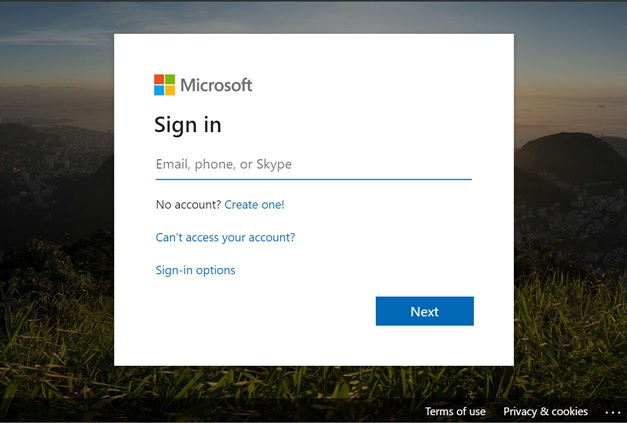
scope=https%3a%2f%2fgraph.microsoft.com%2fmail.read%20https%3a%2f%2fgraph.microsoft.com%2fcalendars.readWhen the application go to the URL above, Microsoft Identity Platform will show the following login UI.
Now the user can login using either an organization account (Entra ID account) or a consumer account (Microsoft Account). (In this post, I use a consumer account.)
The first time to use this application, the following confirmation UI (consent UI) is displayed after login. When you agree to this consent, this application (TestApp01) can read your e-mails using your access token. If you think it’s suspicious, don’t confirm this consent.
Even when you’re using organization accounts, the application in some tenant A is consented by a user in another tenant B. (However the application must be configured for multi-tenant.) In short, the application is shared by all tenants and you don’t need to register your application in each user’s tenant every time.
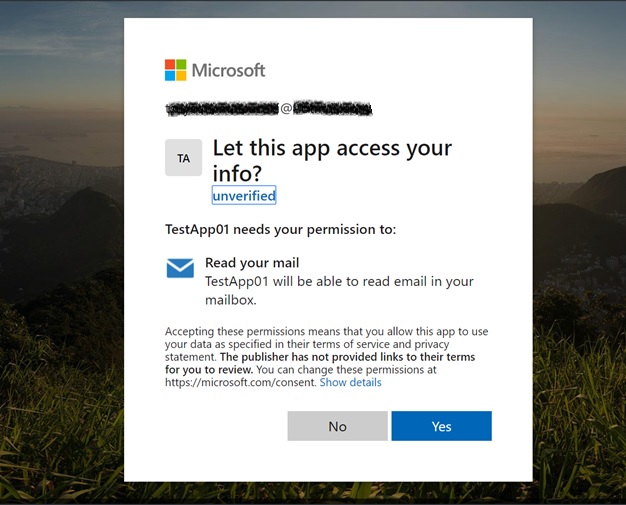
Once you’ve agreed this consent, this UI for e-mail access will never be shown.
However, when the application requests your calendar access next time, the differential consent (i.e, the consent only for calendar access) is displayed.
Note : When you want to revoke permission for this application, please go to :
https://myapplications.microsoft.com/ when using Entra ID (organization account)
https://account.live.com/consent/Manage when using MSA (consumer account)Note : This type of consent is called User Consent. On the contrary, an administrator in your organization can grant (consent) to all the users in your organization. (i.e, Each consents for users are not shown, when using this application.) This type of consent is called Administrator Consent (Admin Consent).
For the details about Admin Consent, see “How to use Application Permission with v2 endpoint and Microsoft Graph“.
After the consent is successfully agreed by the user, the page is redirected into the following URL. Here https://localhost/testapp01 is your application’s URL (see “Redirect URI” above) and the “code” (called authorization code) in query string is returned to your application by Microsoft Identity Platform. Then your client application extracts this “code” and use this “code” in the following authentication flow.
Note : This authorization code is disabled, once you have used for authentication. (You cannot repeatedly use this code.) Furthermore, authorization code is expired in 5 minutes. (If you want to debug, don’t drink your coffee !)
https://localhost/testapp01?code=Me9ba53c4...Next the application should invoke the following HTTP POST in order to request access token (which is very important and sensitive ticket).
In the following, the “code” is the authorization code which is extracted above. The “client_id” is the application id which is copied in app registration. The “client_secret” is the secret (app password) which is generated in app registration.
This request should not be exposed for users, since this request uses the client secret (app password). Then this request should be invoked on server side (in the back-end). Please be sure not to use the secret in client side.
(Later I will show you how to build a native application which doesn’t have server back-end.)
POST https://login.microsoftonline.com/common/oauth2/v2.0/tokenContent-Type: application/x-www-form-urlencodedgrant_type=authorization_code&code=Me9ba53c4...&client_id=2f4e4a32-e473-4925-9d89-534119ec8e9f&client_secret=y-%2FSvG.g...&scope=https%3A%2F%2Fgraph.microsoft.com%2Fmail.read&redirect_uri=https%3A%2F%2Flocalhost%2Ftestapp01Note : You can also use certificate, instead of client secret (password).
When using the certificate, first you download a private key (pfx file) and use this key in your application. The application signs token using this key, generate JWT, and attach this JWT as “client_assertion” property in POST body. The identity endpoint (Entra ID), in turn, verifies this JWT using a public key.
For more details about JWT, please see “How to verify id token in Entra ID“.
When this request is successfully accepted, the following response (response body in HTTP) is returned.
As you can see, it includes access token, which is used for accessing your information. (This access token expires in one hour. Later I’ll show you how to sustain the token.)
{ "token_type": "Bearer", "expires_in": "3600", "scope": "https://graph.microsoft.com/mail.read", "access_token": "EwCgAsl6BA..."}As I mentioned above, this token is used for reading your e-mail in this example. Now let’s invoke Microsoft Graph API and get user’s e-mail using this access token.
To call Microsoft Graph, you should set access token in “Authorization” HTTP header as follows. Here we’re requesting my latest 20 e-mails in my inbox (Outlook.com).
For details about Microsoft Graph API, please see the official reference for Microsoft Graph.
GET https://graph.microsoft.com/v1.0/me/messages?$orderby=receivedDateTime%20desc&$top=20&$select=subject,receivedDateTime,fromAccept: application/jsonAuthorization: Bearer EwCgAsl6BA...HTTP Response Body (a list of e-mails) is here :
{ "@odata.context": "https://graph.microsoft.com/v1.0/$metadata#users('appdev14%40outlook.com')/messages(subject,receivedDateTime,from)", "value": [{ "@odata.etag": "W/"CQAAABYAAAA/ywOhHYtLTIFtKce5fzrrAACaPeCP"", "id": "AQMkADAwAT...", "receivedDateTime": "2016-01-12T20:10:17Z", "subject": "Hello World", "from": {"emailAddress": { "name": "Tsuyoshi Matsuzaki", "address": "tsuyoshi.matsuzaki@ezweb.ne.jp"} }},{ ...},{ ...},... ]}Note that this sample trusts token without any verification, but in the real production, the verification process is also needed. (See “How to verify id token in Entra ID” for token verification.)
HTTP Flow – Native or Mobile Application (Public Client)
As I mentioned above, previous code-grant-flow uses the client secret (app password) and needs server back-end.
When building a native or mobile application (which doesn’t have server back-end), you should change this flow a little.
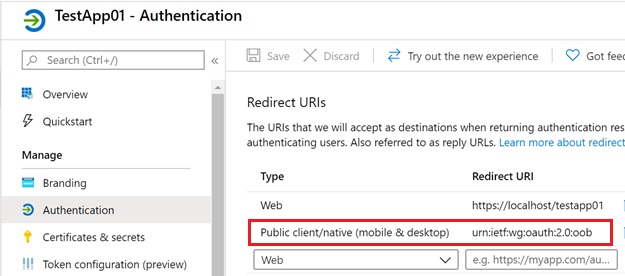
First, please add redirect URI for a native client with the following URI type, “Public client/native (mobile & desktop)”. (See the following screenshot.)
In a native client, the pseudo URL (such as, “urn:ietf:wg:oauth:2.0:oob”, “msalxxxxxxxx-xxxx-xxxx-xxxx-xxxxxxxxxxxx://auth”, …) is often used as redirect URI for more secure communication. (See the following note for details.)
Note : When the page is redirected, the identity server (Entra ID endpoint) will set “Location” HTTP header with “code” value (authorization code) in HTTP envelop, then the browser (user agent) will redirect to this URL. HTTP envelop is encrypted by https protocol.
However, once “code” is used in the address (as a query string), this is not protected.
Because of this, if redirect URI is not the actual internet address, the “code” value will not be exposed as a plain text in the network.
For other parts of flow, it’s the same as Web client (above) except for not using client secret.
Request login
https://login.microsoftonline.com/common/oauth2/v2.0/authorize ?response_type=code &response_mode=query &client_id=2f4e4a32-e473-4925-9d89-534119ec8e9f &scope=https%3a%2f%2fgraph.microsoft.com%2fmail.read%20offline_access &redirect_uri=urn%3aietf%3awg%3aoauth%3a2.0%3aoobRedirected URL, after login
urn:ietf:wg:oauth:2.0:oob?code=M70aabedc...Request access token
POST https://login.microsoftonline.com/common/oauth2/v2.0/tokenContent-Type: application/x-www-form-urlencodedgrant_type=authorization_code&code=M70aabedc...&client_id=2f4e4a32-e473-4925-9d89-534119ec8e9f&scope=https%3A%2F%2Fgraph.microsoft.com%2Fmail.read%20offline_access&redirect_uri=urn%3Aietf%3Awg%3Aoauth%3A2.0%3AoobHTTP response with access token
HTTP/1.1 200 OKContent-Type: application/json; charset=utf-8{ "token_type": "Bearer", "expires_in": "3600", "scope": "https://graph.microsoft.com/mail.read", "access_token": "EwCgAsl6BA...", "refresh_token": "MCT8l7kY72..."}For Web client, it is breached for phishing attacks. Once a malicious user gets your application’s id, he can easily impersonate your application using code-grant flow and get your information using access token. (The access token includes your personal information. See “How to verify id token in Entra ID“.) To prevent this kind of attacks, your application should use the client secret (app password) in server-side.
On the contrary, the almost all mobile applications (iOS, Android, Windows store app, and so on) will be consented, when it’s installed. The user can identify the application when installing, instead the client secret is not used (skipped) for the security reason.
Requesting Access Token Again
In above example, you get your e-mails using access token, but you cannot retrieve your events (appointments) in your calendar using the same access token, because the access token is including which API can be used (as “scope”). If your application needs to access your calendar, the application should request another access token (for calendar) again.
As I show you here, your application doesn’t need to show login UI again for requesting another access token.
First, you should change the request for access token to include “offline_access” in scopes as follows. With this request, you can retrieve another token called refresh token in the response body. (Please specify this “offline_access” also in the request for authorization code. I skip writing for this change.)
POST https://login.microsoftonline.com/common/oauth2/v2.0/tokenContent-Type: application/x-www-form-urlencodedgrant_type=authorization_code&code=Me9ba53c4...&client_id=2f4e4a32-e473-4925-9d89-534119ec8e9f&client_secret=y-%2FSvG.g...&scope=https%3A%2F%2Fgraph.microsoft.com%2Fmail.read%20offline_access&redirect_uri=https%3A%2F%2Flocalhost%2Ftestapp01{ "token_type": "Bearer", "expires_in": "3600", "scope": "https://graph.microsoft.com/mail.read", "access_token": "EwCgAsl6BA...", "refresh_token": "MCadUMfvHs..."}Using this refresh token, you can request another access token with the following HTTP POST request without login UI.
You can set an arbitrary scope (for e-mails, calendar, files, …) in the following request. (But, note that the scope should be consented beforehand ! Otherwise, you will get errors.)
POST https://login.microsoftonline.com/common/oauth2/v2.0/tokenContent-Type: application/x-www-form-urlencodedgrant_type=refresh_token&refresh_token=MCVK%2A%2A...&client_id=2f4e4a32-e473-4925-9d89-534119ec8e9f&client_secret=y-%2FSvG.g...&scope=https%3A%2F%2Fgraph.microsoft.com%2Fmail.read%20offline_access&redirect_uri=https%3A%2F%2Flocalhost%2Ftestapp01As I mentioned above, the access token expires in 1 hour by default. Even when the access token is expired, you can also request another access token using refresh token, because the refresh token is active (not expired) till 90 days (1 year when consumer account) by default. (The lifetime is configurable. See here for details.)
By caching refresh token, you can also provide “always connected” (not need login next time) experience for users.
Note : The refresh token is disabled (the user should get refresh token again), when the user has changed password.
The refresh token is frequently used in the real production.
Update History :
Dec 04, 2019 Update App Registration Portal (https://apps.dev.microsoft.com) to Azure Portal, because of App Registration Portal deprecation
Dec 04, 2019 Converted into English
Categories: Uncategorized

Hello ,
Liked this post very much, have a question:
You have mentioned a note about using a certificate instead of a secret as :
“Note : You can also use certificate, instead of client secret (password). When using the certificate, first you download a private key (pfx file) and use this key in your application. The application signs token using this key, generate JWT, and attach this JWT as “client_assertion” property in POST body.”
I am trying to get an access token from a Azure AD using a certificate instead of a client_secret from postman, can you please suggest on the “client_assertion” JWT generation part to be used in postman, is there any other method or way apart from c# code to generate the client_assertion JWT, since i want to get the access token from postman.
Also, is there any other authentication type that can be used with a certificate if you are aware about ?
Regards,
Ravindra R Pathak
LikeLike
Sorry for my late response. As you say, client_assertion is also JWT, in which some specific format of payload is signed with your (your application’s) key which is the generated certificate in Azure AD. (The key (in key pairs) is also stored in Azure AD and then Azure AD can verify your signed JWT.)
I’m sorry, but there’s no appropriate document describing about this “specific format of payload”.
The easy way to find this format (payload) is to capture HTTP traffic generated by C# (MSAL) with Fiddler or other development tools. And you can soon parse the captured JWT in internet parser, such like https://jwt.io/ , and can get the original payload.
After you know this original payload format, you can sign (create a signature) with a lot of tools, such as, openssl or others.
(See my post /2016/03/08/azure-ad-msa-v2-endpoint-validate-id_token/ for details about JWT format. This post uses php openssl function for verification. In this case, you should sign, not verify.)
Sorry for not providing an exact answer for your question, but I think this will help you understand how to sign by yourself without MSAL.
LikeLike