
こんにちは。
今回は、Barracuda, F5 など Azure Marketplace にある 3rd party の (Certified の) イメージを Resource manager template で展開する場合のノウハウを紹介します。
3rd party アプリの展開とユーザーによる許諾 (terms of use)
例えば、Azure Marketplace にある Barracuda Web Application Firewall (Hourly) の VHD image を ARM template に組み込むには、下記の通り imageReference と plan を使って記述できます。
今回は つまらない単一の VM 構成ですが、WAF と他のコンポーネントを組み合わせた複雑なソリューションも、このように 1 つの template にして記述できます。
{ "$schema": "https://schema.management.azure.com/schemas/2015-01-01/deploymentTemplate.json#", "contentVersion": "1.0.0.0", "parameters": { }, "variables": { }, "resources": [{ "name": "testvnet", "type": "Microsoft.Network/virtualNetworks", "location": "East US", "apiVersion": "2015-06-15", "tags": {"displayName": "testvnet" }, "properties": {"addressSpace": { "addressPrefixes": ["10.0.0.0/16" ]},"subnets": [ {"name": "testsubnet","properties": { "addressPrefix": "10.0.0.0/24"} }] }},{ "name": "tsmatsuzteststorage", "type": "Microsoft.Storage/storageAccounts", "location": "East US", "apiVersion": "2015-06-15", "tags": {"displayName": "teststorage" }, "properties": {"accountType": "Standard_GRS" }},{ "apiVersion": "2015-06-15", "type": "Microsoft.Network/publicIPAddresses", "name": "testip", "location": "East US", "properties": {"publicIPAllocationMethod": "Dynamic","dnsSettings": { "domainNameLabel": "tsmatsuzendpoint"} }},{ "name": "testnic", "type": "Microsoft.Network/networkInterfaces", "location": "East US", "apiVersion": "2015-06-15", "dependsOn": ["Microsoft.Network/virtualNetworks/testvnet","Microsoft.Network/publicIPAddresses/testip" ], "properties": {"ipConfigurations": [ {"name": "ipconfig","properties": { "privateIPAllocationMethod": "Dynamic", "subnet": {"id": "[concat(resourceId('Microsoft.Network/virtualNetworks', 'testvnet'), '/subnets/testsubnet')]" }, "publicIPAddress": {"id": "[resourceId('Microsoft.Network/publicIPAddresses', 'testip')]" }} }] }},{ "name": "testvm", "type": "Microsoft.Compute/virtualMachines", "location": "East US", "apiVersion": "2015-06-15", "dependsOn": ["Microsoft.Storage/storageAccounts/tsmatsuzteststorage","Microsoft.Network/networkInterfaces/testnic" ], "plan": {"name": "hourly","publisher": "barracudanetworks","product": "waf" }, "properties": {"hardwareProfile": { "vmSize": "Standard_A1"},"osProfile": { "computername": "testvm", "adminUsername": "demouser", "adminPassword": "P@ssw0rd01"},"storageProfile": { "imageReference": {"publisher": "barracudanetworks","offer": "waf","sku": "hourly","version": "latest" }, "osDisk": {"name": "testdisk","vhd": { "uri": "http://tsmatsuzteststorage.blob.core.windows.net/vhds/test.vhd"},"caching": "ReadWrite","createOption": "FromImage" }},"networkProfile": { "networkInterfaces": [{ "id": "[resourceId('Microsoft.Network/networkInterfaces', 'testnic')]"} ]} }} ], "outputs": { }}補足 : 利用可能な Image Publisher, Offer, Sku は、Windows PowerShell などで確認できます。例えば、下記は、利用可能な Image Publisher を取得します。Get-AzureRmVMImagePublisher -Location eastus | Where-Object { $_.PublisherName -match "barracuda" }
下記は、取得した Image Publisher から、利用可能な Offer を取得します。Get-AzureRmVMImageOffer -Location eastus -PublisherName barracudanetworks
下記は、取得した Image Publisher と Offer から Sku を取得します。(今回は hourly、byod などが返ってきます。)Get-AzureRmVMImageSku -Location eastus -PublisherName barracudanetworks -Offer waf
この Resource manager template を展開する際、実は 1 つ大きな課題があります。それは、利用者による使用許諾の条項 (terms of use, 法律条件) への明示的な同意が必要であるという点です。
この点をクリアにするもっともシンプルな方法は、「Azure Resource Manager の template の How-to」で紹介したいくつかの展開方法のうち、Azure Portal による展開 (つまり、UI を使った展開) をおこなうことです。例えば、上記の json テンプレートをインターネット上の見える場所に配置しておき、下記の URI にアクセスすることで、下図のような Azure Marketplace の利用に関する条項 (terms of use) の画面が表示され、ユーザーは明示的に同意をおこなうことで展開が成功します。(json の url は Url Encode してください)
https://portal.azure.com/#create/Microsoft.Template/uri/{location url of json}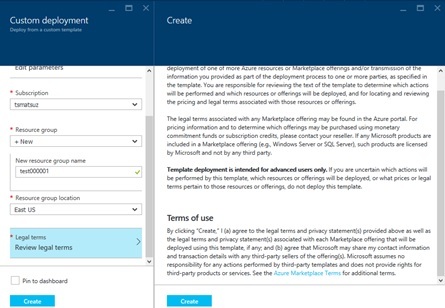
補足 : もし、コマンド ライン (Windows PowerShell など) など UI 以外から展開した場合は、下記エラーが発生して展開に失敗します。
Legal terms have not been accepted for this item on this subscription. To accept legal terms, please go to the Azure portal and configure programmatic deployment for the Marketplace item or create it there for the first time
これは、ClearDB, SendGrid, NewRelic など、Azure Marketplace 上の Service Application (API Application, Developer Services など) でも同様です。例えば、SendGrid EMail Delivery を展開する下記の template は、上述同様、UI では展開可能ですが、コマンドやプログラムからの展開は不可能です。
{ "$schema": "https://schema.management.azure.com/schemas/2015-01-01/deploymentTemplate.json#", "contentVersion": "1.0.0.0", "parameters": { }, "variables": { }, "resources": [{ "name": "test", "type": "Sendgrid.Email/accounts", "location": "East US", "apiVersion": "2015-01-01", "plan": {"name": "free","publisher": "Sendgrid","product": "sendgrid_azure","promotionCode": "" }, "properties": {"password": "P@ssw0rd01","acceptMarketingEmails": "0","email": "" }} ], "outputs": { }}補足 : 上述の type の「Sendgrid.Email/accounts」は、「Sendgrid.Email」プロバイダーの「accounts」リソースを意味しています。セミナーで紹介している通り、Azure Resource Manager の Resource は拡張可能 (extensible) であり、ClearDB, SendGrid, NewRelic などはこうした拡張された type を持っています。Azure 上で使用可能な type (Provider, Resource) の一覧は、Windows PowerShell の以下のコマンドで確認できます。Get-AzureRmResourceProvider -ListAvailable
3rd party アプリの展開に限ったことではありませんが (Microsoft が提供する Computing の展開でも同様ですが)、このように、UI に表示される条項に了承した場合、template に高コストな外部の Resource (Computing など) が記述されていた場合でもその展開に同意したことになってしまうので、一般に template 展開の際には Readme などを充分確認した上で展開をおこなってください。(なお、Azure Marketplace 上の template は、Certify された団体による、Certify された template のみが表示されています。)
Programmatic Deployment (UI を使わない配置)
開発・テスト時の自動展開など、展開の際に UI を避けなければならないケースもあります。Azure Marketplace 上の VHD image のアプリケーションの場合は (つまり、上記の Barracuda の例のような場合は)、以下の Programmatic Deployment (Programmatic Enablement) の手順を踏むことで、こうしたコマンドやプログラムからの 3rd party image の展開が可能です。(この方法は、現在、上記の Service application のケースでは使用できません。)
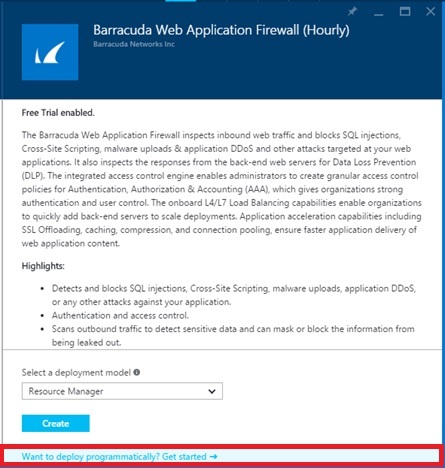
まず、UI Less と言えども、あらかじめ、同意はしておく必要があります。あらかじめ、Azure Portal 上から該当のアプリケーションを探し、下記の「Want to deploy programmatically ?」(日本語「プログラムによるデプロイについて」) と書かれたバーをクリックします。
表示される Programmatic Deployment の条項 (terms of use) を確認し、有効にする Subscription の [Enable] を選択して [Save] ボタンを押します。
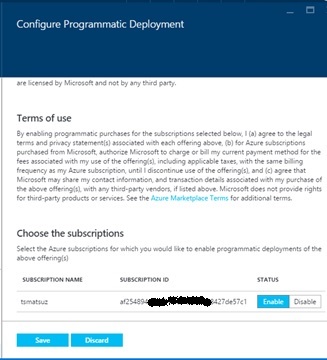
補足 : 既定では、すべての Application が Disable になっていますが、Azure Portal からいったん購入すると Enable になるので注意してください。
以上で準備は完了です。
以降は、Windows PowerShell, Azure CLI, REST API などのコマンドやプログラムを使って上記の 3rd party image を含んだ Resource manager template を展開すると、エラーは表示されずに展開に成功します。
※ 参考資料
Microsoft Azure : Working with Marketplace Images on Azure Resource Manager
https://azure.microsoft.com/ja-jp/blog/working-with-marketplace-images-on-azure-resource-manager/
※ (ISV 企業の皆さま) 皆さまのソリューションを、是非、Azure Marketplace へご登録ください !
https://azure.microsoft.com/ja-jp/documentation/articles/marketplace-publishing-getting-started/
Categories: Uncategorized
