
In Azure, there exist 2 projects – “Azure IoT Edge Connector for Kubernetes” and “Azure IoT Edge on Kubernetes” – for integrating Azure IoT Edge with popular Kubernetes.
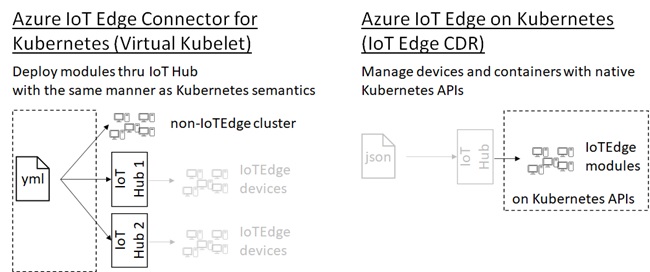
In this post, I’ll show you the latter project “Azure IoT Edge on Kubernetes” (now in Preview), in which you can take advantage of Kubernetes abilities, such as, self-monitoring, resource-balancing, horizontal-scaling, so on and so forth without IoT SDKs.
(See my previous post for the former project.)
Preparation (IoT Hub Settings)
Before stariting (managing resources), please provision and configure your IoT Hub resource in cloud.
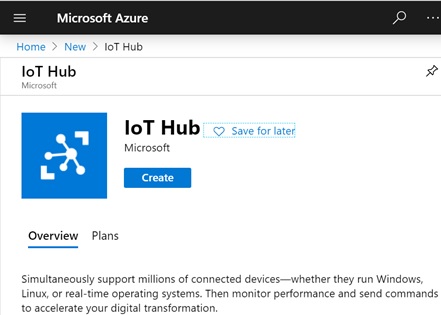
First of all, create your IoT Hub resource on Azure Portal UI. (See below.)
Same as my previous post, here we also use trivial container images, module01 and module02, in Docker Hub.
With these images, module01 receives a message string with HTTP port 8081 and module02 logs this message in container. (A message is passed across modules through an Edge hub.)

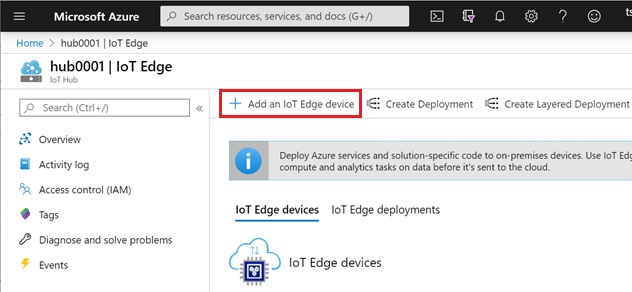
Now add an Edge-enabled device named “device01” in your IoT Hub. (In this example, we only use a single device.)
Then upload the following deployment manifest (deployment.json) into device01 in IoT Hub. (Here I don’t describe details about manifest settings, but please see my early post “Building Azure IoT Edge Module with Message Routing” for this manifest.)
deployment.json
{ "modulesContent": {"$edgeAgent": { "properties.desired": {"schemaVersion": "1.0","runtime": { "type": "docker", "settings": {"minDockerVersion": "v1.25","loggingOptions": "", }},"systemModules": { "edgeAgent": {"type": "docker","settings": { "image": "mcr.microsoft.com/azureiotedge-agent:1.0", "createOptions": "{}"} }, "edgeHub": {"type": "docker","status": "running","restartPolicy": "always","settings": { "image": "mcr.microsoft.com/azureiotedge-hub:1.0", "createOptions": "{\"HostConfig\":{\"PortBindings\":{\"5671/tcp\":[{\"HostPort\":\"5671\"}],\"8883/tcp\":[{\"HostPort\":\"8883\"}],\"443/tcp\":[{\"HostPort\":\"443\"}]}}}"} }},"modules": { "module01": {"version": "1.0","type": "docker","status": "running","restartPolicy": "always","settings": { "image": "tsmatz/iot-module-sample01:1.0.0", "createOptions": "{\"HostConfig\":{\"PortBindings\":{\"8081/tcp\":[{\"HostPort\":\"8081\"}]}}}"} }, "module02": {"version": "1.0","type": "docker","status": "running","restartPolicy": "always","settings": { "image": "tsmatz/iot-module-sample02:1.0.0", "createOptions": "{}"} }} }},"$edgeHub": { "properties.desired": {"schemaVersion": "1.0","routes": { "SampleModuleToModule": "FROM /messages/modules/module01/outputs/output1 INTO BrokeredEndpoint(\"/modules/module02/inputs/input1\")"},"storeAndForwardConfiguration": { "timeToLiveSecs": 7200} }} }}By running the following command on Azure Cloud Shell (in web browser), upload this manifest into device01 config in IoT Hub.
Note that these settings are not still provisioned on the real devices and just uploaded to an IoT Hub resource. (Later we’ll deploy these modules on physical devices with Kubernetes APIs.)
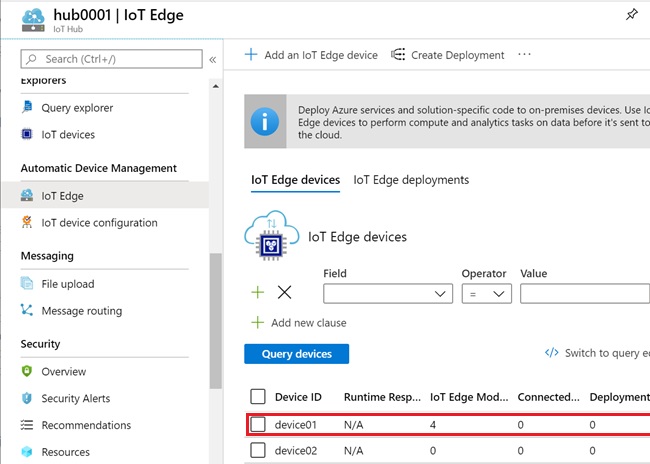
az iot edge set-modules \ --hub-name {YOUR IOT HUB NAME} \ --device-id device01 \ --content ./deployment.jsonWhen you click “IoT Edge” menu on IoT Hub blade, you can find 4 modules – module01, module02, and 2 system modules – as follows.
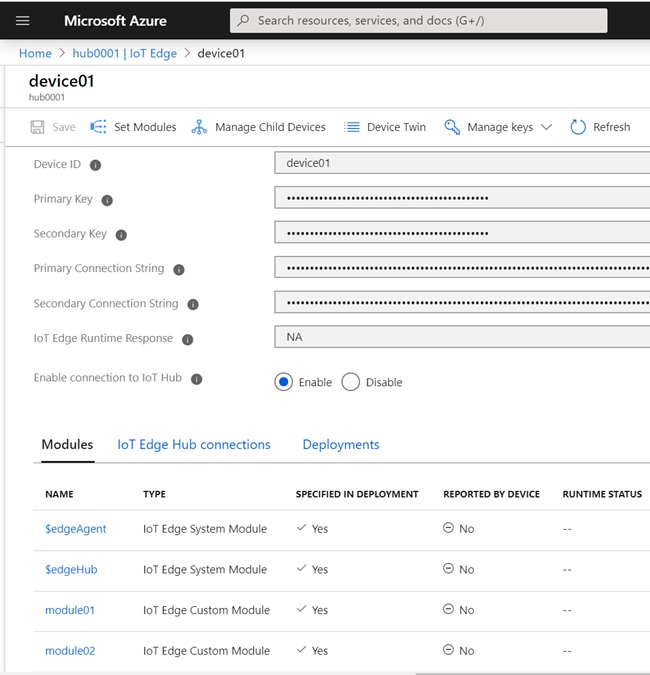
Finally, please copy a connection string for this Edge-enabled device (device01).

Create a Cluster and Install IoT Edge CRDs
For deploying and managing IoT Edge resources in Kubernetes cluster, you should create a Kubernetes cluster (with Kubernetes controller) and install Custom Resource Definitions (CRD) for IoT Edge in that cluster.
In the real production, you may use physical on-premises devices. You can provision on-premises Kubernetes cluster (such as, MiniKube, k3d, …) and manage resources with on-premises Kubernetes controller.
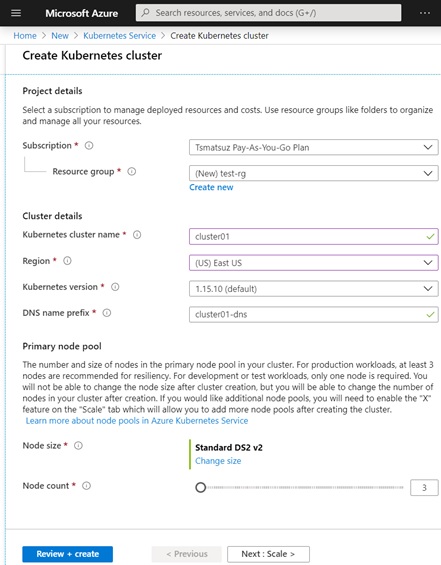
However, for simplicity, we run a cluster on Azure Kubernetes Cluster (AKS) in this tutorial.
Here we create an AKS cluster with 3 nodes.
In order to connect your console to this cluster, run the following CLI command in Azure Cloud Shell.
(If you run a console locally, please install Azure CLI in your environment.)
az aks get-credentials \ --resource-group {Resource Group Name} \ --name {AKS Cluster Name} \ --subscription {Subscription ID}Using Helm3, install Custom Resource Definitions (CRD) for Azure IoT Edge on this cluster. (Helm 3 is also pre-installed in Azure Cloud Shell.)
helm install --repo https://edgek8s.blob.core.windows.net/staging \ edge-crd \ edge-kubernetes-crdNow it’s ready for managing IoT Edge resources in this cluster !
Deploy and Run Modules on Your Cluster
In ordinary steps of Azure IoT, you would install and configure Azure IoT Edge runtime on devices to run modules, and manage resources (containers, network, volumes, …) by handcrafting or IoT SDKs.
With IoT Edge CRD (in Kubernetes cluster), you can do same things with native Kubernetes APIs !
First, run the following command in order to install and run Edge modules on your cluster.
# Create namespace for device01kubectl create namespace ns01# Install and run modules on device01helm install --repo https://edgek8s.blob.core.windows.net/staging \ example01 \ edge-kubernetes \ --namespace ns01 \ --set "provisioning.deviceConnectionString={device01 connection string}"Note : As I’ll describe in the later section, you should set up persistent volumes for iotedged during edge workload installation in real production. In this tutorial, we don’t specify these settings for demo purpose.
After a few minutes, you will find Edge resources are running in this cluster as Kubernetes objects.
For instance, IoT Edge system objects (Edge Hub module, Edge Agent module, and iotedged) and your custom modules (module01 and module02 in this tutorial) are all provisioned as Kubernetes pods. (In each pod, a module image is running as a container.)
kubectl get pods -n ns01 -o wideNAME STATUS NODEedgeagent-8499d5dd66-hdp6l Running aks-agentpool-15488478-vmss000002edgehub-cbb55c6c-zbt8g Running aks-agentpool-15488478-vmss000002iotedged-7d589b8b7-6jg7v Running aks-agentpool-15488478-vmss000001module01-6bdcc97cb8-j2t7w Running aks-agentpool-15488478-vmss000000module02-65cbcbf874-vk4hr Running aks-agentpool-15488478-vmss000000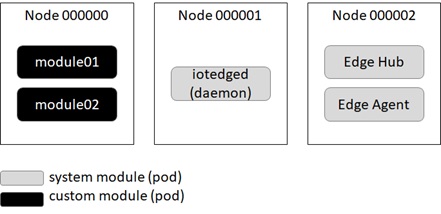
The port bindings in Edge modules are provisioned using Kubernetes services.
kubectl get services -n ns01NAME TYPE CLUSTER-IP EXTERNAL-IP PORT(S)edgehubClusterIP 10.0.25.0<none> 5671/TCP,8883/TCP,443/TCPiotedged ClusterIP 10.0.252.95 <none> 35000/TCP,35001/TCPmodule01 ClusterIP 10.0.78.165 <none> 8081/TCPAll Kubernetes objects in IoT Edge deployment have common labels with net.azure-devices.edge.hub={hub name}, net.azure-devices.edge.deviceid={device id}, and net.azure-devices.edge.module={module name}. (See below.)
Using these labels, you can easily manage only objects in a particular hub or a particular device.
kubectl get pod module01-6bdcc97cb8-j2t7w \ --show-labels \ -n ns01NAME STATUS LABELSmodule01-6bdcc97cb8-j2t7w Running net.azure-devices.edge.deviceid=device01, net.azure-devices.edge.hub=hub0001.azure-devices.net, net.azure-devices.edge.module=module01, pod-template-hash=6bdcc97cb8Manage Resources in Kubernetes Mode
By installing Helm chart for CRD, both ExperimentalFeatures__Enabled and ExperimentalFeatures__EnableK8SExtensions are set to true in IoT Edge agent (edgeAgent) by default, and then Kubernetes mode is enabled. In this mode, IoT Edge agent (edgeAgent) behaves as an Operator (CRD controller) in Kubernetes cluster.
From now on, the properties in IoT Edge (on cloud) are automatically translated into Kubernetes constructs.
For instance, when you add another module (e.g, module03) in manifest (deployment.json) and upload again, you will see this added pod in the cluster after a while.
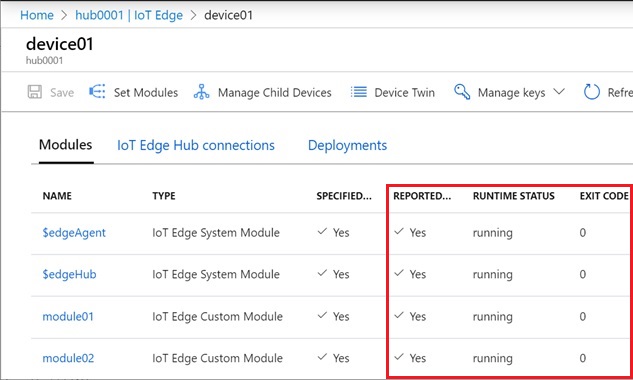
> # Upload the modified manifest (deployment.json) again> az iot edge set-modules \> --hub-name {YOUR IOT HUB NAME} \> --device-id device01 \> --content ./deployment.json> # After a while, you can see the added pod (module03)> kubectl get pods -n ns01NAME STATUS NODEedgeagent-8499d5dd66-hdp6l Running aks-agentpool-15488478-vmss000002edgehub-cbb55c6c-zbt8g Running aks-agentpool-15488478-vmss000002iotedged-7d589b8b7-6jg7v Running aks-agentpool-15488478-vmss000001module01-6bdcc97cb8-j2t7w Running aks-agentpool-15488478-vmss000000module02-65cbcbf874-vk4hr Running aks-agentpool-15488478-vmss000000module03-74b58c75db-fwshs Running aks-agentpool-15488478-vmss000001When Kubernetes mode is enabled, IoT Edge resources (Kubernetes objects) are all managed and monitored by native Kubernetes. Then IoT Edge agent (edgeAgent) reports the monitoring results (health information) to an IoT Hub. (See below for the reported results.)
The ordinary Azure IoT Edge reporting by IoT Edge runtime is not used in this mode.
You can also manage objects with regular Kubernetes manners.
For instance, let’s provide an additional service, a Kubernetes ingress controller, to configure a route for module01.
Note : Here we set up an ingress controller to receive a traffic outside the cluster, but you can directly expose a service without ingress objects by setting service’s type to
LoadBalancer(instead ofClusterIP) in helm installation. (Use MetalLB, when it’s on-premise (bare metal) clusters.)
See “4.7. Exposing services outside the cluster” for settingLoadBalancertype in IoT Edge resources.
As you can see below, port 8081 in module01 is not exposed and only accessible inside the cluster in the current settings.
kubectl get services -n ns01NAME TYPECLUSTER-IPEXTERNAL-IP PORT(S)edgehubClusterIP 10.0.25.0 <none>5671/TCP,8883/TCP,443/TCPiotedged ClusterIP 10.0.252.95 <none>35000/TCP,35001/TCPmodule01 ClusterIP 10.0.78.165 <none>8081/TCPNow we install an ingress controller and setup a route from outside traffic.
By the following configuration, an ingress external IP (https://{External IP}/...) is routed to port 8081 in module01 (https://10.0.78.165:8081/...).
# Install ingresshelm repo add stable https://kubernetes-charts.storage.googleapis.com/helm install myingress stable/nginx-ingress \ --namespace ns01# Set ingress for module01cat << EOF | kubectl apply -f -apiVersion: extensions/v1beta1kind: Ingressmetadata: name: ingress-sample namespace: ns01 annotations:nginx.ingress.kubernetes.io/rewrite-target: /$1spec: rules: - http: paths: - backend: serviceName: module01 servicePort: 8081path: /EOFNote : Azure Application Gateway ingress controller (AGIC) is also available as an add-on in AKS. (Here I used self-managed Nginx network tools.)
You can get an ingress external IP address with the following command. (In this example, it’s 52.152.251.29 .)
kubectl get services -n ns01NAMETYPE CLUSTER-IP EXTERNAL-IP PORT(S)edgehub ClusterIP10.0.25.0<none>5671/TCP,8883/TCP,443/TCPiotedgedClusterIP10.0.252.95 <none>35000/TCP,35001/TCPmodule01ClusterIP10.0.78.165 <none>8081/TCPmyingress-nginx-ingress-controller LoadBalancer 10.0.28.219 52.152.251.29 80:30992/TCP,443:30290/TCPmyingress-nginx-ingress-default-backend ClusterIP10.0.69.6<none>80/TCPLet’s connect to module01 using external IP !
When you open http://52.152.251.29/{arbitrary message} in your web browser, the request is routed to https://10.0.78.165:8081/{arbitrary message} (i.e, module01 inside a cluster) and {arbitrary message} is eventually logged in module02 container.
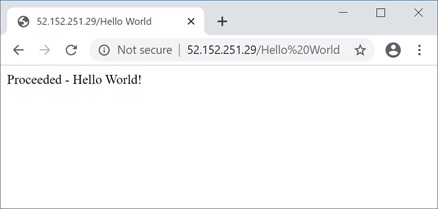
When you see logs in module02 container, you will find that {arbitrary message} is correctly received.
kubectl logs -n ns01 \ module02-65cbcbf874-vk4hr \ module02Received - b'Hello World'!Note : If there exist some errors in an ingress service, see container logs in an ingress controller pod.
# Get pod's name for ingress controllerkubectl -n ns01 get pods# Get container name for ingress controllerkubectl -n ns01 describe pod myingress-nginx-ingress-controller-77c944f4fc-s66wr# Get container logs in controllerkubectl logs -n ns01 \ myingress-nginx-ingress-controller-77c944f4fc-s66wr \ nginx-ingress-controllerTo clean up ingress, run the following commands.
# Remove a generated ingress objectkubectl delete ingress ingress-sample -n ns01# Uninstall ingresshelm uninstall myingress -n ns01
createOptions extensions
As we saw above, the settings in IoT Edge deployment manifest (.json) are automatically translated into Kubernetes constructs by a running Edge agent. However, IoT Edge properties (see here for default properties) doesn’t cover Kubernetes constructs, and not all Kubernetes settings can be written in device deployment manifest. (If you configure these settings using Kubernetes API by yourself, these settings will be overwritten in case of manifest changes.)
In order to fill these gaps, you can specify several major Kubernetes-specific constructs with createOptions properties in device deployment manifest.
In this section, let’s see how it takes effect in Kubernetes objects with several examples.
Note : For details about translations, see “3.1 Translations” in GitHub document.
Unlike IoT Edge twin properties (device twin), this app model translation is not bi-directional. (Even when you patch objects in native Kubernetes, the device manifest will not be changed.)Note : If modules are not running on Kubernetes cluster, these Kubernetes-specific options (in
createOptions) will be ignored and doesn’t effect in a regular runtime.
Example : Node Selector
When you want to assign a pod to a particular node in Kubernetes, you can use nodeSelector in Kubernetes pod’s (deployment’s) configuration.
In IoT Edge deployment manifest, you can assign to a particular node using createOptions.k8s-extensions.nodeSelector instead.
As we saw above, our custom modules (module01 and module02) are currently running on aks-agentpool-15488478-vmss000000 .
> kubectl get nodesNAMESTATUSaks-agentpool-15488478-vmss000000 Readyaks-agentpool-15488478-vmss000001 Readyaks-agentpool-15488478-vmss000002 Ready> kubectl get pods -n ns01 -o wideNAME STATUS NODEedgeagent-8499d5dd66-hdp6l Running aks-agentpool-15488478-vmss000002edgehub-cbb55c6c-zbt8g Running aks-agentpool-15488478-vmss000002iotedged-7d589b8b7-6jg7v Running aks-agentpool-15488478-vmss000001module01-6bdcc97cb8-j2t7w Running aks-agentpool-15488478-vmss000000module02-65cbcbf874-vk4hr Running aks-agentpool-15488478-vmss000000Now we start to assign these custom modules (module01 and module02) to aks-agentpool-15488478-vmss000001 using device deployment manifest.
First, we add a label testlabel=device01 in node aks-agentpool-15488478-vmss000001.
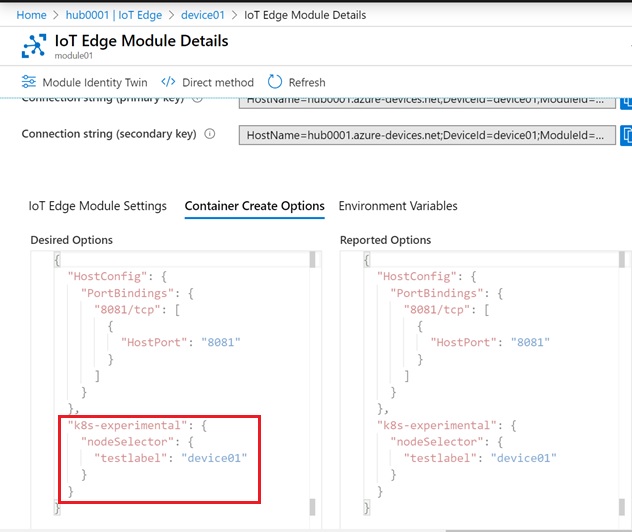
kubectl label nodes \ aks-agentpool-15488478-vmss000001 \ testlabel=device01In order to assign a module to this node, we add the following configuration in createOptions of corresponding modules (in this case, both module01 and module02).
createOptions.k8s-extensions
"k8s-experimental": { "nodeSelector": {"testlabel": "device01" }}Since the data type of createOptions is string (not json object), then you should escape a json string as follows.
Escaped string
\"k8s-experimental\": {\"nodeSelector\": {\"testlabel\": \"device01\"}}Add this escaped string into createOptions section in deployment manifest (deployment.json) as follows.
Modified manifest (deployment.json)
{ "modulesContent": {"$edgeAgent": { "properties.desired": {"schemaVersion": "1.0","runtime": { "type": "docker", "settings": {"minDockerVersion": "v1.25","loggingOptions": "", }},"systemModules": { "edgeAgent": {"type": "docker","settings": { "image": "mcr.microsoft.com/azureiotedge-agent:1.0", "createOptions": "{}"} }, "edgeHub": {"type": "docker","status": "running","restartPolicy": "always","settings": { "image": "mcr.microsoft.com/azureiotedge-hub:1.0", "createOptions": "{\"HostConfig\":{\"PortBindings\":{\"5671/tcp\":[{\"HostPort\":\"5671\"}],\"8883/tcp\":[{\"HostPort\":\"8883\"}],\"443/tcp\":[{\"HostPort\":\"443\"}]}}}"} }},"modules": { "module01": {"version": "1.0","type": "docker","status": "running","restartPolicy": "always","settings": { "image": "tsmatz/iot-module-sample01:1.0.0", "createOptions": "{\"HostConfig\":{\"PortBindings\":{\"8081/tcp\":[{\"HostPort\":\"8081\"}]}},\"k8s-experimental\": {\"nodeSelector\": {\"testlabel\": \"device01\"}}}"} }, "module02": {"version": "1.0","type": "docker","status": "running","restartPolicy": "always","settings": { "image": "tsmatz/iot-module-sample02:1.0.0", "createOptions": "{\"k8s-experimental\": {\"nodeSelector\": {\"testlabel\": \"device01\"}}}"} }} }},"$edgeHub": { "properties.desired": {"schemaVersion": "1.0","routes": { "SampleModuleToModule": "FROM /messages/modules/module01/outputs/output1 INTO BrokeredEndpoint(\"/modules/module02/inputs/input1\")"},"storeAndForwardConfiguration": { "timeToLiveSecs": 7200} }} }}Note : Using Visual Studio Code and Azure IoT Tools extension,
createOptionsstring is automatically escaped by IDE. You don’t need to escape a string by yourself using Visual Studio Code.
Finally, update the device configuration in IoT Hub by uploading this manifest (deployment.json).
az iot edge set-modules \ --hub-name {YOUR IOT HUB NAME} \ --device-id device01 \ --content ./deployment.jsonPlease make sure that createOptions are correctly updated in IoT Hub.
After a few minutes, you will find that both module01 and module02 are running on aks-agentpool-15488478-vmss000001.
kubectl get pods -n ns01 -o wideNAME STATUS NODEedgeagent-8499d5dd66-hdp6l Running aks-agentpool-15488478-vmss000002edgehub-cbb55c6c-zbt8g Running aks-agentpool-15488478-vmss000002iotedged-7d589b8b7-6jg7v Running aks-agentpool-15488478-vmss000001module01-6cb46d8486-n5qst Running aks-agentpool-15488478-vmss000001module02-54d54cf768-qpl6v Running aks-agentpool-15488478-vmss000001Note : When you set (or change) node selector, the current pod is terminated and re-deployed as a new pod.
Even when you update node selector in native Kubernetes (usingkubectl patch deploymentcommand), the device manifest (in IoT Hub) will not be changed. (It’s not bi-directional.)
Example : Persistent Volume (Failure Resilience or State Sharing)
In current deployment, the state is not maintained, because data is not preserved across container restarts.
In Kubernetes, a persistent volume is used to keep the state for improved reliability (resilience or sharing across pods). This volume can be mounted in a pod, and the state is persisted even when a container restarts or a pod is terminated.
Here I show you how to mount a persistent volume in module01 using createOptions settings.
Before settings, we need to prepare a persistent volume claim (pvc) in our cluster.
In Azure Kubernetes Service (AKS), you can use the following built-in storage class, with which the persistent volume can be provioned.
In this example, we use azurefile, which is a class of Azure File Storage with Standard LRS sku.
kubectl get storageclassNAMEPROVISIONERazurefile kubernetes.io/azure-fileazurefile-premium kubernetes.io/azure-filedefault (default) kubernetes.io/azure-diskmanaged-premium kubernetes.io/azure-diskUsing this storage class, we create a persistent volume claim (pvc) named azurefile as follows.
Note : When you run the following command, Azure File storage account is automatically created in node resource group (i.e, a resource group named “MC_{ResourceGroupName}_{ClusterName}_{region}”). You don’t need to create an Azure storage account by yourself.
cat << EOF | kubectl apply -f -apiVersion: v1kind: PersistentVolumeClaimmetadata: name: azurefile namespace: ns01spec: accessModes:- ReadWriteMany storageClassName: azurefile resources:requests: storage: 1GiEOFNow we have a persistent volume claim (pvc) named “azurefile“. Now let’s start to mount this volume in a pod (module01). Here we’ll mount this volume as /teststorage directory.
To mount this volume, you should add the following configuration in createOptions settings in deployment manifest.
createOptions.k8s-extensions
"k8s-experimental": { "volumes": [{"volume": { "name": "pvcvol", "persistentVolumeClaim": {"claimName": "azurefile" }},"volumeMounts": [{ "name": "pvcvol", "mountPath": "/teststorage"}] }]}As you saw above, this configuration (json) should be escaped as a string and added to createOptions in deployment manifest (deployment.json) as follows.
Modified manifest (deployment.json)
{ "modulesContent": {"$edgeAgent": { "properties.desired": {"schemaVersion": "1.0","runtime": { "type": "docker", "settings": {"minDockerVersion": "v1.25","loggingOptions": "", }},"systemModules": { "edgeAgent": {"type": "docker","settings": { "image": "mcr.microsoft.com/azureiotedge-agent:1.0", "createOptions": "{}"} }, "edgeHub": {"type": "docker","status": "running","restartPolicy": "always","settings": { "image": "mcr.microsoft.com/azureiotedge-hub:1.0", "createOptions": "{\"HostConfig\":{\"PortBindings\":{\"5671/tcp\":[{\"HostPort\":\"5671\"}],\"8883/tcp\":[{\"HostPort\":\"8883\"}],\"443/tcp\":[{\"HostPort\":\"443\"}]}}}"} }},"modules": { "module01": {"version": "1.0","type": "docker","status": "running","restartPolicy": "always","settings": { "image": "tsmatz/iot-module-sample01:1.0.0", "createOptions": "{\"HostConfig\":{\"PortBindings\":{\"8081/tcp\":[{\"HostPort\":\"8081\"}]}},\"k8s-experimental\": {\"nodeSelector\": {\"testlabel\": \"device01\"},\"volumes\":[{\"volume\":{\"name\":\"pvcvol\",\"persistentVolumeClaim\":{\"claimName\":\"azurefile\"}},\"volumeMounts\":[{\"name\":\"pvcvol\",\"mountPath\":\"/teststorage\"}]}]}}"} }, "module02": {"version": "1.0","type": "docker","status": "running","restartPolicy": "always","settings": { "image": "tsmatz/iot-module-sample02:1.0.0", "createOptions": "{\"k8s-experimental\": {\"nodeSelector\": {\"testlabel\": \"device01\"}}}"} }} }},"$edgeHub": { "properties.desired": {"schemaVersion": "1.0","routes": { "SampleModuleToModule": "FROM /messages/modules/module01/outputs/output1 INTO BrokeredEndpoint(\"/modules/module02/inputs/input1\")"},"storeAndForwardConfiguration": { "timeToLiveSecs": 7200} }} }}Now upload your manifest into your IoT Hub.
az iot edge set-modules \ --hub-name {YOUR IOT HUB NAME} \ --device-id device01 \ --content ./deployment.jsonAfter a while, you can see the volume is mounted in your container “module01”.
# Get the name for re-deployed pod "module01"kubectl get pods \ -l net.azure-devices.edge.module=module01 \ -n ns01NAME STATUS NODEmodule01-67458b6bcf-kzrc4 Running aks-agentpool-15488478-vmss000001# Connect to a running containerkubectl -n ns01 exec \ -it module01-67458b6bcf-kzrc4 \ --container module01 \ /bin/bash> # list dirs in root> ls /> usr lib opt sbin sys teststorage ...> # change dir to /teststorage> cd /teststorage> # exit shell> exitIf you mount a volume in built-in system modules (such as, edgeHub and edgeAgent), you should also set an environment variable called storageFolder with createOptions to make modules to point to a storage folder in a container. (See “Give modules access to a device’s local storage” in IoT Edge document.)
createOptions.Env
"createOptions": { "Env": ["storageFolder=/teststorage" ], ...}Especially, iotedged must be backed by persistent volumes in production use, since IoT Edge security daemon requires the certificates to be retained in production. (See here for details.)
Here I don’t describe how to configure this settings (setting up persistent volumes in iotedged), but please see “4.5 Setup iotedged for failure resilience” for these settings.
Reference :
GitHub – Deploy Azure IoT Edge on Kubernetes (Preview)
https://microsoft.github.io/iotedge-k8s-doc/
Categories: Uncategorized

when I follow this Module 1 doesnt start but the other modules do. any ideas?
LikeLike