
Here I show you how to run deep learning tasks on Azure Databricks using simple MNIST dataset with TensorFlow programming.
With this tutorial, you can also learn basic usage of Azure Databricks through lifecycle, such as — managing your cluster, analytics in notebook, working with external libraries, working with surrounding Azure services (and security), submitting a job for production, etc.
As you know, many of deep learning frameworks itself is having capabilities for distributed training without Apache Spark. (For instance, TensorFlow is having Distributed TensorFlow.) But it will be still useful to run distributed training using Apache Spark for several reasons, such as : you can integrate other computing operations (data prep, transform, other machine learning tasks, …) with completely distributed manners, or it enables you to run step-by-step for debugging (in notebooks) on driver node, etc, etc.
Here I only run TensorFlow jobs, but you can easily use a lot of open-source ecosystem on Apache Spark with distributed manner by using fully-managed Azure Databricks.
Note : Currently you cannot have GPUs on Azure Databricks and please wait for running GPU-accelerated deep learning workloads. GPU accelerated driver node and workers has just started as beta and new Databricks Runtime ML is offered.
With new Databricks Runtime ML, both HorovodEstimator (estimator API that leverages Uber’s Horovod framework) and TensorFlow library are already built-in and soon you can start your TensorFlow programming with optimized environment.
See my step-by-step tutorial (Databricks’ Hands-On lab) for Horovod Estimator.
What is Azure Databricks, Shortly ?
For ones who doesn’t know about Databricks, here I describe the brief outline of Azure Databricks.
Azure Databricks is fully-managed Spark cluster for advanced analytics, which includes a variety of built-in components for advanced analytics, like notebook, language runtime, libraries, visualizations, and so forth. This is optimized Spark environment, and more than 10x faster compared with ordinary cloud or on-premise deployment.
It’s not a 3rd party Azure application (it’s one of the 1st party supported services by Microsoft and Databricks Inc, which company is a founder of Apache Spark) and you can soon start with only Azure subscription. You can also take first-class Azure support service for asking about Databricks against a variety of issues.
The architecture is also flexible.
When you create your Databricks artifacts (notebooks, clusters, etc), the computing components like VMs, VNet and disk images are provisioned in your Azure subscription, and other control components, such as cluster manager, job scheduling, dashboard offering and so forth are provisioned in Databricks account on Azure.
You can soon start a notebook (serverless notebook) without starting clusters. However, on the other hand, you can view these computing resources in your subscription and collaborate with your other computing resources. (For instance, peering with VNet, communicating with on-premise thru VNet, etc.)
Azure Databricks is a managed application in Microsoft Azure, and these computing resources in your subscription are all managed and locked by Azure Databricks (these are all in separated managed resource group), though these are visible and charged in your billing.
Note : Azure Databricks is also charged for Databricks DBU consumption, not only computing consumption. (See pricing for details.)
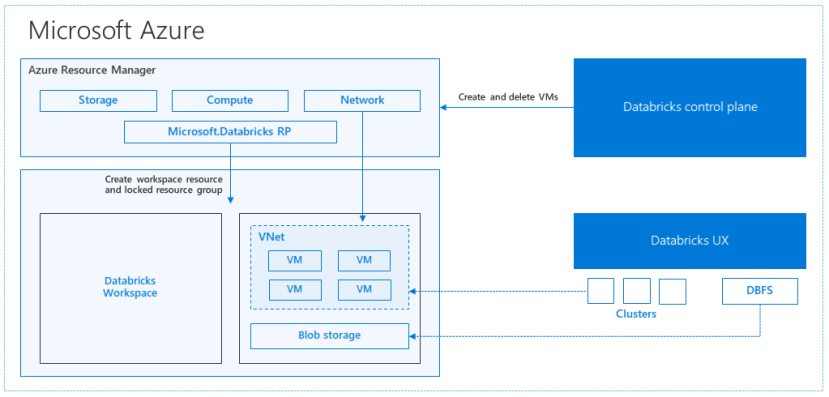
Picture from “A technical overview of Azure Databricks” in Azure team blog (see here)
With Azure Databricks, you can soon start programming and run by turning on your cluster, and then it would lower a barrier for your starting Apache Spark. Moreover you can also take more advanced management capabilities, such as automatic recovery in failure, automatic upgrades with zero-downtime, autoscaling of instance storage and so on and forth, and you can focus on your analytics with advanced distributed machine learning platform.
Azure Databricks is tightly integrated with a variety of Azure services.
As you can see later in this post, Azure Databricks is secured by native Azure permissions (Azure AD and RBAC), same like other built-in Azure services. This control by Azure AD ensures that only authorized users can access their artifacts (clusters, notebooks, jobs, etc). For instance, some users might be able to create and run notebooks, but not be able to create clusters.
Azure Databricks is also having a lot of built-in functionalities working with surrounding Azure services like Blob, SQL Database, Cosmos DB, Data Factory, Power BI, etc. You can take optimized throughput or execution with these built-in components (built-in connectors), such as high-performance data loading (integrated with PolyBase), data read parallelism (for SQL Data Warehouse), and distributed processing (between Spark worker nodes and Cosmos DB data nodes), etc.
In this post we simply use and interact with Azure Data Lake Storage (ADLS) for your beginning.
For more details, see “Azure team blog : A technical overview of Azure Databricks“.
Learn key features with step-by-step Databricks HOL in my GitHub repo.
Start Azure Databricks
Now let’s see how to use Azure Databricks using Distributed TensorFlow training example.
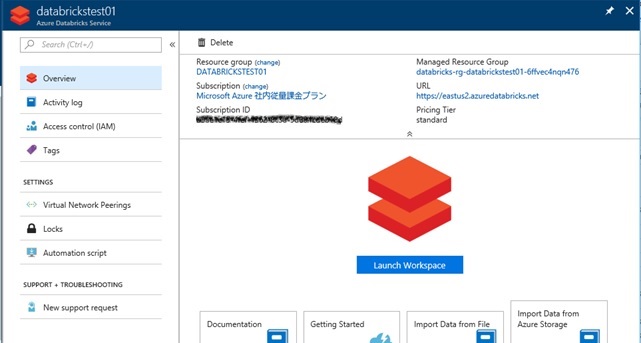
First of all, you create Azure Databricks service using Azure Portal. After your service instance is created, please press “Launch Workspace” (see below) to launch Databricks UI.
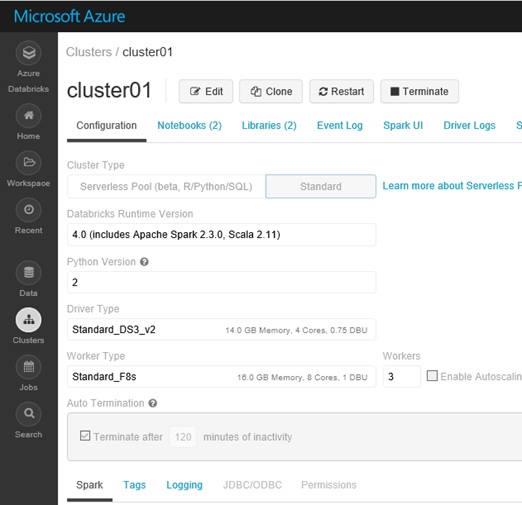
In Databricks UI, fisrt you click “Clusters” in the left side navigation and create your first cluster (interactive cluster) in Databricks service.
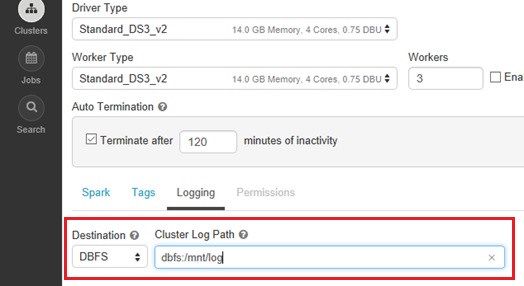
When you create a cluster, you can specify the size of VM instances (VM size), the number of workers, whether to use autoscaling, etc, but you can also easily change these settings using “Edit” button, even after creation.
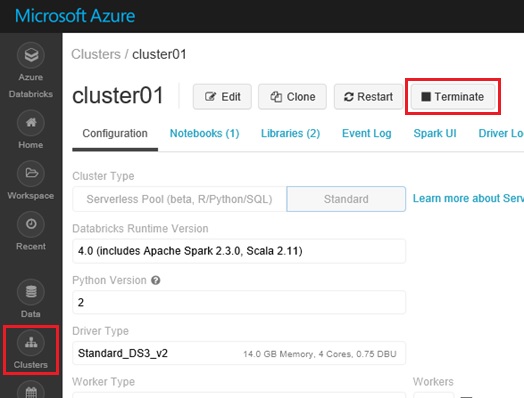
Note that, while your cluster is running, your usage (both computing cost and DBU cost) is charged and get billed by minutes. When you don’t need to use, you can soon terminate your cluster with only one click (see below), or you can set auto termination, which automatically stop your cluster when it’s not in use for certain time.
Note : When you terminate your cluster, the disk image is also gone and not charged.
I also recommend to set logging (log transfer folder) on cluster settings, because you can transfer logs (stdout or stderr) into the mounted DBFS folder (i.e, Azure Blob, Azure Data Lake Store) and soon you can download all nodes’ logs on your working client. (Later I’ll describe how to mount your Azure Data Lake Store in your cluster.)
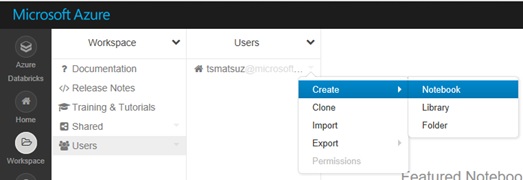
After your cluster is started, you can create your notebook on your workspace and soon you can start to generate your distributed programming code. (Or you can create notebook without attaching to your cluster.)
Set up Service Principal and Permissions for ADLS
In this post, we use data (training data and generated models) on Azure Data Lake Stores (ADLS) for our TensorFlow jobs. ADLS is HDFS-based file storage in Azure and easy to use.
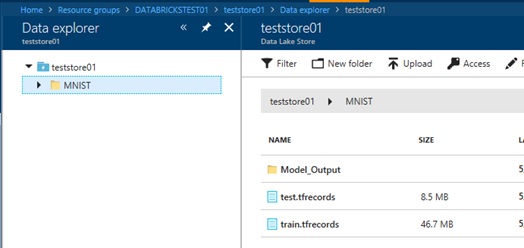
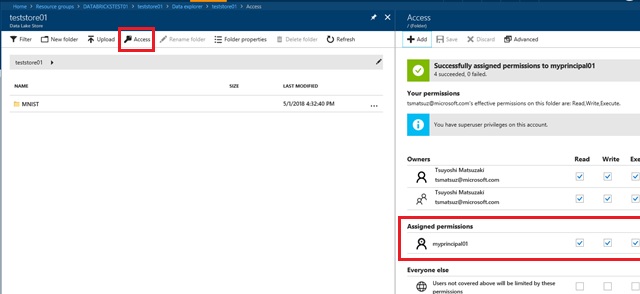
After you create your ADLS account, you put the training data (train.tfrecords) – which is generated from well-known MNIST dataset – on ADLS using Data Explorer in Azure Portal. (See the following screenshot.)
Note : Here I’m using .tfrecords (TensorFlow record format), but for the efficient file IO, it’s better to use parquet for training inputs. (Spark dataframe is supported in tensorflowonspark.pipeline.TFEstimator .)
For the purpose of accessing ADLS from your Azure Databricks’ cluster, you should first create a service principal in Azure Active Directory (Azure AD) and set “read” and “write” permissions for ADLS in ADLS Data Explorer as follows.
For more details about service principal and RBAC, please see “Use Azure REST API without interactive Login UI” in my early post.
Mount ADLS
There are several ways to access Azure Data Lake store (ADLS) from Azure Databricks (see here), but here we use Databricks File System (DBFS) by mounting ADLS.
Please see “Databricks File System – DBFS” for more details about DBFS. Shortly it is a persistent file system which can be connected to external storage (Azure Blob Storage, Azure Data Lake Store) and data is not lost even after cluster termination. Once it’s created, it can be shared by all workers in cluster (but data can be cached on the local disk of workers).
Please create your notebook and run once the following Python code in your cluster. Then your ADLS folder is mounted on dbfs:/mnt/mnist.
(Note that “6da13c5c-…” should be your service principal id, “htytxWiKY…” is service principal’s secret, “yourtenant.onmicrosoft.com” is your tenant domain in Azure AD, “teststore01” is your ADLS account, and “MNIST” is the folder name in your ADLS.)
Note : Here we’re writing secret’s (key’s) information (following “dfs.adls.oauth2.credential“) with plain text in my code, but you also can use Databricks Secrets API for managing and protecting your secrets.
run_once.py
configs = { "dfs.adls.oauth2.access.token.provider.type": "ClientCredential", "dfs.adls.oauth2.client.id": "6da13c5c-504f-4fe4-93db-bb697f016a71", "dfs.adls.oauth2.credential": "htytxWiKY...", "dfs.adls.oauth2.refresh.url": "https://login.microsoftonline.com/yourtenant.onmicrosoft.com/oauth2/token"}dbutils.fs.mount( source = "adl://teststore01.azuredatalakestore.net/MNIST", mount_point = "/mnt/mnist", extra_configs = configs)Once you have mounted, you can access with DBFS CLI, dbutils, Spark API, or local file APIs (accessed by /dbfs/{mount point} using local file APIs).
Install Required Libraries
In this post we use TensorFlowOnSpark (TFoS) for running TensorFlow’s distributed training job in Spark cluster. (You can also use Horovod for TensorFlow’s distributed job. CNTK or BigDL is also available in Azure Databricks.)
Before building your code, you must install libraries for TensorFlow and TensorFlowOnSpark as follows.
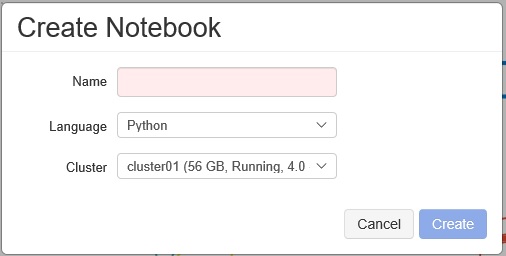
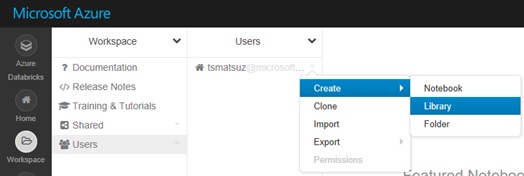
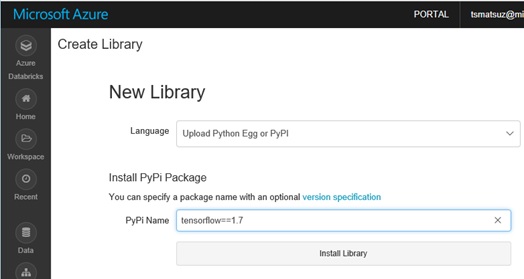
With Databricks UI, select “Create” – “Library” in your workspace and install “tensorflow==1.7” (“tensorflow-gpu==1.7” when using GPU) of PyPi package as following screenshot. (The package is installed with pip.)
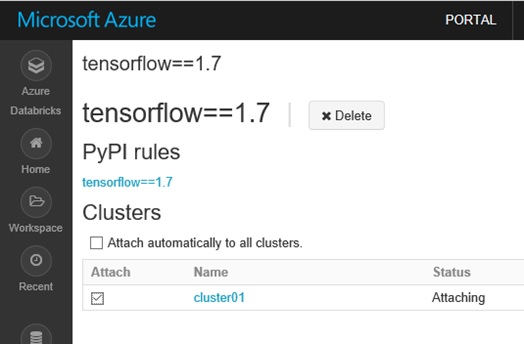
After installed, please attach the TensorFlow package to your generated cluster. (See below.)
Note : If you get errors (“No module named google.protobuf”, “cannot import name pywrap_tensorflow”, etc) when using TensorFlow library, please detach / reattach your notebook to the cluster and try again.
Next you should install TensorFlowOnSpark library and attach to your cluster.
First you clone TensorFlowOnSpark from Github repo and build TensorFlowOnSpark egg from the source code by running the following command in your local machine. (Then .egg file is generated.)
python setup.py bdist_egg
Next you can upload your own egg (.egg file) into Databricks’ cluster using the same UI by selecting “Create” – “Library”.
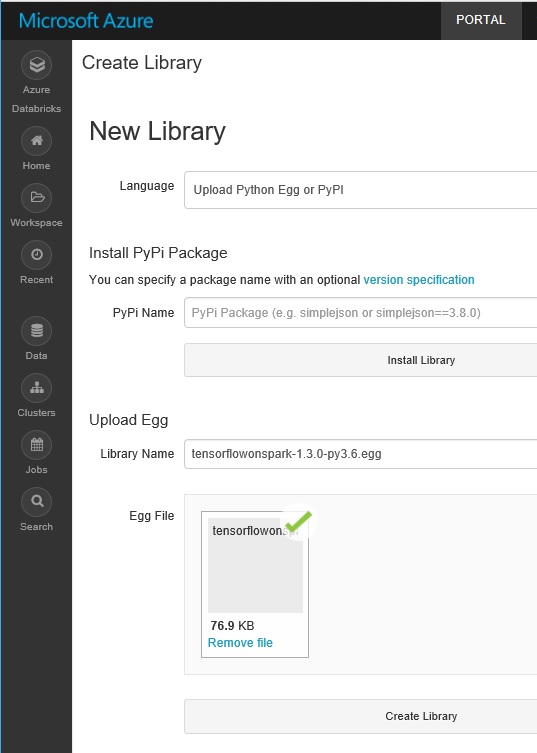
After you upload and attach the egg to your cluster, now you can use latest TensorFlowOnSpark in your Databricks’ cluster.
Run Your Code for Analytics
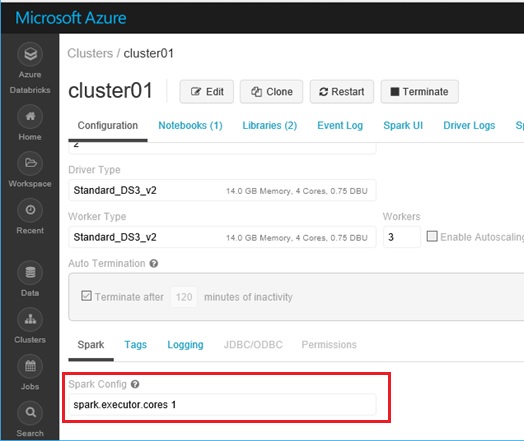
Before start programming, you must set 1 for spark.executor.cores in Spark configuration on Databricks’ cluster (push “Edit” button in cluster pane), because now we must use CPU instances for workers in Azure Databricks. <- (Added on May 2018) Now you can use GPU instances in Azure Databricks.
After the configuration is changed, you must restart your cluster.
Now let’s create new Python notebook for programming distributed jobs.
Here we use the same logic as useful example “@Subaru : End-to-End Example for Distributed TensorFlow” for our distributed training with well-known MNIST dataset. The following is our sample code and highlighted lines are the modified lines for our Spark distributed programming.
I explain the outline of this code as follows.
First the following run_server function is the entry point for our TensorFlowOnSpark tasks and TFNode starts TensorFlowOnSpark server on all workers. Almost all the logic is the same as regular Distributed TensorFlow, but you don’t need to specify ClusterSpec, because TensorFlowOnSpark framework generates ClusterSpec automatically along with your cluster settings.
For a large number of IO, here we use local file system (not DBFS) for working files and copy (sync periodically) results into mounted DBFS.
Note : Do not use mounted file system for running the large working tasks with IO. (Copy to local file system.) See here for details.
In the initial stage, our training data (train.tfrecords) exists on DBFS mounted directory /dbfs/mnt/mnist (which is physically on Azure Data Lake Storage), then these are copied into the local file system for training.
The trained model output (here we use checkpoint files) are saved in local file system and periodically synced with mounted DBFS directory /dbfs/mnt/mnist/Model_Output.
Finally we can download the output from Azure Data Lake Storage. (You can evaluate, re-train, and predict using these output results.)
Here we’re using MonitoredTrainingSession for Distributed TensorFlow, but you can also work with high-level TensorFlow Estimator class (see here) using latest TensorFlowOnSpark.
import mathimport osimport shutilimport timefrom threading import Thread, Eventimport tensorflow as tffrom tensorflowonspark import TFNodebatch_size = 100sync_interval = 20train_filename = 'train.tfrecords'dbfs_data_dir = '/dbfs/mnt/mnist'local_data_dir = '/tmp/mnist-data'dbfs_out_dir = '/dbfs/mnt/mnist/Model_Output'local_out_dir = '/tmp/mnist-model'def run_server(args, ctx): # copy data file from dbfs to local file system dbfs_train_file = os.path.join(dbfs_data_dir, train_filename) local_train_file = os.path.join(local_data_dir, train_filename) if os.path.exists(local_data_dir):shutil.rmtree(local_data_dir) os.makedirs(local_data_dir) shutil.copy(dbfs_train_file, local_train_file) # create new model dir if os.path.exists(local_out_dir):shutil.rmtree(local_out_dir) os.makedirs(local_out_dir)# sync model dir every seconds class MyThread(Thread):def __init__(self, event): Thread.__init__(self) self.stopped = eventdef run(self): while not self.stopped.wait(sync_interval):out_files = os.listdir(local_out_dir)for out_file in out_files: out_file_fullpath = os.path.join(local_out_dir, out_file) if (os.path.isfile(out_file_fullpath)):shutil.copy(out_file_fullpath, dbfs_out_dir)print('model file is synced at %s %d' % (ctx.job_name, ctx.task_index)) stopFlag = Event() thread = MyThread(stopFlag) thread.start() # run server with TensorFlowOnSpark cluster, server = TFNode.start_cluster_server(ctx, num_gpus=0) # proceed each server roles (training or parameter) if ctx.job_name == 'ps':server.join() elif ctx.job_name == 'worker':train(ctx.job_name, ctx.task_index, cluster, server) else:raise ValueError('invalid job_name')# timer stop stopFlag.set()def train(job_name, task_index, cluster, server): with tf.device(tf.train.replica_device_setter(worker_device='/job:%s/task:%d' % (job_name, task_index),cluster=cluster)): ###### Training### ## read training data# # image - 784 (=28 x 28) elements of grey-scaled integer value [0, 1]# label - digit (0, 1, ..., 9)local_train_file = os.path.join(local_data_dir, train_filename)train_queue = tf.train.string_input_producer( [local_train_file], num_epochs = 2) # data is repeated and it raises OutOfRange when data is overtrain_reader = tf.TFRecordReader()_, train_serialized_exam = train_reader.read(train_queue)train_exam = tf.parse_single_example( train_serialized_exam, features={'image_raw': tf.FixedLenFeature([], tf.string),'label': tf.FixedLenFeature([], tf.int64) })train_image = tf.decode_raw(train_exam['image_raw'], tf.uint8)train_image.set_shape([784])train_image = tf.cast(train_image, tf.float32) * (1. / 255)train_label = tf.cast(train_exam['label'], tf.int32)train_batch_image, train_batch_label = tf.train.batch( [train_image, train_label], batch_size=batch_size) ## define training graph# # define inputplchd_image = tf.placeholder( dtype=tf.float32, shape=(batch_size, 784))plchd_label = tf.placeholder( dtype=tf.int32, shape=(batch_size)) # define network and inference# (simple 2 fully connected hidden layer : 784->128->64->10)with tf.name_scope('hidden1'): weights = tf.Variable(tf.truncated_normal( [784, 128], stddev=1.0 / math.sqrt(float(784))),name='weights') biases = tf.Variable(tf.zeros([128]),name='biases') hidden1 = tf.nn.relu(tf.matmul(plchd_image, weights) + biases)with tf.name_scope('hidden2'): weights = tf.Variable(tf.truncated_normal( [128, 64], stddev=1.0 / math.sqrt(float(128))),name='weights') biases = tf.Variable(tf.zeros([64]),name='biases') hidden2 = tf.nn.relu(tf.matmul(hidden1, weights) + biases)with tf.name_scope('softmax_linear'): weights = tf.Variable(tf.truncated_normal( [64, 10], stddev=1.0 / math.sqrt(float(64))), name='weights') biases = tf.Variable(tf.zeros([10]),name='biases') logits = tf.matmul(hidden2, weights) + biases # define optimizationglobal_step = tf.train.create_global_step() # start without checkpointoptimizer = tf.train.GradientDescentOptimizer( learning_rate=0.07)loss = tf.losses.sparse_softmax_cross_entropy( labels=plchd_label, logits=logits)train_op = optimizer.minimize( loss=loss, global_step=global_step) ## run session#with tf.train.MonitoredTrainingSession( master=server.target, checkpoint_dir=local_out_dir, is_chief=(task_index == 0)) as sess: # when data is over, OutOfRangeError occurs and ends with MonitoredSessionstep = 0 array_image, array_label = sess.run([train_batch_image, train_batch_label]) while not sess.should_stop():feed_dict = { plchd_image: array_image, plchd_label: array_label}_, loss_value, array_image, array_label = sess.run( [train_op, loss, train_batch_image, train_batch_label], feed_dict=feed_dict)step += 1if step % 100 == 0: # You can also use tf.train.LoggingTensorHook for output print('Worker: Step %d (Loss: %.2f)' % (step, loss_value))# wait for seconds to complete sync time.sleep(sync_interval + 10) print('training finished')Now we can call this entry point (run_server function) with the following TFCluster.run() and it launches tasks on all workers. (Press “Run All” in your notebook to start !)
Here we use 3 Spark workers — one parameter node and two worker nodes for Distributed TensorFlow.
from tensorflowonspark import TFClustercluster = TFCluster.run( sc=sc, map_fun=run_server, tf_args=[], num_executors=3, num_ps=1, tensorboard=False, input_mode=TFCluster.InputMode.TENSORFLOW)cluster.shutdown()
After running, you can monitor jobs using Spark UI in your cluster.

Same as other notebook experience (like jupyter), you can also visualize data or output results (plotting) in your notebook.
Note : Sorry but visualizing by Tensorboard is not supported in Azure Databricks now. To view results in Tensorboard UI, please download the output and run tensorboard command on external machine.
Here we wrote our code in only one notebook, but you can also separate your code in multiple notebooks and run another notebook with dbutils.notebook.run() (or %run) command. Databricks notebook can be parameterized and get return values, and finally you can create complex workflows using Databricks notebook combination.
Schedule a job
Previously we examined our Spark code for analytics and experimentation using notebook UI.
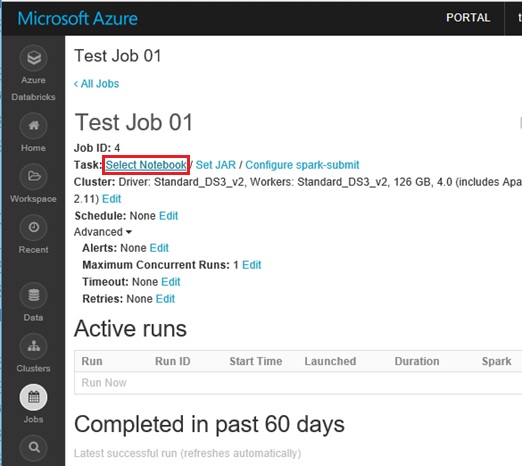
After you’ve complete your exploration in Databricks, next you can create and schedule a job by invoking your finalized notebook as well as regular spark-submit. That is, you can use notebook itself for scheduling a job and you don’t need to change (or re-write) for production use.
See the following screenshots.
Note : You can run commands for management tasks like cluster start, terminate, restart, viewing job status, job scheduling, and so forth inside your notebook pane. You can keep to stay in your notebook while developing. (You don’t need to move to other panes during development-time.)
Using a notebook for creating a job
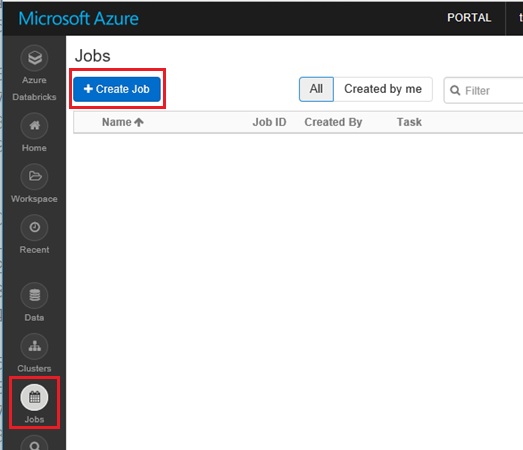
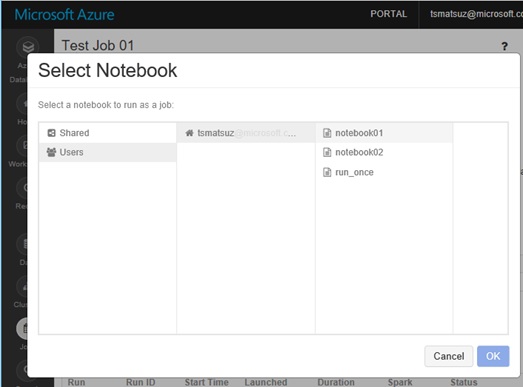
With this screenshots I create a job with Databricks UI, but you can also remotely create using Databricks’ REST API. (Here I don’t describe about details and see the following reference.)
Azure Databricks REST API – Jobs API
https://docs.azuredatabricks.net/api/latest/jobs.html
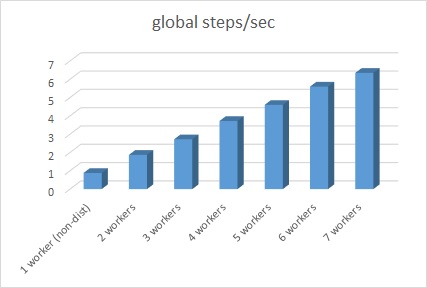
For your reference, I attach the following performance results by CPU instances (Standard F8s — Intel Xeon Haswell, 8 cores and 16 GB memory) using CIFAR-10 ResNet32 to show how it scales. (Currently you can run GPU accelerated Spark jobs using aztk in Azure.)
Now GPU accelerated instances are available in Azure Databricks. When using Tesla K80 workers, you can take performance more than 5x faster. (Added on May 2018)
Learn Azure Databricks with step-by-step HandsOn !
Categories: Uncategorized

Hey very nice blog!! Man .. Beautiful .. Superb ..
I will bookmark your website and take the feeds additionally?
I am happy to find so many useful information here within the post, we
need work out extra strategies on this regard, thanks for sharing.
. . . . .
LikeLike
It’s awesome to pay a quick visit this web site and reading the views of
all mates about this piece of writing, while I am also
eager of getting know-how.
LikeLike
Awesome issus here. I am very glad to see your post.
Thanks a lot and I’m looking forward to contact you. Will you please drop me a e-mail?
LikeLike
This is a good tiip especially to thoose new to tthe blogosphere.
Simple but very precise info… Thanks for sharing this
one. A mst read post!
LikeLike
If some one needs expert view on the topic of blogging after that
i suggest him/her to go to see this website, Keep up the good work.
LikeLike