
The gaming will be the best place to run and learn reinforcement learning (RL).
This post shows you tutorials of how to use Malmo platform and MineRL to run RL in Minecraft.
Minecraft is the most popular video game and provides various styles of games – such as, crafting, survival, and finding items. As you can see in this post, one of important benefits to use Malmo platform is that you can configure a variety of games as you like.
In the former part of this post, I’ll show you primitive usage of Malmo and MineRL.
And in the latter part of this post, I’ll show you reinforcement learning example running on Malmo platform.
Table of Contents
- Malmo platform
- MineRL
- Simple Reinforcement Learning example in Minecraft (Project Malmo)
Note (Dec 2022) : Today, there exist a lot of research works for SOTA algorithms/models to play Minecraft.
For instance, NVIDIA research team has developed a generally capable agent, which is learned from a vast amount of internet resources – such as, YouTube videos, Wiki pages, and other webpages – and is trained in the platform, MineDojo, which is also built on Malmo platform. In this research, they have developed a model (called MineCLIP) to associate video snippets with video’s transcript (language descriptions), and then trained an agent by reinforcement learning without manually shaping.
OpenAI has also developed an agent (which works on MineRL environment), which is learned using Minecraft videos. First, videos were annotated by human contractors. They have trained so-called Inverse Dynamics Models (IDM) to pick up actions from a vast amount of videos and an agent is then trained by imitation learning with this annotated data. (It’s then finally adjusted by reinforcement learning.)
These research works speed up (shortcut) learning with a lot of internet resources (such as, YouTube videos) instead of training an agent from scratch. This can be done by the fact that Minecraft is the world’s most played game and it then has a lot of internet resources for playing.
1. Malmo platform
Malmo platform is built on top of modded Minecraft.
Using Malmo platform, you can programmatically trace an agent and get the observation results in Minecraft. Depending on your game definitions (definitions in mission files), you can run a variety of reinforcement learning (RL) workloads – such as, racing, chasing, fighting, or finding items, etc.
In this section, I’ll describe how your agent can work on Malmo platform.
Installation and Settings (Malmo)
In this post, I assume installation on Ubuntu 20.04, in which Python 3.8 is pre-installed.
(Here I have used Ubuntu Server 20.04 LTS in Microsoft Azure.)
First, install required packages in Ubuntu as follows.
Malmo is built on Minecraft Java edition (Forge edition) with mods and we then setup JDK version 8.
# update package informationsudo apt-get update# install required componentssudo apt-get install \ build-essential \ libpython3.8-dev \ openjdk-8-jdk \ swig \ doxygen \ xsltproc \ ffmpeg \ python-tk \ python-imaging-tk \ zlib1g-dev# set environment for Javaecho -e "export JAVA_HOME=/usr/lib/jvm/java-8-openjdk-amd64" >> ~/.bashrcsource ~/.bashrc# update certificatessudo update-ca-certificates -fIn order to build Malmo, we install cmake as follows.
mkdir ~/cmakecd ~/cmakewget https://cmake.org/files/v3.12/cmake-3.12.0.tar.gztar xvf cmake-3.12.0.tar.gzcd cmake-3.12.0./bootstrapmake -j4sudo make installcdMalmo depends on Boost components, and we should then install Boost as follows.
mkdir ~/boostcd ~/boostwget http://sourceforge.net/projects/boost/files/boost/1.67.0/boost_1_67_0.tar.gztar xvf boost_1_67_0.tar.gzcd boost_1_67_0./bootstrap.sh --with-python=/usr/bin/python3.8 --prefix=../b2 link=static cxxflags=-fPIC installcdNote : Python 3.8 requires Boost 1.67 or later.
Now, let’s download and build Malmo.
First, we download Malmo from GitHub repository.
git clone https://github.com/Microsoft/malmo.git ~/MalmoPlatformwget https://raw.githubusercontent.com/bitfehler/xs3p/1b71310dd1e8b9e4087cf6120856c5f701bd336b/xs3p.xsl -P ~/MalmoPlatform/Schemasecho -e "export MALMO_XSD_PATH=$PWD/MalmoPlatform/Schemas" >> ~/.bashrcsource ~/.bashrccd ~/MalmoPlatformBefore building Malmo, you should fix a bug in CMakeLists.txt.
Open CMakeLists.txt in editor (such as, nano) and replace VERSION_GREATER with VERSION_GREATER_EQUAL in line 60 as follows.
# Fix : VERSION_GREATER --> VERSION_GREATER_EQUAL# if (Boost_VERSION VERSION_GREATER 1.67 )if (Boost_VERSION VERSION_GREATER_EQUAL 1.67 ) # From version 1.67 and up, Boost appends the Python version number to # the library name by default. # (https://www.boost.org/users/history/version_1_67_0.html) execute_process(COMMAND python3 -c "import sys; print('python' + str(sys.version_info[0]) + str(sys.version_info[1]), end='')" OUTPUT_VARIABLE BOOST_PYTHON_NAME )Now you can build Malmo as follows.
mkdir buildcd buildcmake -DBoost_INCLUDE_DIR=/home/$USER/boost/boost_1_67_0/include -DUSE_PYTHON_VERSIONS=3.8 -DBoost_VERSION=1.67 -DCMAKE_BUILD_TYPE=Release ..make installcdNote : It might show errors for downloading assets from
http://resources.download.minecraft.net/(nothttps://) in building Minecraft, but you can ignore.
The compiled library ./install/Python_Examples/MalmoPython.so is the entry point for Malmo Python package.
Mission File (XML)
The beauty of Malmo is the flexibility for building your own game with XML definition, which is called a mission file. (Mission file is also used in MineRL.)
In this example, please prepare the following sample definition’s file, lava_maze.xml.
lava_maze.xml
<Mission xmlns="http://ProjectMalmo.microsoft.com" xmlns:xsi="http://www.w3.org/2001/XMLSchema-instance"> <About><Summary>Avoid Lava</Summary> </About> <ModSettings><MsPerTick>1</MsPerTick> </ModSettings> <ServerSection><ServerInitialConditions> <Time><StartTime>0</StartTime><AllowPassageOfTime>false</AllowPassageOfTime> </Time> <Weather>clear</Weather> <AllowSpawning>false</AllowSpawning></ServerInitialConditions><ServerHandlers> <FlatWorldGenerator generatorString="3;7,220*1,5*3,2;3;,biome_1"/> <DrawingDecorator><DrawSphere x="-29" y="70" z="-2" radius="100" type="air"/><DrawCuboid x1="-34" y1="70" z1="-7" x2="-24" y2="70" z2="3" type="lava" /> </DrawingDecorator> <MazeDecorator><Seed>random</Seed><SizeAndPosition width="5" length="5" height="10" xOrigin="-32" yOrigin="69" zOrigin="-5"/><StartBlock type="emerald_block" fixedToEdge="true"/><EndBlock type="lapis_block" fixedToEdge="true"/><PathBlock type="grass"/><FloorBlock type="air"/><GapBlock type="lava"/><GapProbability>0.6</GapProbability><AllowDiagonalMovement>false</AllowDiagonalMovement> </MazeDecorator> <ServerQuitFromTimeUp timeLimitMs="15000000" description="out_of_time"/> <ServerQuitWhenAnyAgentFinishes/></ServerHandlers> </ServerSection> <AgentSection mode="Survival"><Name>Agent0</Name><AgentStart> <Placement x="-28.5" y="71.0" z="-1.5" pitch="70" yaw="0"/></AgentStart><AgentHandlers> <VideoProducer want_depth="false"><Width>800</Width><Height>600</Height> </VideoProducer> <DiscreteMovementCommands/> <RewardForMissionEnd><Reward description="out_of_time" reward="-100" /> </RewardForMissionEnd> <RewardForTouchingBlockType><Block reward="-100" type="lava" behaviour="onceOnly"/><Block reward="100" type="lapis_block" behaviour="onceOnly"/> </RewardForTouchingBlockType> <RewardForSendingCommand reward="-1"/> <AgentQuitFromTouchingBlockType><Block type="lava" /><Block type="lapis_block" /> </AgentQuitFromTouchingBlockType></AgentHandlers> </AgentSection></Mission>Now let me introduce the brief outline of this mission (lava_maze.xml).
In this mission, we start to create Minecraft’s world with superflat biome. (See here for superflat biome in Minecraft.)
You can also use other biomes in mission – such as, bringing your own world map in Malmo.
<FlatWorldGenerator generatorString="3;7,220*1,5*3,2;3;,biome_1"/>In this flat world, it fills the lava in a range between (-34, 70, -7) and (-24, 70, 3).
<DrawingDecorator> ... <DrawCuboid x1="-34" y1="70" z1="-7" x2="-24" y2="70" z2="3" type="lava" /> </DrawingDecorator>Next it randomly creates a maze, in which the start block is an emerald block and the goal block is a lapis block.
The path is then filled with grass blocks.
<MazeDecorator> <Seed>random</Seed> <SizeAndPosition width="5" length="5" height="10" xOrigin="-32" yOrigin="69" zOrigin="-5"/> <StartBlock type="emerald_block" fixedToEdge="true"/> <EndBlock type="lapis_block" fixedToEdge="true"/> <PathBlock type="grass"/> <FloorBlock type="air"/> <GapBlock type="lava"/> <GapProbability>0.6</GapProbability> <AllowDiagonalMovement>false</AllowDiagonalMovement></MazeDecorator>In this mission, your agent can take the following rewards.
- The time is up : reward = -100
- The agent on lava : reward = -100
- The agent on lapis block (goal) : reward = 100
- The agent proceeds : reward = -1 for each step
<RewardForMissionEnd> <Reward description="out_of_time" reward="-100" /></RewardForMissionEnd><RewardForTouchingBlockType> <Block reward="-100" type="lava" behaviour="onceOnly"/> <Block reward="100" type="lapis_block" behaviour="onceOnly"/></RewardForTouchingBlockType><RewardForSendingCommand reward="-1"/>Malmo includes various kinds of reward’s definitions and you can then build a variety of missions (such as, finding items, damaging mobs, etc) combining with these definitions.
Note : For available rewards, please see the Handler’s reference in Malmo document.
When the agent reaches to the lava (which will result into death) or lapis blocks (goal), this mission will be finished.
<AgentQuitFromTouchingBlockType> <Block type="lava" /> <Block type="lapis_block" /></AgentQuitFromTouchingBlockType>Same as usual Minecraft game, the world is uniquely created by a seed value, which is generated automatically in Minecraft by default.
Therefore, when you want to debug with the same world definition, you should set a seed in mission file (XML) manually.
Note : You can also replay the same maze using a fixed seed in above maze definition.
When you run a program, each steps (ticks) has some interval (milliseconds), which is defined by MsPerTick in mission file. For instance, when you set MsPerTick=5, the time interval between each steps (each ticks) has 5 milliseconds. If an agent runs next step within 5 milliseconds, the step will wait (sleep) till next 5 milliseconds. Minecraft’s game normally runs on tick’s interval of 50 milliseconds, then you can speed up games by setting more small MsPerTick in mission file as follows.ServerQuitFromTimeUp means that the game will end after timeLimitMs milliseconds, when MsPerTick=50 . If you set MsPerTick=1 , the game will end 50 times faster. After the game has ended, an agent cannot take an action.
<ModSettings> <MsPerTick>1</MsPerTick></ModSettings><ServerSection> ... <ServerHandlers>...<ServerQuitFromTimeUp timeLimitMs="15000000" description="out_of_time"/>... </ServerHandlers></ServerSection>As you can see in the next section, the world of this mission (lava_maze.xml) will look like here. (See below.)
See other mission samples in GitHub repo.
Run Your First Program (Malmo)
Now let’s make an agent work in Malmo platform.
Both Malmo and MineRL only support running on the machine with a monitor attached.
So please configure X remote desktop on Ubuntu, and then please set up desktops. (Here I don’t show steps for these configuration, but see here to use remote desktop on Ubuntu 20.04.)
Note : If you run in a console without a monitor, run your program with a virtual monitor – such as,
xvfb(X Virtual Frame Buffer) – as follows.# run program on xvfbxvfb-run --listen-tcp --server-num 55 --auth-file /tmp/xvfb.auth -s "-ac -screen 0 800x600x24" python3 test01.pyWhen you want to see the result’s output, you can bypass the screen on
xvfbto physical monitor, or record the screen as a video file as follows.# Bypass xvfb screen (55) to real monitor (10)/usr/bin/x11vnc -rfbport 5902 -forever -display :55 &DISPLAY=:10 /usr/bin/vncviewer localhost:5902 &# record above screen (display #55)ffmpeg -f x11grab -video_size 800x600 -i :55 -codec:v libx264 -r 12 /home/tsmatsuz/test01.mp4# gracefully stop recordingkill $(pgrep ffmpeg)See this post for training with virtual monitor.
Now you should login to operating system with a monitor attached shell (e.g, terminal on X remote desktop).
Before running your agent, launch Minecraft as follows.
In this example, the Malmo client can communicate with port 9000, and later your agent (program) will connect to this listening port.
cd MalmoPlatform/Minecraft./launchClient.sh -port 9000Note : In launching Minecraft, it might show errors for downloading assets from
http://resources.download.minecraft.net/(nothttps://), but you can ignore.
Now let’s run your agent in another shell. (Open another terminal.)
Before running, copy the compiled python package ~/MalmoPlatform/build/install/Python_Examples/MalmoPython.so in your current working directory.
cp ~/MalmoPlatform/build/install/Python_Examples/MalmoPython.so .You can run Malmo agent with raw socket APIs or pre-built MalmoPython package.
In this example, we use MalmoPython and run (perform) agent step-by-step in Python console as follows.
# Start Python consolepython3# In Python console, import Malmo library at the beginningimport MalmoPythonNow, let’s create an agent and start the above mission ( lava_maze.xml) as follows.
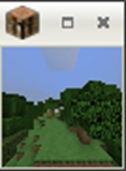
Your program will then start to connect to the running Minecraft, and this world will then be shown in Minecraft UI.
# Read mission file and generate MissionSpecfrom pathlib import Pathxml = Path('lava_maze.xml').read_text()my_mission = MalmoPython.MissionSpec(xml,True)# Generate MissionRecordSpecmy_mission_record = MalmoPython.MissionRecordSpec()my_mission_record.recordRewards()my_mission_record.recordObservations()# Generate an Agentagent_host = MalmoPython.AgentHost()# Connection setting (connecting to port 9000)pool = MalmoPython.ClientPool()client_info = MalmoPython.ClientInfo('127.0.0.1', 9000)pool.add(client_info)# Start Mission with your Agent !agent_host.startMission(my_mission, pool, my_mission_record, 0, 'test1')# Wait till mission beginsworld_state = agent_host.getWorldState()while not world_state.has_mission_begun: time.sleep(0.1) world_state = agent_host.getWorldState()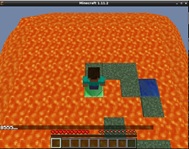
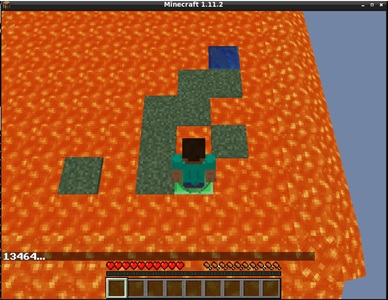
Fig. output screen (here I’ve changed to third-person view by F5 key.)
Note : In the screen, you can use your familiar Minecraft’s commands – such as, F5 key. It’s a regular Minecraft forge client.
Now we make the agent move to the goal (a lapis block) as follows in Python console.
# move forwardagent_host.sendCommand("move 1")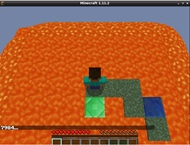
# turn rightagent_host.sendCommand("turn 1")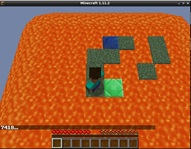
# move forwardagent_host.sendCommand("move 1")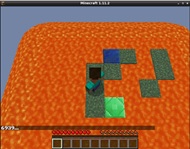
# move forwardagent_host.sendCommand("move 1")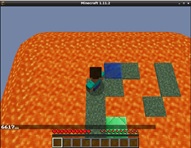
# turn rightagent_host.sendCommand("turn 1")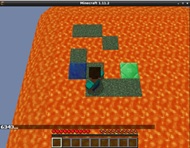
# move forwardagent_host.sendCommand("move 1")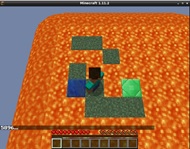
# turn leftagent_host.sendCommand("turn -1")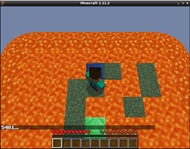
# move forwardagent_host.sendCommand("move 1")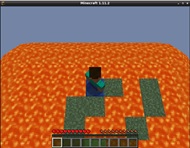
Note : When you want to continuously move and turn an agent, set the following
<ContinuousMovementCommands/>in mission file, instead of setting<DiscreteMovementCommands/>. Especially, for attacking (damaging) mobs in the game, please use this setting. The followingturnSpeedDegs=180means that the rotating degrees per second is 180 (i.e, half-rotation) byturncommand withMsPerTick=50setting. (IfMsPerTick=10, it will rotate 5 times fatser.)<ContinuousMovementCommands turnSpeedDegs="180"/>Note : If the command “move 1” doesn’t work in your world with
<DiscreteMovementCommands/>setting, please change your agent’s starting position to the half of blocks in x-axis or z-axis. (Because the agent is not on the absolute position.)
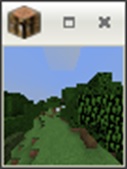
You can use getWorldState() to see the reward and agent’s view in each steps. (See below.)
The returned world_state.video_frames[-1].pixels is integer’s array of RGB pixels. In this example, the size of this array will be 800 x 600 x 3 = 1,440,000 . (See above mission file.)
# Get world state againworld_state = agent_host.getWorldState()# Mission is still running (True or False)print('Mission is running : ', world_state.is_mission_running)# Show rewardif world_state.number_of_rewards_since_last_state > 0: reward = world_state.rewards[-1].getValue() print('Reward is ', reward)# Show agent's viewimport numpy as npimport matplotlib.pyplot as pltif world_state.number_of_video_frames_since_last_state > 0: height = 600; width = 800; depth = 3 frame = world_state.video_frames[-1] array = np.frombuffer(frame.pixels, dtype=np.uint8) image = array.reshape((height, width, depth)) plt.imshow(image) plt.show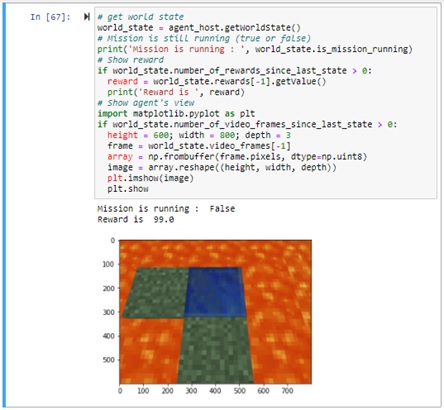
When the agent has reached to a lapis block, the agent will get 99 rewards in world_state.rewards[-1] (since the agent can obtain 100 in lapis block and consume -1 in each step) and get True in world_state.is_mission_running. (The game will be done, since the agent has reached to a lapis block.)
Note : In Malmo, there is time-lag for getting rewards by
getWorldState(). (The state is delayed a little bit later.)
You can also generate gym-compliant environments to simulate an agent (for instance, the forked MarLÖ is also one of these environments), and build your own learner with a variety of RL algorithms, such as, plain Q-learning, DQN, DDQN, PPO, and so on.
Later I’ll show you the reinforcement learning example with custom gym environment in Project Malmo.
Note : The human players can also join into the same game as follows.
- In Minecraft on server,
- Start mission.
- Open to LAN in running Minecraft. (As you know, the port is randomly assigned.)
If you want to fix to the static port 25565, put this mod into./MalmoPlatform/Minecraft/run/mods/directory.- If needed, make sure to allow this inbound port to be accessed in the network settings.
- In your Minecraft client,
- Install Minecraft Forge client version 1.11.2. (Go to here.)
- Copy and place Malmo mod’s jar (MalmoMod-0.36.0.jar) in
%appdata%\.minecraft\mods\to enable Malmo mod.
(This jar file is on./MalmoPlatform/Minecraft/.minecraft/mods/or./MalmoPlatform/Minecraft/.minecraftserver/mods/)- Start Minecraft Forge client. (You should login with your own Minecraft account.)
- Enter into the game using previous host and port. (Click “Multiplayer”, “Direct Connect”, and “Join Server” button.)
- Press “Enter” key in the game to use mouse controls. (It’s toggled to human mode.)
Note : You can also run multiple agents in the same game as follows.
- Run multiple client (Minecraft) with different ports. (Use
./MalmoPlatform/Minecraft/launchClient.sh.)- Set multiple roles as
<AgentSection />in mission file.- Add multiple
ClientPool()in pool setting (corresponding to the previous ports and role number).- Start mission for each roles.
See
~/MalmoPlatform/Malmo/samples/Python_examples/multi_agent_test.pyfor the multi-agent’s sample code.
2. MineRL
MineRL is a famous fork of Malmo platform, which provides an OpenAI Gym-integrated environments and has a lot of pre-built missions.
In this section, let’s see how you can use MineRL.
Installation and Settings (MineRL)
Same like Malmo, we assume the setup on Ubuntu 18.04.
It’s very simple to setup MineRL.
Just install a package with pip. (The dependent package, gym, is also installed.)
pip3 install minerlSuch like Malmo, this also simulates the agent in Minecraft using the engine of Minecraft Java version.
Then you should install java runtime and set JAVA_HOME in your environment.
sudo apt-get install openjdk-8-jdkecho -e "export JAVA_HOME=/usr/lib/jvm/java-8-openjdk-amd64" >> ~/.bashrcsource ~/.bashrcSame like Malmo, you need to login with a monitor attached for experiments, even when you run on Linux. Thereby, you should setup X remote desktop.
Use a virtual monitor, when you run a program as a batch.
Run Your First Program (MineRL)
Now, run your program on MineRL.
Same like Malmo, you should login with a monitor attached. (Here I have used built-in remote desktop client in Windows, but please use appropriate X terminal client depending on your working environment.)
Using minerl package, a variety of Minecraft environments are already registered in gym and these are available in gym-integrated manners.
For instance, the following will load the environment, in which the agent can get rewards for the purpose of obtaining diamonds.
When you run gym.make() command, Minecraft Java edition will be automatically launched. (Unlike Malmo, Minecraft client is automatically started by running your agent’s program.)
import gymimport minerl# this will take a while, since the data is so large.env = gym.make('MineRLObtainDiamond-v0')
Note : MineRL also provides environments for competitions, such as,
MineRLObtainDiamondDenseVectorObf-v0. (These environments include “VectorObf” in its name.)
In competition environments, both actions and observations are well-featurized (vectorized) for competition’s use.
When you reset (start) a gym environment, the agent enters into the generated Minecraft’s world.
Same as Malmo, you can also specify a seed for the world, when debugging or testing. (Otherwise, the seed is randomly generated by default.)
obs = env.reset()
The result (observation), obs, includes the frame of agent’s view and it has the following format. The following pov is the array of RGB pixels of 64 x 64 image (i.e, 64 x 64 x 3).
OrderedDict( [('compassAngle', array(-22.53418)),('inventory', OrderedDict([('dirt', array(0))])),('pov', array([ [[15, 22, 77],[14, 20, 77],[16, 23, 81],...,[36, 25, 19],[36, 25, 19],[36, 25, 19] ], [[17, 26, 82],[16, 25, 81],[15, 22, 78],...,[27, 18, 14],[26, 18, 14],[44, 32, 24] ], [[14, 21, 75],[16, 23, 79],[16, 24, 80],...,[26, 18, 14],[26, 18, 13],[44, 32, 24] ], ...,[[16, 11, 8],[19, 14, 10],[12, 8, 6],...,[15, 11, 8],[15, 11, 8],[23, 16, 12] ], [[11, 8, 6],[11, 8, 6],[16, 11, 8],...,[15, 11, 8],[15, 10, 7],[23, 16, 11] ], [[23, 17, 12],[24, 17, 13],[15, 11, 8],...,[18, 13, 9],[18, 13, 9],[18, 13, 9] ]],dtype=uint8 )) ])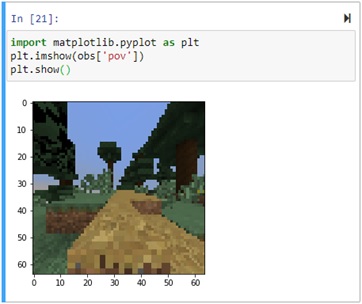
Now, let’s move an agent forward in your program.
The following env.action_space.no_op() will create a new action of “nothing to do”. When you want an agent to move forward, you should set action['forward'] = 1 and call env.step(action).
When the agent find and obtain diamonds, the agent will get a high score in reward and get True in done. (See here about the rewards for obtaining diamonds.)
Each action can also include multiple activities at once, such as, action['attack'] = 1 and action['camera'] = [0, 90] (turn to 90 degree).
action = env.action_space.no_op()action['forward'] = 1# run step-by-step in python consoleobs, reward, done, info = env.step(action)obs, reward, done, info = env.step(action)obs, reward, done, info = env.step(action)obs, reward, done, info = env.step(action)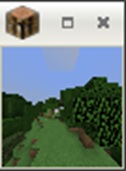


Note : You can also bring your own mission in MineRL with base
MineRLEnvclass.Note : Same as Malmo platform, the human player can also connect into an environment, in which you can interact with your agent.
In order to join into the same game with Minecraft client on PC, do as follows :
- In Minecraft on server,
- Launch Minecraft separately from your program.
To launch Minecraft separately in MineRL, run as follows :from minerl.env.malmo import InstanceManagerinstance = InstanceManager.Instance(9000)instance.launch()- Start mission with
MineRLEnvand stop again. (Please stop once, since you cannot operate Minecraft GUI during mission running.)- To connect to the running Minecraft, specify
portparameter- Open to LAN in Minecraft. (The port will be randomly assigned.)
- If needed, make sure to allow this port to be accessed in the network settings.
- In your Minecraft client on desktop,
- Install Minecraft Forge client version 1.11.2. (Go to here.)
- Download
MalmoMod-0.37.0.jarfrom here and place this jar (MalmoMod-0.37.0.jar) in%appdata%\.minecraft\mods\to enable Malmo mod.- Start Minecraft Forge client. (You should login with your own Minecraft account.)
- Enter into the game using previous host and port. (Click “Multiplayer”, “Direct Connect”, and “Join Server” button.)
- Press “Enter” key (toggle to human mode) in the game to enable mouse controls.
- On server, start mission again.
You can also join into the same game with built-in MineRL interactor utility. See here for MineRL interactor.
Note : In MineRL, Minecraft directory is randomly generated on
/tmpdirectory. Then you cannot install your own custom mods or resource packs beforehand.
Sample DataSet (MineRL)
MineRL also provides a lot of sample dataset collected from human playing, which you can use in your machine learning tasks – such as, offline RL or imitation learning.
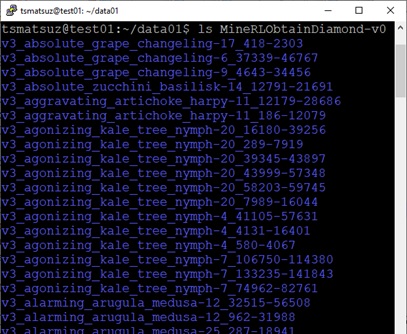
Now let’s download the dataset in the mission for obtaining diamonds (MineRLObtainDiamond-v0) as follows.
mkdir data01MINERL_DATA_ROOT="$PWD/data01" python3 -m minerl.data.download 'MineRLObtainDiamond-v0'The downloaded folder includes a lot of sub-folders corresponding for each episodes.
Each episode’s folder includes 3 files, metadata.json, recording.mp4, and rendered.npz .recording.mp4 is an original video which is captured in Minecraft Java server using MineRL recording mod.

All frames in a video are annotated and tagged, and these (all tags) are included in rendered.npz.
from numpy import loaddat = load('MineRLObtainDiamond-v0/v3_ample_salad_doppelganger-1_556-12734/rendered.npz')files = dat.filesfor item in files: print(item)'reward''observation$inventory$coal''observation$inventory$cobblestone''observation$inventory$crafting_table''observation$inventory$dirt''observation$inventory$furnace''observation$inventory$iron_axe''observation$inventory$iron_ingot''observation$inventory$iron_ore''observation$inventory$iron_pickaxe''observation$inventory$log''observation$inventory$planks''observation$inventory$stick''observation$inventory$stone''observation$inventory$stone_axe''observation$inventory$stone_pickaxe''observation$inventory$torch''observation$inventory$wooden_axe''observation$inventory$wooden_pickaxe''observation$equipped_items.mainhand.damage''observation$equipped_items.mainhand.maxDamage''observation$equipped_items.mainhand.type''action$forward''action$left''action$back''action$right''action$jump''action$sneak''action$sprint''action$attack''action$camera''action$place''action$equip''action$craft''action$nearbyCraft''action$nearbySmelt'Each entry has an attribute’s array for each video frames.
For instance, in the following example, you can find that the player (agent) goes forward in the first several frames and doesn’t go forward in the last several frames.
print(dat['action$forward'])array([1, 1, 1, ..., 0, 0, 0])In the following example, it means that the player obtains diamonds in the final frame. (See here about the rewards for obtaining diamonds mission.)
print(dat['reward'])array([0, 0, 0, ..., 0, 0, 1024])You can use these captured dataset in a variety of machine learning tasks.
For instance, MineRL tutorial “K-means exploration” demonstrates more natural (human-like) behaviors by clustering sample actions using K-means algorithm. (This dataset is actually used for a competition.)
3. Simple Reinforcement Learning example in Minecraft (Project Malmo)
(Please download here for this source code.)
Now you are ready to run your agent in reinforcement learning with Project Malmo or MineRL.
In this example, we train a primitive agent to solve the previous mission of lava maze in Malmo platform.
In this example, I will use reinforcement learning’s algorithm, Deep Q-Network (DQN), in RLlib library.
Note : In this post, I don’t focus on reinforcement learning algorithms, but see here for details.
Before running your agent, install Ray library (with RLlib extra), TensorFlow, and prerequisite packages as follows.
Here I use TensorFlow models in RLlib, but you can also use PyTorch models if you prefer.
sudo apt-get install -y python3-pipsudo -H pip3 install --upgrade pippip3 install \ gym==0.21.0 \ lxml \ numpy==1.19.5 \ matplotlib==3.3.4 \ scikit-image==0.17.2 \ pillow \ tensorflow==2.4.1 \ gpustat==0.6.0 \ aiohttp==3.7.4 \ prometheus-client==0.8.0 \ redis==3.5.3 \ ray[default]==1.6.0 \ dm-tree==0.1.7 \ attrs==19.1.0 \ pandaspip3 install \ ray[rllib]==1.6.0 \ ray[tune]==1.6.0To run the training in RLlib, I have created a Gym-integrated environment (custom class inherited from gym.core.Env) named MalmoMazeEnv as follows.
As you saw in the above Malmo settings, all setup for mission is made up in __init__() method of this class.
In step() method, it returns frame pixels (with 3 channels) as observation’s result.
maze_env.py
import gymimport MalmoPythonimport randomimport timeimport numpy as npfrom enum import EnumCLIENT_PORT = 9000# malmo portTIME_WAIT = 0.05 # time to wait for retreiving world state (when MsPerTick=20)MAX_LOOP = 50 # wait till TIME_WAIT * MAX_LOOP seconds for each actionclass AgentActionSpace(gym.spaces.Discrete): def __init__(self):actions = []actions.append("move")actions.append("right")actions.append("left")self.actions = actionsgym.spaces.Discrete.__init__(self, len(self.actions)) def sample(self):return random.randint(1, len(self.actions)) - 1 def __getitem__(self, action):return self.actions[action] def __len__(self):return len(self.actions)class MalmoMazeEnv(gym.Env): """ A class implementing OpenAI gym environment to run Project Malmo 0.36.0 Python API for solving maze. init parameters --------------- xml : str (required)Mission setting (XML string) used in Project Malmo. width : int (required)Frame width for agent height : int (required)Frame height for agent. millisec_per_tick : int (optional)Millisec between each ticks. Set lower value to speed up.Default is 50 (which is normal Minecraft game speed). mazeseed : str/int (optional)Seed value for maze. To create the same maze, set same value of seed.Default is "random". """ def __init__(self,xml,width,height,millisec_per_tick = 50,mazeseed = "random"):# Set up gym.Envsuper(MalmoMazeEnv, self).__init__()# Initialize self variablesself.xml = xmlself.height = heightself.width = widthself.shape = (self.height, self.width, 3)self.millisec_per_tick = millisec_per_tickself.mazeseed = mazeseed# none:0, move:1, right:2, left:3self.action_space = AgentActionSpace()# frameself.observation_space = gym.spaces.Box(low=0, high=255, shape=self.shape, dtype=np.float32)# Create AgentHostself.agent_host = MalmoPython.AgentHost()# Create MissionRecordSpecself.my_mission_record = MalmoPython.MissionRecordSpec()self.my_mission_record.recordRewards()self.my_mission_record.recordObservations()# Create ClientPoolself.pool = MalmoPython.ClientPool()client_info = MalmoPython.ClientInfo('127.0.0.1', CLIENT_PORT)self.pool.add(client_info) """ Public methods """ def reset(self):# Create MissionSpecxml = self.xmlxml = xml.format( PLACEHOLDER_MSPERTICK=self.millisec_per_tick, PLACEHOLDER_WIDTH=self.width, PLACEHOLDER_HEIGHT=self.height, PLACEHOLDER_MAZESEED=self.mazeseed)my_mission = MalmoPython.MissionSpec(xml,True)# Start missionself.agent_host.startMission(my_mission, self.pool, self.my_mission_record, 0, 'test1')# Wait till mission beginsworld_state = self.agent_host.getWorldState()while not world_state.has_mission_begun: time.sleep(TIME_WAIT * self.millisec_per_tick / 20) world_state = self.agent_host.getWorldState()# Get reward, done, and frameframe, _, _ = self._process_state(False)if frame is None: self.last_obs = np.zeros(self.shape, dtype=np.float32)else: self.last_obs = np.frombuffer(frame.pixels, dtype=np.uint8).reshape(self.shape)return self.last_obs def step(self, action):# Take corresponding actions""" none:0, move:1, right:2, left:3 """if self.action_space[action] == "move": self.agent_host.sendCommand("move 1")elif self.action_space[action] == "right": self.agent_host.sendCommand("turn 1")elif self.action_space[action] == "left": self.agent_host.sendCommand("turn -1")# Get reward, done, and frameframe, reward, done = self._process_state()if reward is None: reward = 0# Clean upif done: frame2, reward2 = self._comsume_state() if frame2 is not None:frame = frame2 reward = reward + reward2# Return observationsif frame is None: self.last_obs = np.zeros(self.shape, dtype=np.uint8)else: self.last_obs = np.frombuffer(frame.pixels, dtype=np.uint8).reshape(self.shape)return self.last_obs, reward, done, {} """ Internal methods """ # Extract frames, rewards, done_flag def _process_state(self, get_reward=True):reward_flag = Falsereward = 0frame_flag = Falseframe = Nonedone = Falseloop = 0while True: # get world state time.sleep(TIME_WAIT * self.millisec_per_tick / 20) world_state = self.agent_host.getWorldState() # reward (loop till command's rewards are all retrieved) if (not reward_flag) and (world_state.number_of_rewards_since_last_state > 0):reward_flag = True;reward = reward + world_state.rewards[-1].getValue() # frame if world_state.number_of_video_frames_since_last_state > 0:frame = world_state.video_frames[-1]frame_flag = True # done flag done = not world_state.is_mission_running # judge quit if get_reward and reward_flag and frame_flag:break; elif (not get_reward) and frame_flag:break; # exit when MAX_LOOP exceeds loop = loop + 1 if loop > MAX_LOOP:reward = Nonebreak;return frame, reward, done def _comsume_state(self):reward_flag = Truereward = 0frame = Noneloop = 0while True: # get next world state time.sleep(TIME_WAIT * self.millisec_per_tick / 5) world_state = self.agent_host.getWorldState() # reward (loop till command's rewards are all retrieved) if reward_flag and not (world_state.number_of_rewards_since_last_state > 0):reward_flag = False; if reward_flag:reward = reward + world_state.rewards[-1].getValue() # frame if world_state.number_of_video_frames_since_last_state > 0:frame = world_state.video_frames[-1] if not reward_flag:break;return frame, rewardlava_maze_malmo.xml
<Mission xmlns="http://ProjectMalmo.microsoft.com" xmlns:xsi="http://www.w3.org/2001/XMLSchema-instance"> <About><Summary>Lava Maze</Summary> </About> <!-- This is replaced by the program code --> <ModSettings><MsPerTick>{PLACEHOLDER_MSPERTICK}</MsPerTick> </ModSettings> <ServerSection><ServerInitialConditions> <Time><StartTime>0</StartTime><AllowPassageOfTime>false</AllowPassageOfTime> </Time> <Weather>clear</Weather> <AllowSpawning>false</AllowSpawning></ServerInitialConditions><ServerHandlers> <FlatWorldGenerator generatorString="3;7,220*1,5*3,2;3;,biome_1"/> <DrawingDecorator><DrawSphere x="-29" y="70" z="-2" radius="100" type="air"/><DrawCuboid x1="-34" y1="70" z1="-7" x2="-24" y2="70" z2="3" type="lava" /> </DrawingDecorator> <MazeDecorator><Seed>{PLACEHOLDER_MAZESEED}</Seed><SizeAndPosition width="5" length="6" height="10" xOrigin="-32" yOrigin="69" zOrigin="-5"/><StartBlock type="emerald_block" fixedToEdge="true"/><EndBlock type="lapis_block" fixedToEdge="true"/><PathBlock type="grass"/><FloorBlock type="air"/><GapBlock type="lava"/><GapProbability>0.6</GapProbability><AllowDiagonalMovement>false</AllowDiagonalMovement> </MazeDecorator> <ServerQuitFromTimeUp timeLimitMs="300000" description="out_of_time"/> <ServerQuitWhenAnyAgentFinishes/></ServerHandlers> </ServerSection> <AgentSection mode="Adventure"><Name>Agent0</Name><AgentStart> <!-- Look down a little to see the blocks --> <Placement x="-28.5" y="71.0" z="-1.5" pitch="70" yaw="0"/></AgentStart><AgentHandlers> <!-- This size is supported for rllib built-in conv_net model (No custom model is needed) --> <VideoProducer want_depth="false"><Width>{PLACEHOLDER_WIDTH}</Width><Height>{PLACEHOLDER_HEIGHT}</Height> </VideoProducer> <DiscreteMovementCommands/> <MissionQuitCommands quitDescription="game_quit"/> <RewardForMissionEnd><Reward description="out_of_time" reward="-100" /> </RewardForMissionEnd> <RewardForTouchingBlockType><Block reward="-100" type="lava" behaviour="onceOnly"/><Block reward="100" type="lapis_block" behaviour="onceOnly"/> </RewardForTouchingBlockType> <RewardForSendingCommand reward="-1"/> <AgentQuitFromTouchingBlockType><Block type="lava" /><Block type="lapis_block" /> </AgentQuitFromTouchingBlockType></AgentHandlers> </AgentSection></Mission>With this custom MalmoMazeEnv class, let’s start to train an agent as follows.
For simplicity (not to make things difficult), here I start Ray tune’s framework in a single machine with real monitor (X desktop).
In practical training, however, you can also scale the training batches to multiple workers (in multiple machines) with xvfb virtual monitor. (See here for details.)
train.py
# Reinforcement Learning with RLlibimport numpy as npfrom pathlib import Pathimport argparseimport osimport rayimport ray.tune as tunefrom maze_env import MalmoMazeEnv # See above for this custom class# For creating OpenAI gym environment (custom MalmoMazeEnv)def create_env(config): xml = Path(config["mission_file"]).read_text() env = MalmoMazeEnv(xml=xml,width=config["width"],height=config["height"],millisec_per_tick=config["millisec_per_tick"]) return env# For stopping a learner for successful trainingdef stop_check(trial_id, result): return result["episode_reward_mean"] >= 85# Mainif __name__ == '__main__': parser = argparse.ArgumentParser() parser.add_argument("mission_path",help="full path to the mission file lava_maze_malmo.xml",type=str) parser.add_argument("--num_gpus",type=int,required=False,default=0,help="number of gpus") args = parser.parse_args() tune.register_env("testenv01", create_env) ray.init() tune.run(run_or_experiment="DQN",config={ "log_level": "WARN", "env": "testenv01", "env_config": {"mission_file": args.mission_path,"width": 84,"height": 84,"millisec_per_tick": 20 }, "framework": "tf", "num_gpus": args.num_gpus, "num_workers": 1, "double_q": True, "dueling": True, "explore": True, "exploration_config": {"type": "EpsilonGreedy","initial_epsilon": 1.0,"final_epsilon": 0.02,"epsilon_timesteps": 500000 }},stop=stop_check,checkpoint_freq=1,checkpoint_at_end=True,local_dir='./logs' ) print('training has done !') ray.shutdown()In this training, only the frame pixels (image) is used for observation, and the convolution network (CNN) is used for the model in Deep Q-Learning (Dueling Double DQN) trainer.
Note : When the input shape [42, 42, K] or [84, 84, K] is used in RLlib, the built-in CNN (convolution network) is automatically used in trainer. (Otherwise, use custom model or
conv_filtersin RLlib to meet the size of observation images.)
In order to use this built-in CNN, I have reduced pixels to 84 x 84 in this example.
When you run this script, the RLlib framework keeps picking up samples and repeatedly trains an agent with these samples in each training batches.
python3 train.py /home/tsmatz/minecraft-rl-example/lava_maze_malmo.xml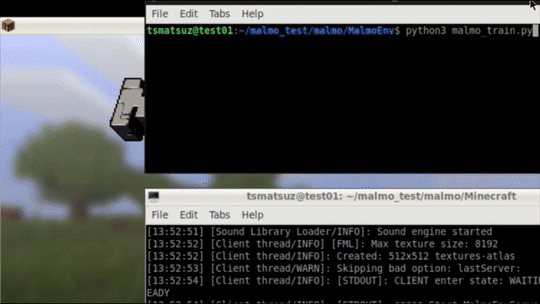
Fig. start training (the shape of observation pixels is 84 x 84 x 3)
Note : During the training, the summary of current progress can be seen in
{log folder}/DQN/DQN_{env}_{experiment}/progress.csv.
Even when the training has been interrupted by accident, you can restore and start again with the saved checkpoint files.
For the entire source code and detailed steps, please refer here (GitHub repository).
In this example, it has reached to enough performance (accuracy) around 500 training iterations, each of which has batches in 32 episodes.
You can restore this checkpoint in this repository and run the trained agent. (See below.)
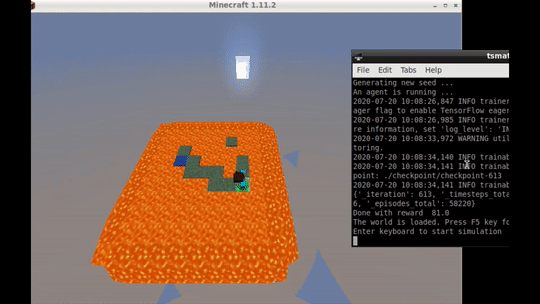
Fig. tracing a trained agent’s trajectory with slow speed

Fig. progress of reward means (1 iteration includes 32 episode samples)
GitHub : Reinforcement Learning algorithms by Python
https://github.com/tsmatz/reinforcement-learning-tutorials
GitHub : Project Malmo Reinforcement Learning Example
https://github.com/tsmatz/minecraft-rl-example
MineRL Competition
https://minerl.io/competition/
Update History :
Dec 2020 : Updated for Malmo 0.36.0
Sep 2021 :
Consolidated RL examples to Project Malmo (removed MineRL training examples)
Updated to ray 1.6.0
Oct 2023 : Malmo environment change from Ubuntu 18.04 (pip installation) to Ubuntu 20.04 (compilation of source code)
Categories: Uncategorized

Nice and helpful article!! Thanks for sharing such an informative post.
360DigiTMG
LikeLike
hi! Nice post !
I have a question that what if I want to use the world_state information (which is the important object in Original Malmo Python interface including all kinds of observations like observations from grid , observations from ray ) in Malmo or MineRL package, what should I do? Should I modify the package code of Malmo or MineRL ? As far as I consider the Malmo or MineRL just a python wrapper of Malmo server and interface.
Looking for your reply!
Great post !
LikeLike
I think that more appropriate function for getting world state might be AgentHost::peekWorldState() in malmo. (See https://github.com/microsoft/malmo/pull/96 )
peekWorldState() can also be used in python with MalmoPython (see the source code in https://github.com/microsoft/malmo/tree/master/Malmo/samples/Python_examples ), but I think you might have to generate your own environments, when you need gym-like environments with peekWorldState().
import MalmoPython
agent_host = MalmoPython.AgentHost()
world_state = agent_host.peekWorldState()
LikeLike
Yes, I already change my code to peekWorldState()
But, I still want to know how can I obtain the world_state ( = agent_host.peekWorldState()) information in MineRL or Malmo. Do you know how to generate my own environment? I have read the code of MineRL and MalmoEnv , the key code seems talks about socket sendMessage to Minecraft Server or receive Message from Minecraft server, As far as I consider , the Minecraft server provide all kinds of message, but I can not find how to receive message including world_state, Do you have experience of this problem ? can You help me?
LikeLike
Yes, the agent interacts with minecraft server (w/ malmo mod) using socket (TCP) communication.
I’m sorry since I’m not familiar with implementation details, but the agent (see AgentHost.cpp below) holds the socket communication as observations_server, video_server, etc. These “server” objects are all implemented as StringServer (StringServer.cpp), which uses TCPServer (TCPServer.cpp) for underlying TCP connection. As you can see in TCPServer.cpp, it handles the received message in its callback. When you peek states, these message will be returned to the client.
As you know, python implementation is just wrapping these native C++ implementation.
MineRL will also be using this malmo implementation at the bottom.
AgentHost.cpp
https://github.com/microsoft/malmo/blob/master/Malmo/src/AgentHost.cpp
StringServer.cpp
https://github.com/microsoft/malmo/blob/master/Malmo/src/StringServer.cpp
TCPServer.cpp
https://github.com/microsoft/malmo/blob/master/Malmo/src/TCPServer.cpp
LikeLike
Would it be possible to extract inputs (like point of view) from Minecraft using the Malmo or MineRL libraries to determine the reward in Python itself? i.e. make a mission that doesn’t specify any rewards in the XML file but determines these in the Python code exclusively instead.
LikeLike
Hi Freek-san. Please specify “ObservationFromFullStats” in mission and determine rewards in your custom env. You can get the following information (positions, life, etc) with this setting, “ObservationFromFullStats”.
https://microsoft.github.io/malmo/0.21.0/Schemas/MissionHandlers.html
If it doesn’t meet your requirements, please see other observation options you can use in the above document. (You can use other observation options together with ObservationFromFullStats.)
LikeLike
It’s pretty wild to think of an Ai playing Minecraft
LikeLike