
(Please download source code from here.)
In this post’s series, I’m introducing multilingual fine-tuning in Hugging Face.
Especially, some languages, such like, Japanese, Korean, and Chinese, don’t have an explicit whitespace tokenization, and we need to consider several things for language processing.
In the third post of this series, I’ll show you multilingual (Japanese) example for question-answering.
Hugging Face multilingual fine-tuning (series of posts)
- Named Entity Recognition (NER)
- Text Summarization
- Question Answering
There exist a lot of types of question answering (QA), and here I deal with extractive QA, in which the answer is included in the prepared text called “context”.
Note : There exist a lot of types (and corresponding models) for question answering (QA).
For instance, in abstractive QA (or generative QA), the answer’s phrase does not always exist in the text and it builds the answers by synthesizing evidences across multiple text.
Community QA gathers question-answer pairs from forum or board (such like, Stack Overflow) and provides the most relevant answer for some specific question.
TAPAS is used for answering questions about tabular data, such as, “What is the highest sales in EMEA in 2022”.
Note : If you’re new to transformers in deep learning, see these tutorials.
Architecture for Extractive QA
Before fine-tuning, I’ll show you how model is configured and involved in practical QA systems. (If you’re familiar to QA systems, please skip this section.)
Unlike previous examples, the input is provided as a pair of question and context in extractive QA. (See below.)
| Context | Microsoft was founded by Bill Gates and Paul Allen on April 4, 1975, to develop and sell BASIC interpreters for the Altair 8800. |
|---|---|
| Question | Who has founded Microsoft ? |
| Answer | Bill Gates and Paul Allen |
As you can see above, the answer is the sequence of words (i.e, text) and you might then think that it will be sequence-to-sequence (seq2seq) problem.
However, in extractive QA, it might be appropriate for extracting the span of text in the context (in above example, “Bill Gates and Paul Allen” is the span between 5th word and 9th word in the context), because the answers are guaranteed to exist in the context.
The extractive QA can then be considered as a token classification problem, in which the answer’s start index and end index in the context will be predicted for obtaining the answer span.
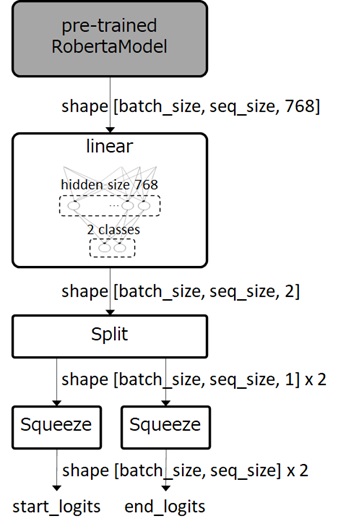
As the following picture shows, our model will then be built from pre-trained encoder-based transformers, such as, BERT-based models. (Later I’ll describe details about this model architecture.)
Note : Currently, a lot of SOTA (the state of the art) QA models – such as, ALBERT, FPNet, and IE-Net – can deal with questions which cannot be answered from the span of text alone.
In the first version of famous SQuAD (The Stanford Question Answering Dataset) dataset, all answers to the questions were guaranteed to be found from the span of text in the context. SQuAD 2.0 is a new reading comprehension dataset – in which the answers cannot be found by only picking up the span of text -, and a lot research works were performed for this dataset.
Most models in recent works surpasses human parity.
However, in practical QA system, the user will ask for only question and the context will not be provided by humans. In most cases, the context will then be a vast amount of document, such as, FAQs, websites, or a collection of reports.
One of famous library to tackle this practice is Haystack NLP framework provided by deepset.
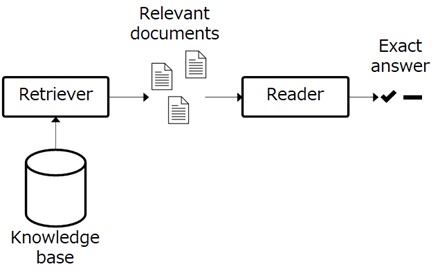
In this Haystack pipeline, there are two main components, called retriever and reader.
The retriever is responsible for retrieving documents in knowledge base for a specific query and provides a set of relevant documents to the reader side. The retriever is responsible for measuring the relevancy between document and query.
The reader is then responsible for extracting answers using a query (i.e, question) and an individual document (i.e, context), in which you you can perform extractive QA model fine-tuned in Hugging Face.
To wrap up, such like a human response, it will search for documents in knowledge base and will then extract the exact answer from the relevant documents.
Here I don’t go details about Haystack library, but please see official GitHub repo or document for details (tutorials, api reference, etc).
Like Haystack framework, most QA frameworks (such as, custom question answering in Azure AI Services) has a set of components – such as, database, search, workflow (pipeline), and QA processing.
In this post, I’ll focus on only building the extractive QA model in Hugging Face.
Set up Environment
In this example, I have used GPU virtual machine with Ubuntu Server 20.04 LTS image in Microsoft Azure.
Set up GPU drivers (NVIDIA CUDA) and install Hugging Face standard libraries (transformers, datasets).
# compilers and development settingssudo apt-get updatesudo apt install -y gccsudo apt-get install -y make# install CUDA 11.4.4 (because I use old generation K80 GPU)wget https://developer.download.nvidia.com/compute/cuda/11.4.4/local_installers/cuda_11.4.4_470.82.01_linux.runsudo sh cuda_11.4.4_470.82.01_linux.runecho -e "export LD_LIBRARY_PATH=/usr/local/cuda-11.4/lib64" >> ~/.bashrcsource ~/.bashrc# install and upgrade pipsudo apt-get install -y python3-pipsudo -H pip3 install --upgrade pip# install pytorch with GPU accelerated# (see https://pytorch.org/get-started/locally/ )pip3 install torch torchvision torchaudio --extra-index-url https://download.pytorch.org/whl/cu114# install sentencepiece for multi-lingual modelingpip3 install omegaconf hydra-core fairseq sentencepiece# install huggingface librariespip3 install transformers datasets# install additional packagespip3 install numpy# install jupyter if you run code in notebookpip3 install jupyterProcess Data (Dataset)
Now let’s start to build model for extractive question answering.
In this example, we use JaQuAD (Japanese Question Answering Dataset, provided by Skelter Labs) in Hugging Face, which has over 30000 samples in training set.
Such like famous SQuAD (Stanford Question Answering Dataset) dataset, JaQuAD is also a human annotated question-answering data (extractive set of answers) for Japanese language, in which data is collected from Wikipedia articles.
Note : For other languages (such as, Chinese), you can also use XQuAD (Cross-lingual Question Answering Dataset) dataset. (I don’t use XQuAD, since this doesn’t include Japanese language.)
As you can see below, both context and question are provided for inputs, and answer_start indicates the index of starting character in the context text.
from datasets import load_datasetds = load_dataset("SkelterLabsInc/JaQuAD")ds["train"][0]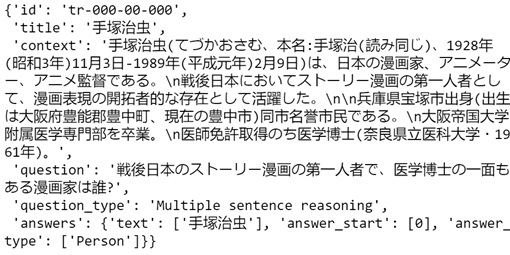
To generate inputs for fine-tuning, now we should tokenize question and context into the sequence of token ids.
First, we should prepare a tokenizer in pre-trained model.
Here I use mulilingual encoder-based RoBERTa model, xlm-roberta-base, which I have also used in previous NER example.
from transformers import AutoTokenizertokenizer = AutoTokenizer.from_pretrained("xlm-roberta-base")Before running tokenization, let’s see how tokenizer builds inputs for a pair of question and answer.
In question-answering, we need the complete form for the question, but the context can be incomplete.
By setting max_length property with truncation="only_second" as follows, the question sequence won’t be truncated, but the second sequence, context, is truncated by the maximum length of tokens.
features = tokenizer( ds["train"][0]["question"], ds["train"][0]["context"], max_length = 384, truncation="only_second", padding = "max_length",)print("".join(tokenizer.batch_decode(features["input_ids"])))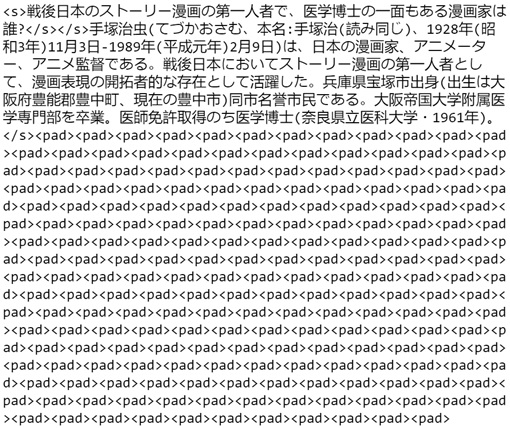
As you can see above, the two inputs (question and context) are converted into a single sequence which takes the following format :
<s> question text </s></s> context text </s> padNow let’s tokenize and convert dataset for fine-tuning.
The following is the code for converting into question-answering inputs, and this code is a little tricky.
First, question-answering model in Hugging Face expects answer’s start_positions and end_positions which indicate the positions in the above input’s sequence. In order to convert character-based positions into token-based positions, here I then use the offset mapping.
The offset mapping is the array of tuple (start_character, end_character + 1) for each tokens. For instance, when “abc def” is converted into tokens “ab”, “c”, and “def”, the offset mapping will be (0,2), (2,3), (3,6).
Note : To get token index for each character, you can also use
char_to_token()method in tokenizer, instead of offset mapping.
When the context is beyond the maximum sequence length (here, it’s 384), it’s simply truncated and the overflowing tokens will be returned as the next sequence, by setting the following return_overflowing_tokens=True.
However, it might happen that the answer tokens are separated into multiple sequences. To prevent this occurence, the size of stride in sliding window can be controlled by the following stride property. For instance, the last n tokens are not fit and overflow, m + n tokens will be in the next sequence when stride=m. These m tokens are then the overlapped tokens between windows.
The position of answer will then be either of first sequence or second sequence, or in both sequences.
def tokenize_sample_data(data): # tokenize tokenized_feature = tokenizer(data["question"],data["context"],max_length = 384,return_overflowing_tokens=True,stride=128,truncation="only_second",padding = "max_length",return_offsets_mapping=True, ) # When it overflows, multiple rows will be returned for a single example. # The following then gets the array of corresponding the original sample index. sample_mapping = tokenized_feature.pop("overflow_to_sample_mapping") # Get the array of [start_char, end_char + 1] in each token. # The shape is [returned_row_size, max_length] offset_mapping = tokenized_feature.pop("offset_mapping") start_positions = [] end_positions = [] for i, offset in enumerate(offset_mapping):sample_index = sample_mapping[i]answers = data["answers"][sample_index]start_char = answers["answer_start"][0]end_char = start_char + len(answers["text"][0]) - 1# The format of sequence_ids is [None, 0, ..., 0, None, None, 1, ..., 1, None, None, ...]# in which question's token is 0 and contex's token is 1sequence_ids = tokenized_feature.sequence_ids(i)# find the start and end index of contextidx = 0while sequence_ids[idx] != 1: idx += 1context_start = idxwhile sequence_ids[idx] == 1: idx += 1context_end = idx - 1# Set start positions and end positions in inputs_ids# Note: The second element in offset is end_char + 1#if offset[context_start][0] > end_char or offset[context_end][1] <= start_char:if not (offset[context_start][0] <= start_char and end_char < offset[context_end][1]): # The case that answer is not inside the context ## Note : Some tokenizer (such as, tokenizer in rinna model) doesn't place CLS ## for the first token in sequence, and I then set -1 as positions. ## (Later I'll process rows with start_positions=-1.) start_positions.append(-1) end_positions.append(-1)else: # The case that answer is found in the context # Set start position idx = context_start while offset[idx][0] < start_char:idx += 1 if offset[idx][0] == start_char:start_positions.append(idx) else:start_positions.append(idx - 1) # Set end position idx = context_end while offset[idx][1] > end_char + 1:idx -= 1 if offset[idx][1] == end_char + 1:end_positions.append(idx) else:end_positions.append(idx + 1) # build result tokenized_feature["start_positions"] = start_positions tokenized_feature["end_positions"] = end_positions return tokenized_feature# Run conversiontokenized_ds = ds.map( tokenize_sample_data, remove_columns=["id", "title", "context", "question", "question_type", "answers"], batched=True, batch_size=128)In above code, I have set -1 in start_positions and end_positions, when the answer doesn’t exist in input’s sequence.
I then remove rows, in which the answer doesn’t exist.
tokenized_ds = tokenized_ds.filter(lambda x: x["start_positions"] != -1)Note : When you also train “whether it includes the answer or not”, you should specify some position information in labels even when the answer is not found.
As we saw in my previous post, SentencePiece tokenizer (which is based on Unigram subword segmentation) is also used in this tokenization and we can then process multilingual languages which don’t have an explicit whitespace separator.
See my previous post for how it tokenizes source text. (Several pre-processing tasks, such as normalization, are also performed in the HuggingFace tokenizer.)
Load model and data collator
As I have mentioned above, the question-answering model will also consist of the pre-trained transformer and classification head, such like a token classification example (see here).
However, in question-answering model, the final output (which shape is [batch_size, sequence_length, 2]) is split into 2 parts, and each of them then has the shape [batch_length, sequence_length]. These two tensors are used as start logits and end logits, and the token classification’s loss between these logits and true labels (start position and end position, respectively) are then computed for optimization.
See below for model architecture again.
In Hugging Face, you can use built-in AutoModelForQuestionAnswering without manually implementing this model.
For pre-trained transformer, I use multilingual BERT-based RoBERTa model, xlm-roberta-base. (Because the encoder-only models will be well-suited for classification task.)
from transformers import AutoConfig, AutoModelForQuestionAnswering# see https://huggingface.co/docs/transformers/main_classes/configurationconfig = AutoConfig.from_pretrained( "xlm-roberta-base", num_labels=2, hidden_size=768,)model = (AutoModelForQuestionAnswering .from_pretrained("xlm-roberta-base", config=config) .to(device))Note : As I have mentioned in my previous post, you can also implement your own custom model.
See here for the source code ofRobertaForQuestionAnswering.
Now we prepare data collator, which works for preprocessing data.
Unlike other examples, here we can use default data collator which doesn’t do any extra works – such as, filling -100 in padded tokens -, because we don’t need to skip loss or evaluation in padded tokens in question-answering.
from transformers import DefaultDataCollatordata_collator = DefaultDataCollator()Fine-Tuning for Question Answering
Now let’s configure and run fine-tuning.
In this example, we use HuggingFace transformer’s trainer class, with which you can run fine-tuning without manually writing training loop.
First we prepare HuggingFace training arguments as follows.
from transformers import TrainingArgumentstraining_args = TrainingArguments( output_dir = "xlm-roberta-qa-ja", log_level = "error", num_train_epochs = 3, learning_rate = 7e-5, lr_scheduler_type = "linear", warmup_steps = 100, per_device_train_batch_size = 2, per_device_eval_batch_size = 1, gradient_accumulation_steps = 16, evaluation_strategy = "steps", eval_steps = 150, save_steps = 500, logging_steps = 50, push_to_hub = False)Note : See my previous post for the gradient accumulation technique.
Now let’s put it all together into trainer class and run fine-tuning.
from transformers import Trainertrainer = Trainer( model = model, args = training_args, data_collator = data_collator, train_dataset = tokenized_ds["train"], eval_dataset = tokenized_ds["validation"].select(range(100)), tokenizer = tokenizer,)trainer.train()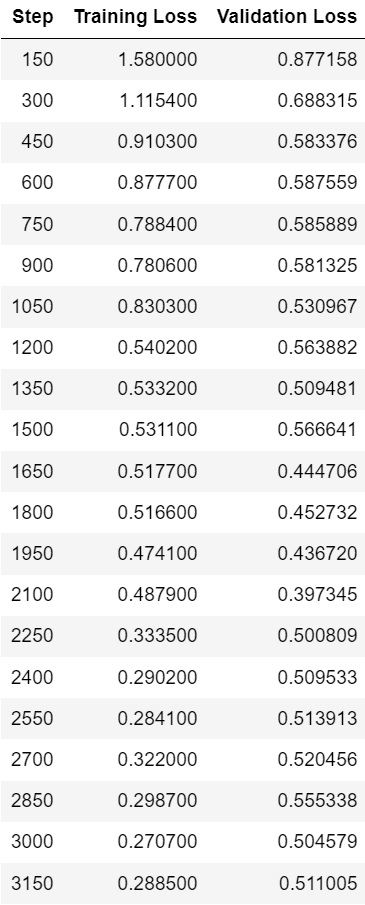
After the training has completed, you can save the fine-tuned model with Hugging Face API as follows.
import osfrom transformers import AutoModelForQuestionAnswering# save fine-tuned model in localos.makedirs("./trained_for_qa_jp", exist_ok=True)if hasattr(trainer.model, "module"): trainer.model.module.save_pretrained("./trained_for_qa_jp")else: trainer.model.save_pretrained("./trained_for_qa_jp")# load local modelmodel = (AutoModelForQuestionAnswering .from_pretrained("./trained_for_qa_jp") .to(device))Predict Answers (Perform Question Answering)
Using our fine-tuned model, now let’s predict the answer for the given context and question (which has not seen in the training set).
Instead manually running through forward pass, you can use a dedicated pipeline, in which preprocessing and postprocessing (such as, skipping padded tokens) are wrapped.
As you can see below, specify align_to_words=False for Asian languages (such as, Chinese, Korean, and Japanese) which doesn’t have an explicit white space separator.
The confidence scores are also returned in pipeline results.
from transformers import pipelineqa_pipeline = pipeline( "question-answering", model=model, tokenizer=tokenizer, device=0)idx = 0print("***** context *****")print(ds["validation"]["context"][idx])print("")print("***** question *****")print(ds["validation"]["question"][idx])print("")print("***** true answer *****")print(ds["validation"]["answers"][idx]["text"][0])print("")print("***** predicted top3 answer *****")qa_pipeline( question = ds["validation"]["question"][idx], context = ds["validation"]["context"][idx], align_to_words = False, top_k=3,)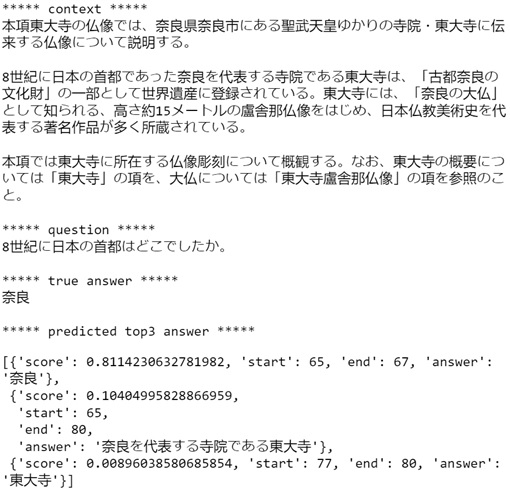
Note : Picking up argmax of start and end indicies sometimes fails to take correct answer. For instance, if span (9, 11), (5, 7), and (3, 7) are the top 3 candidates for the answer, 7th token might be picked up as end’s index, and it might then return the span (9, 7).
The QA pipeline in Hugging Face automatically picks up the best combination to avoid these mistakes.
When you manually run through forward pass without a pipeline, do not specify padding="max_length" in tokenization as follows.
import torchimport numpy as npdef inference_answer(question, context): question = question context = context test_feature = tokenizer(question,context,max_length=318, ) with torch.no_grad():outputs = model(torch.tensor([test_feature["input_ids"]]).to(device)) start_logits = outputs.start_logits.cpu().numpy() end_logits = outputs.end_logits.cpu().numpy() answer_ids = test_feature["input_ids"][np.argmax(start_logits):np.argmax(end_logits)+1] return "".join(tokenizer.batch_decode(answer_ids))idx = 0question = ds["validation"]["question"][idx]context = ds["validation"]["context"][idx]answer_pred = inference_answer(question, context)print("***** question *****")print(question)print("")print("***** context *****")print(context)print("")print("***** true answer *****")print(ds["validation"]["answers"][idx]["text"][0])print("")print("***** predicted answer *****")print(answer_pred)
idx = 1question = ds["validation"]["question"][idx]context = ds["validation"]["context"][idx]answer_pred = inference_answer(question, context)print("***** question *****")print(question)print("")print("***** context *****")print(context)print("")print("***** true answer *****")print(ds["validation"]["answers"][idx]["text"][0])print("")print("***** predicted answer *****")print(answer_pred)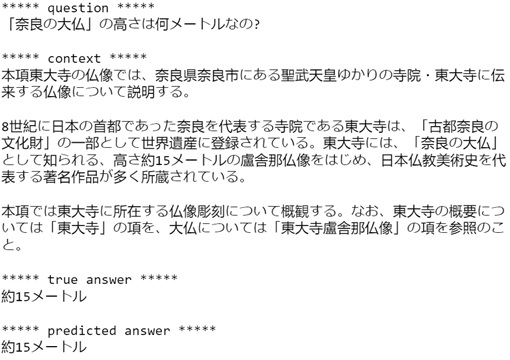
I have published the fine-tuned model into Hugging Face hub, and you can soon try by your own using the inference widget.
tsmatz/roberta_qa_japanese (Hugging Face hub)
https://huggingface.co/tsmatz/roberta_qa_japanese

Note : In my Hugging Face hub and GitHub example, I have used pre-trained RoBERTa model provided by rinna Co., Ltd. (
rinna/japanese-roberta-base) for the reason of learning performance, which model is well-trained and optimized for Japanese corpus.
As I have mentioned above, you can involve this fine-tuned model in Haystack framework for practical QA system. (In this post I don’t describe about steps in Haystack, and then see the document for Haystack.)
Reference :
Source code / Notebook (GitHub)
https://github.com/tsmatz/huggingface-finetune-japanese/
Fine-tuned Model (Hugging Face hub)
https://huggingface.co/tsmatz/roberta_qa_japanese
Categories: Uncategorized

2 replies»