
Azure Blockchain Service will be retired on 10 September 2021. For migration, see here.
In this post, I show you how to build blockchain applications working with Quorum ledger, by using Azure Blockchain Service.
Ethereum protocol is written generally, and it has several forks, such as Go-Ethereum (Geth), Parity, and EthereumJ. Quorum is one of these implementations derived from Ethereum – which is a fork of Geth – and well designed for running a private blockchain (also called, “permissioned blockchain” or “consortium blockchain”).
Azure Blockchain Service – which is introduced in May 2019 as preview – is a managed “blockchain-as-a-service” and it’s built on a standard Quorum implementation. The initial target for Azure Blockchain Service is Quorum, and now also Corda Enterprise is supported as part of Azure Blockchain Service. (For now, Corda on Azure Blockchain Service is in private preview.)
With this managed service, you can soon start developing blockchain applications without the need for cumbersome installation and configuration.
Note : You can also use Azure Blockchain Workbench for prototyping blockchain application with Azure Blockchain Service.
Consortium, Member, and Node (Architecture)
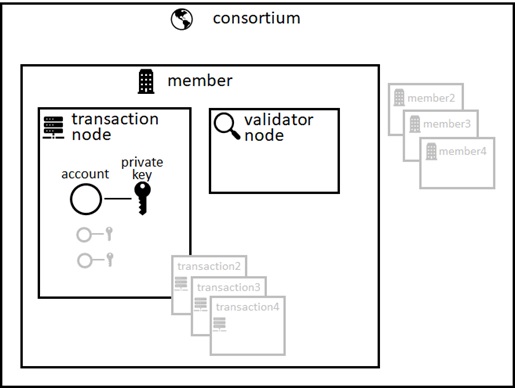
Before starting, let’s see the architecture for each components (consortium, member, node, and account) in Quorum blockchain with Azure Blockchain Service.
Azure Blockchain Service is designed for a private blockchain and the whole blockchain network is called a consortium. The consortium consists of distributed ledger, which is stored in every nodes in the network.
In the first provisioning in Azure Blockchain Service, you should create a new consortium and default node (first node).
The default node includes the default account, which is automatically provisioned. You can access blockchain network through an account using account’s address and account’s password (passphrase). (You can also add a new account in node.)
Each account has key pairs – private key and public key. However, a private key for default account is managed in node and you cannot retrieve for the safety. Therefore, if you need to unlock account or sign with a private key, you should invoke remote API on this node. (Later I show you how to sign using API.)
Note : For this reason, you cannot unlock (or sign) in another node. (A private key for the default account only exists in the default node.)
Azure Blockchain Service also has intermediate components called a member. In a member, you can add a new transaction node (up to 9, total 10 nodes), when you scale transactions. (By default, there exists no account in an added node, and then you should create a new account or use a wallet with this new node.) That is, “member” is used as a management unit in a private blockchain.
For manipulating multiple parties in a consortium network, you can add (invite) other members, which is added by Azure subscription level.
Later I’ll show you how to invite another party.
The following picture illustrates the structure of a consortium, members, nodes, and accounts in Azure Blockchain Service.
(For validator node, I’ll explain in the next post.)
Create First Consortium and Member
Now let’s start to create a new consortium network and related components (member, node, and account) in Azure Blockchain Service.
As I mentioned above, there’s no need to manually install and setup complicated configuration for starting Quorum blockchain.
All you have to do is just filling the required fields on “Azure Blockchain Service” creation wizard in Azure Portal and proceed.
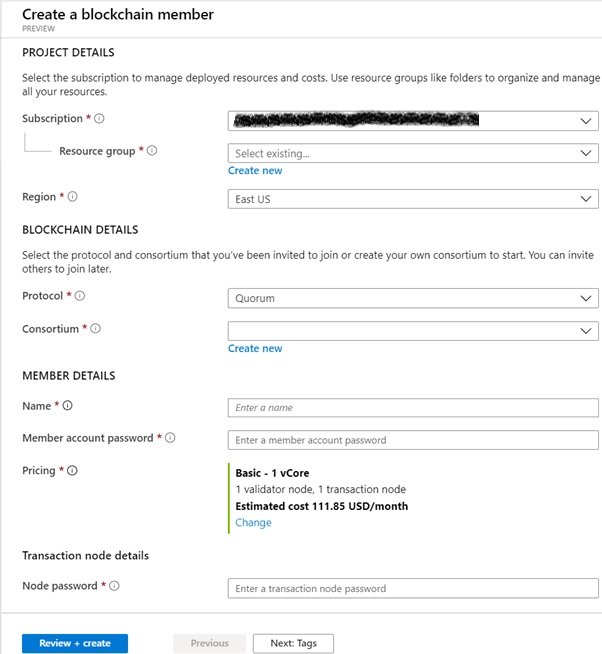
In this creation wizard,
- “Member account password” is used for the default account’s password (which is used to unlock an account).
- You can access node’s endpoint with basic authentication, instead of using ordinary access key. “Node password” in creation wizard is used for this basic authentication.
Note : You can also use Azure AD credential for accessing nodes. (See “Azure Blockchain Service – How to configure Azure Active Directory access“.)
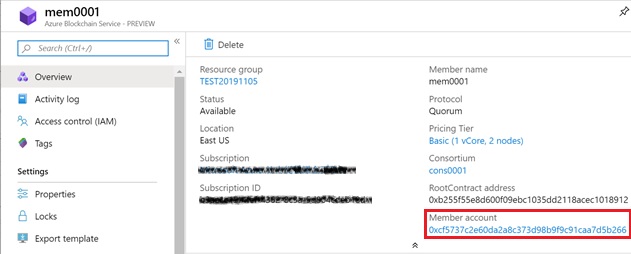
After the creation is completed, a consortium, a member, a default node, and a default account (with key pairs) are automatically provisioned in Azure.
In order to get your default account’s address, open generated blockchain member’s dashboard in Azure Portal and copy. (See below.)
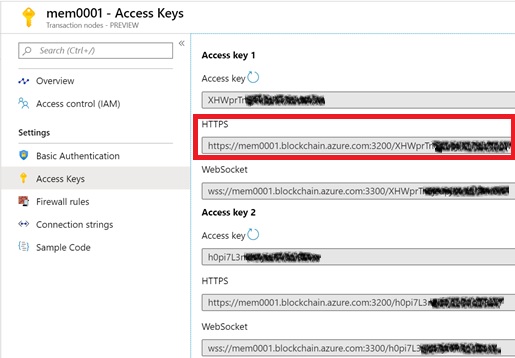
In order to retrieve default node’s endpoint (with access key), go to “Transaction nodes”, select your default node, and click “Access Keys” menu. (See below.)
As I mentioned above, the account’s private key is managed in node and you cannot extract. Therefore you should use a private key through remote API with password. This internally uses a private key for signing.
For instance, the following example signs a transaction with web3.eth.signTransaction() in Web3.js.
Later I explain details about programming for Quorum (Ethereum).
Sign Transaction (Web3.js)
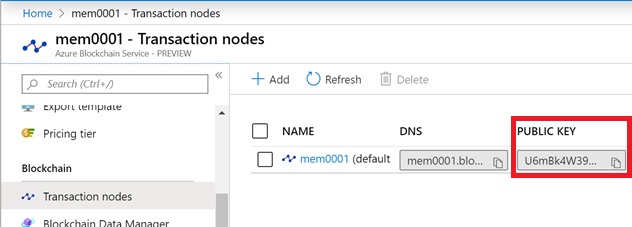
const address = '0xcf5737c2e60da2a8c373d98b9f9c91caa7d5b266';// Unlock Account to Access Private Keyweb3.eth.personal.unlockAccount(address, 'P@ssw0rd', 300).then(function(res){ web3.eth.getTransactionCount(address) .then(function(nonce) {// Sign Transaction with Managed Private Keyweb3.eth.signTransaction({ nonce: nonce, from: address, gas: 1000000000, gasPrice: 0, data: '0x60806040...'}).then(function(receipt){ console.info(receipt); // Send Signed Transaction web3.eth.sendSignedTransaction(receipt.raw) .then(function(receipt){...});}); });});You can extract a public key of default account from node information in Azure Portal. (See below.)
Add New Member
Each members can take one of 2 roles for a consortium network – an administrator (ADMIN) and a user (USER). An administrator can add (invite) or remove other members in a consortium. (In contrast, a user cannot.)
The first member in a consortium has an administrator (ADMIN) privilege.
In order to add a new member, you first invite (grants permission) an Azure subscription, and then add a member in that subscription.
The following PowerShell script invites an Azure subscription yyyyyyyy-yyyy-yyyy-yyyy-yyyyyyyyyyyy to a consortium. In this example, the invited member has USER role. (You don’t need to install PowerShell module in your local machine, and run with browser-based Cloud Shell in Azure Portal. Today it’s exposed by PowerShell, but it’s going to be used in Azure Portal UI and rest api in the future.)
You can also grant to the same (first member’s) subscription and add another member in the same subscription for debugging purpose.
Install-Module -Name Microsoft.AzureBlockchainService.ConsortiumManagement.PS -Scope CurrentUserImport-Module Microsoft.AzureBlockchainService.ConsortiumManagement.PS# Connection object for running Web3# (You can copy RPC endpoint from node information)$Connection = New-Web3Connection ` -RemoteRPCEndpoint 'https://{MEMBER NAME}.blockchain.azure.com:3200/{ACCESS KEY}'# Get your ADMIN account (first generated account in your consortium)# (You can copy the address of member account from Azure Portal)$AdminAccount = Import-Web3Account ` -ManagedAccountAddress '{ACCOUNT ADDRESS}' ` -ManagedAccountPassword '{ACCOUNT PASSWORD}'# Get management contract of this consortium# (You can copy rootContract address from Azure Portal.)$ContractConnection = Import-ConsortiumManagementContracts ` -RootContractAddress '{RootContract ADDRESS}' ` -Web3Client $Connection# Invite External Azure Subscription as USER (Grant permission to join your consortium as USER)$ContractConnection | New-BlockchainMemberInvitation ` -SubscriptionId 'yyyyyyyy-yyyy-yyyy-yyyy-yyyyyyyyyyyy' ` -Role USER ` -Web3Account $AdminAccountNote : In the current preview, consortium management is centralized (not consensus-based). Only one administrator can invite and remove any members from a consortium without other administrators’ consensus.
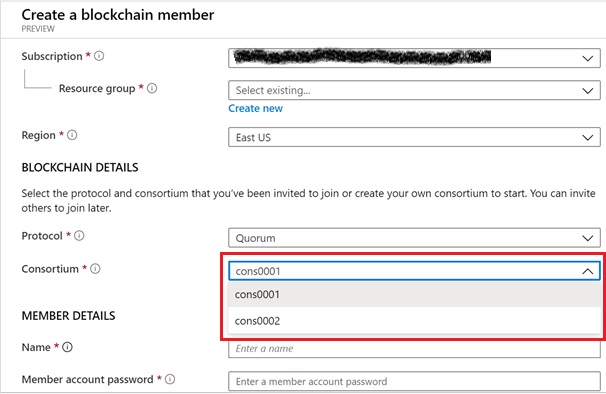
After the invitation (permission grant), new member can join this existing consortium in the invited Azure subscription.
See the following screenshot. (You can select existing consortium, when creating your member.)
When you want to check status for invitation, run the following script.
$ContractConnection | Get-BlockchainMemberInvitation -SubscriptionId 'yyyyyyyy-yyyy-yyyy-yyyy-yyyyyyyyyyyy'In order to revoke invitation, you can run as follows.
$ContractConnection | Remove-BlockchainMemberInvitation -SubscriptionId 'yyyyyyyy-yyyy-yyyy-yyyy-yyyyyyyyyyyy' -Web3Account $AdminAccountNote : Today you can invite only Azure subscriptions, but in the future you’ll be able to invite non-Azure parties on cloud or on-premise.
Use Your Familiar Tools and Languages (Web3, Truffle, HTTP)
As I mentioned above, Azure Blockchain Service is built on standrd Quorum open source and you can use your familiar tools like Geth, Truffle, MetaMask, and so forth.
For instance, you can connect using your Geth (Go-ethereum) client using RPC endpoint and account’s address. (Please see above for how to retrieve node’s endpoint and account’s address.)
Using Geth client, you can interactively run JavaScript on console, or load your script remotely.
Run with Interactive JavaScript Console (Geth client with Web3)
geth attach https://{MEMBER NAME}.blockchain.azure.com:3200/{ACCESS KEY}> address = '{ACCOUNT ADDRESS}'> personal.unlockAccount(address, '{ACCOUNT PASSWORD}', 300)> code = '0x60806040....'> eth.sendTransaction({from:address, gas:1000000000, data:code})> ...Load and Run Your Script File (Geth client)
geth attach https://{MEMBER NAME}.blockchain.azure.com:3200/{ACCESS KEY}> loadScript("C:\\test.js")When you use Node.js or Python, you can also remotely call API using Web3 library from your local application.
The following is the JavaScript example. (This doesn’t need Geth client.)
Run JavaScript in Local (Web3)
const Web3 = require('web3')const web3 = new Web3('https://{MEMBER NAME}.blockchain.azure.com:3200/{ACCESS KEY}')web3.eth.personal.unlockAccount('{ACCOUNT ADDRESS}', '{ACCOUNT PASSWORD}', 300) .then(function(res){... });Even if you’re using other languages, you can directly call HTTP-based JSON RPC endpoint.
The following is an example of python code for invoking HTTP-based JSON RPC.
(See here for JSON RPC reference.)
Call HTTP-based JSON RPC (Python)
import requestsimport jsonsession = requests.Session()content = """{ "jsonrpc":"2.0", "method":"eth_blockNumber", "params":[], "id":1}"""headers = {"Content-type": "application/json"}response = session.post("https://{MEMBER NAME}.blockchain.azure.com:3200/{ACCESS KEY}", data=content, headers=headers)response.contentOutput
b'{"jsonrpc":"2.0","id":1,"result":"0xbf3"}\n'In the following subsequent examples, we call API from local machine using Web3 (version 1.0) JavaScript library.
Note : For debugging purpose, you can view transaction with GUI tool, EPIRUS. (In Azure, you can use Epirus Azure Blockchain Service Explorer in marketplace.)

Programming with Smart Contract (plain Web3 with JavaScript)
Now let’s start your programming for running smart contract using well-known Web3 library with Node.js.
(Here we use only primitive Web3 library. Later I explain how to accelerate your productivity using surrounding tools.)
First of all, you must prepare a smart contract with solidity code.
Here we use a following smart contract.
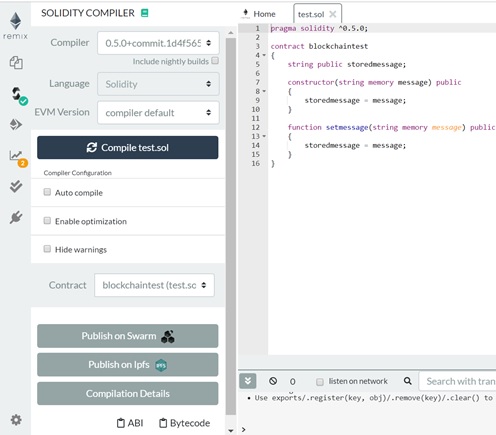
pragma solidity ^0.5.0;contract blockchaintest{ string public storedmessage; constructor(string memory message) public {storedmessage = message; } function setmessage(string memory message) public {storedmessage = message; }}In order to deploy this contract, you should get ABI (interface definition) and bytecode for this contract with solidity compiler.
If you don’t have any compiler in your local machine, you can use Remix online (https://remix.ethereum.org/) and easily generate / download ABI and bytecode with web browser interface.
Now we deploy a smart contract with a generated bytecode.
In the following code, we unlock default account with account’s password using unlockAccount() function and deploy a smart contract using sendTransaction() function.
The value of “code” attribute should be a contract’s bytecode.
In the ordinary blockchain transactions, we should set the recipient with “to” attribute, however, when you deploy a smart contract, we should set blank for this attribute. (See “JPMorgan Chase – Quorum Wiki” for details.)
Smart contract (which is deployed on network) is one of Ethereum accounts without user interaction (called “Contract Account”) and it has own address. Here we retrieve this generated address and output in the console.
const Web3 = require('web3');const web3 = new Web3('https://mem0001.blockchain.azure.com:3200/XHWprTn6jc...');const my_address = '0xcf5737c2e60da2a8c373d98b9f9c91caa7d5b266';const my_password = 'P@ssw0rd';web3.eth.personal.unlockAccount(my_address, my_password, 300) .then(function(res){console.log('unlock succeeded: ' + res);var code = '0x60806040...';web3.eth.sendTransaction({ from: my_address, gas: 1000000000, data: code}).then(function(receipt){ //console.info(receipt); // for debug console.log('Contract Address : ' + receipt.contractAddress);}); });Output
unlock succeeded: trueContract Address : 0x52285353E4B9d43CDC78929fBaE2db02351C47f9Note : In private blockchain, gasPrice must be 0.
In above example, we set a fixed gas value (1000000000), but please useweb3.eth.estimateGas()for an estimated gas value.
When you call a deployed contract, you should use ABI and contract address (which is previously obtained).
The following example is calling setmessage() method in our contract with a string argument “I am member01”.
const Web3 = require('web3')const web3 = new Web3('https://mem0001.blockchain.azure.com:3200/XHWprTn6jc...');const my_address = '0xcf5737c2e60da2a8c373d98b9f9c91caa7d5b266';const my_password = 'P@ssw0rd';const contractAddress = '0x52285353E4B9d43CDC78929fBaE2db02351C47f9';const abi = '[{\"constant\":false,\"inputs\": ...';web3.eth.personal.unlockAccount(my_address, my_password, 300) .then(function(res){console.log('unlock succeeded: ' + res);const contract = new web3.eth.Contract(JSON.parse(abi), contractAddress, { from: my_address});contract.methods.setmessage('I am member01').send().then(function(receipt){}); });Output
unlock succeeded: trueNote : Smart contract is a singleton. (Each contract has its own state.) If you want multiple instances for a contract, you should generate multiple addresses.
Next code extracts “storedmessage” property in our contract and shows the result in console.
As you can see below, this shows “I am member01” in the console.
const Web3 = require('web3')const web3 = new Web3('https://mem0001.blockchain.azure.com:3200/XHWprTn6jc...');const my_address = '0xcf5737c2e60da2a8c373d98b9f9c91caa7d5b266';const my_password = 'P@ssw0rd';const contractAddress = '0x52285353E4B9d43CDC78929fBaE2db02351C47f9';const abi = '[{\"constant\":false,\"inputs\": ...';web3.eth.personal.unlockAccount(my_address, my_password, 300) .then(function(res){console.log('unlock succeeded: ' + res);const contract = new web3.eth.Contract(JSON.parse(abi), contractAddress, { from: my_address});contract.methods.storedmessage().call(function(err, result) { console.log(result) }) });Output
unlock succeeded: trueI am member01With Quorum ledger, you can handle not only a public transaction, but also a private transaction. Using a private contract, you can restrict accounts who can see and use this contract. (Here I don’t describe about how the transaction is encrypted and decrypted, but in the next post, I’ll show you how a private transaction works.)
In the following example, we use the same smart contract as previous one, but we deploy as a private contract which is only available for account01 (address : 0xcf5737c2e60da2a8c373d98b9f9c91caa7d5b266) and account03 (address : 0xc1a526ffe1476795328c2e842d8daee473117321).
In order to handle a private contract, you just use privateFor attribute, in which you set public keys for account01 and account03 as follows. (See above for how to retrieve account’s public key.)
We assume that the following code (both deployment and calling setmessage()) is run by account01.
const Web3 = require('web3');const web3 = new Web3('https://mem0001.blockchain.azure.com:3200/XHWprTn6jc...');const my_address = '0xcf5737c2e60da2a8c373d98b9f9c91caa7d5b266';const my_password = 'P@ssw0rd';web3.eth.personal.unlockAccount(my_address, my_password, 300).then(function(res){ console.log('unlock succeeded: ' + res); var code = '0x60806040...'; web3.eth.getTransactionCount(my_address) .then(function(nonce) {web3.eth.sendTransaction({ from: my_address, gas: 1000000000, data: code, privateFor: ['U6mBk4W39N2KgdU2S1eyivo5nevMAN934+i4LskwD3U=','aig+h52qdU7aOiMr1iQtigHTYImQ/ovA3Yshnqs9PXg=']}).then(function(receipt){ //console.info(receipt); console.log('Contract Address : ' + receipt.contractAddress);}); });});Output
unlock succeeded: trueContract Address : 0xB8376fD4B27Fe38f1E84E891dF8dc082263D4Cd7Note : You cannot call a contract – which is deployed as a public contract – as a private contract. You should publish again (generate another address) as a private contract as above.
const Web3 = require('web3')const web3 = new Web3('https://mem0001.blockchain.azure.com:3200/XHWprTn6jc...');const my_address = '0xcf5737c2e60da2a8c373d98b9f9c91caa7d5b266';const my_password = 'P@ssw0rd';const contractAddress = '0xB8376fD4B27Fe38f1E84E891dF8dc082263D4Cd7';const abi = '[{\"constant\":false,\"inputs\": ...';web3.eth.personal.unlockAccount(my_address, my_password, 300) .then(function(res){console.log('unlock succeeded: ' + res);const contract = new web3.eth.Contract(JSON.parse(abi), contractAddress, { from: my_address,});contract.methods.setmessage('I am member01').send({ privateFor: ['U6mBk4W39N2KgdU2S1eyivo5nevMAN934+i4LskwD3U=','aig+h52qdU7aOiMr1iQtigHTYImQ/ovA3Yshnqs9PXg=']}).then(function(receipt){}); });Output
unlock succeeded: trueWhen account03 extracts a value of “storedmessage” in a contract, that account can get the result “I am member01” as follows. (Note that the node address in the following code is also changed for account03.)
const Web3 = require('web3')const web3 = new Web3('https://mem0003.blockchain.azure.com:3200/aMELBFGU8I...');const my_address = '0xc1a526ffe1476795328c2e842d8daee473117321';const my_password = 'P@ssw0rd';const contractAddress = '0xB8376fD4B27Fe38f1E84E891dF8dc082263D4Cd7';const abi = '[{\"constant\":false,\"inputs\": ...';web3.eth.personal.unlockAccount(my_address, my_password, 300) .then(function(res){console.log('unlock succeeded: ' + res);const contract = new web3.eth.Contract(JSON.parse(abi), contractAddress, { from: my_address,});contract.methods.storedmessage().call({ from: my_address, privateFor: ['U6mBk4W39N2KgdU2S1eyivo5nevMAN934+i4LskwD3U=','aig+h52qdU7aOiMr1iQtigHTYImQ/ovA3Yshnqs9PXg=']}, function(err, result) { console.log(result) }) });Output
unlock succeeded: trueI am member01In contrast, when account02 extracts a value of “storedmessage“, the value cannot be referred as follows.
Since this contract is only available for account01 and account03.
unlock succeeded: trueundefinedAccelerate Your Productivity (Truffle with Visual Studio Code)
Using Azure Blockchain Service, you can accelerate your productivity with the power of several Microsoft offering tools and services. Microsoft provides a lot of developer experience for blockchain integration based on a smart contract.
For instance, with Blockchain Data Manager, you can capture raw block and transactions in managed nodes and trigger into off-chain applications or data stores with Azure Event Grid or direct delivery to Azure SQL Database / Cosmos DB.
For citizen developers, you can also integrate your smart contract with Power Apps or Power Automate (formerly, Microsoft Flow).
For professional developers, you can integrate with Azure Logic Apps or Azure Functions.
In this post, I briefly show you how truffle development (building a smart contract) is accelerated by Azure Blockchain Development Kit in Visual Studio Code.
First, I show you the outline of how to build and deploy a smart contract with ordinary Truffle development flow.
- First, initialize your truffle project with the following command. This will generate truffle-config.js and migration scripts.
truffle init - Please add your solidity file (.sol) in “contracts” folder and deployment scripts in “migrations” folder. (For details, refer the existing migration script.)
- Add your network setting (node endpoint) for Azure Blockchain Service in truffle-config.js. In order to run transaction from remote host using Truffle, you should set an external wallet (account) with
HDWalletProvider, in which you should provide mnemonic for generating key pairs. (You can generate mnemonic with 12 words in this site.) - Please compile your solidity file with the following command. (Beforehand, please install
truffle-hdwallet-providerwith npm, because you needHDWalletProvider.)
This command compiles your contract usingsolc.npx truffle compile - Deploy your smart contract with the following command. Here we assume that
abs_cons0001_mem0001is the name of network configuration in your truffle-config.js.npx truffle migrate --reset --network abs_cons0001_mem0001 - After a contract is successfully deployed, you can invoke your script which uses your smart contract as follows.
truffle exec test.js --network abs_cons0001_mem0001
Note : You can also use interactive truffle console with “
truffle dev” command.
Using Visual Studio Code with Blockchain Development Kit, you can do the same task with more simple manner.
With this tool, you don’t need manual configuration for truffle-config.js. All you have to do is to generate solidity (.sol), select commands in the UI, and fill the required fields along with the wizard.
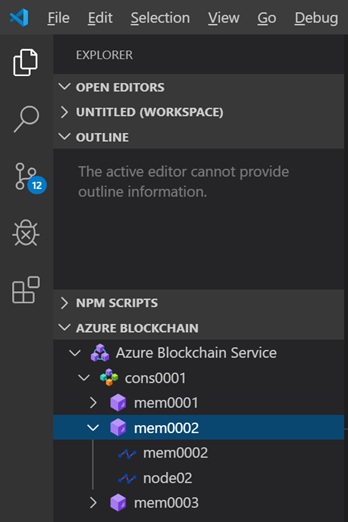
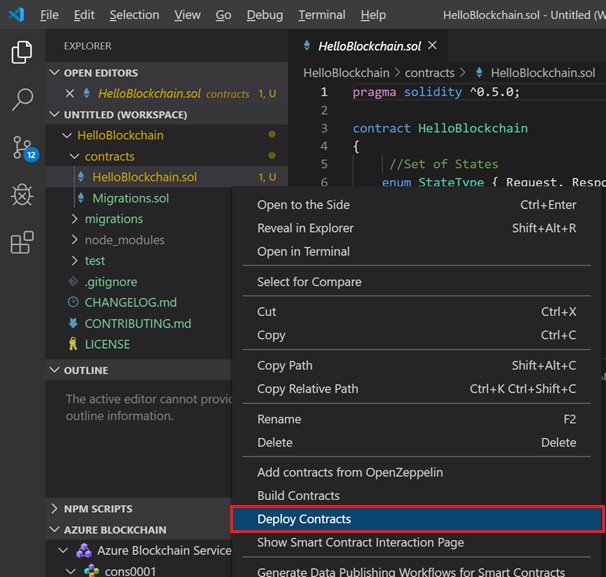
The following is the screenshots for using Visual Studio Code with Blockchain Development Kit. (Here I don’t describe detailed steps. Please see official tutorial document .)
(1) When you create a project, it automatically generates files from a template.
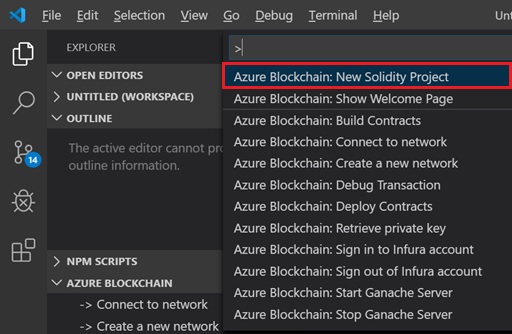
(2) By connecting Azure Blockchain Service, the network configuration is automatically added in your truffle_config.js.
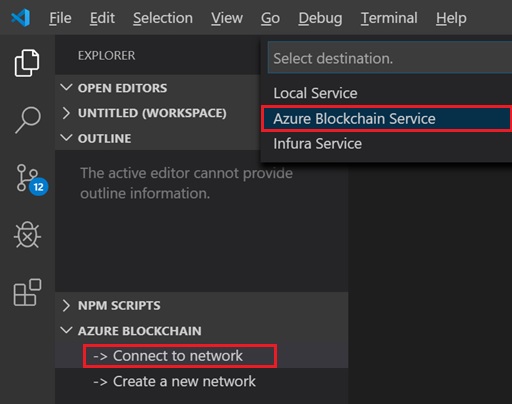
Note : Blockchain Development Kit now supports not only Azure Blockchain Service endpoints, but also Infura endpoints. (See above screenshot.)
(3) You can soon deploy with a command UI.
Development Kit also supports live debugging of contracts (select “Truffle: Debug Transaction” in a command pallet) and you can also generate contract’s applications integrated with Azure Functions or Azure Logic Apps.
Fully Managed
Azure Blockchain Service is PaaS and its management capabilities are all built in Azure Blockchain Service as follows.
- Azure Blockchain Service provides high availability with 99.9% SLA (but, standard tier only) including node recovery and ledger backup.
- Azure Blockchain Service automatically updates patch releases of Quorum.
- When the size of ledger increases, the node storage is automatically increased.
- Data is encrypted in transit / at rest.
- Microsoft monitors node health. It’s integrated with Azure Monitor logging and alerts.

Now you can easily start programming for Quorum ledger with Azure Blockchain Service !
In the next post, I’ll show you how Quorum consensus works.
Categories: Uncategorized

Thanks for this nice explanation.
You have explained how to store the data in Transaction node using HTTP Post method. But if i want to read the same data using its unique value or something else, How can i read that data?
LikeLike