
With new Azure Portal (https://portal.azure.com/), Microsoft Entra ID (formerly, Azure Active Directory) provides very flexible SAML-based configuration, but some folks ask me where to do that ?
In this post, I show you the answer for this question using some bit of SAML-based federation sample code of PHP and Node.js.
Note : For the settings using Azure Classic Portal (Azure Management Portal), see my previous posts “Azure AD (Entra ID) Web SSO with PHP (Japanese)” and “Azure AD (Entra ID) Web SSO with Node.js (Japanese)“.
Settings with Azure Portal
First of all, I’ll show you how the SAML settings page is improved by new Azure Portal.
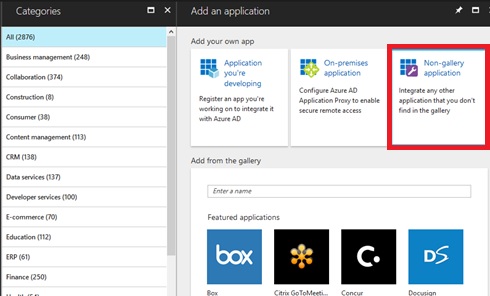
When you want to register your own SAML-based application, select “Azure Active Directory” (Entra ID) in Azure Portal, click “Enterprise applications” menu, and push “add” button.
You can select a lot of pre-defined (registered) applications (like Salesforce, Google, etc), but you click “Non-gallery application” link on top of this page. (You needs your Premium license.)
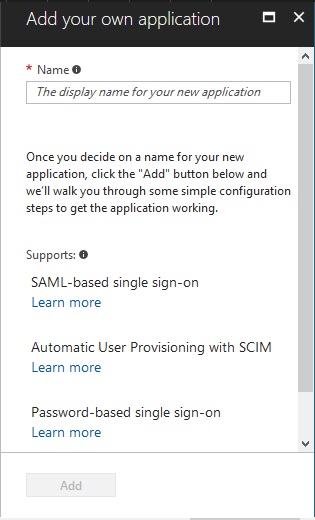
Input your app name in the next screen.
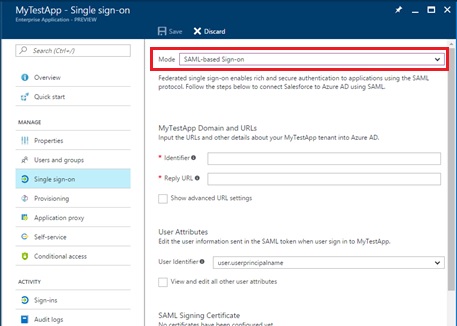
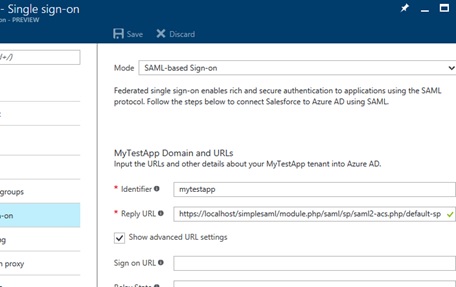
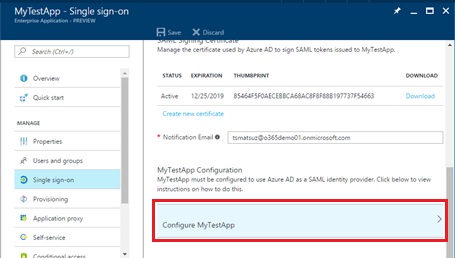
After you’ve added your application, select “Single sign-on” menu in your app settings page and select “SAML-based Sign-on” in “Mode” drop-down menu. (see the following screenshot)
By these steps, you can configure several SAML settings in this page.
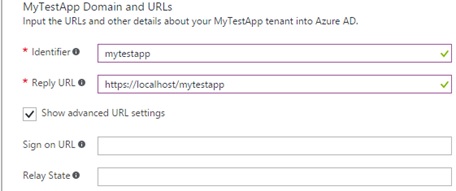
First, you must specify your application identifier (which is used as entityID in SAML negotiation), and your app’s reply url. (Here we set “mytestapp” as identifier. We use this identifier in the following custom federation applications.)
You can also specify the relay state in this section.
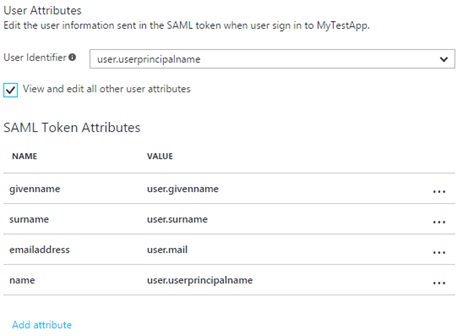
In the next “attributes” section, you can select which attributes should be used as the user identifier (which is returned as NameID by Entra ID in SAML negotiation), and you can also select the claims which should be returned.
When you were using Azure Classic Portal (https://manage.windowsazure.com/), you cannot specify this value and Entra ID always returned the original pairwise identifier as NameID. Some applications which need the e-mail format user principal name as NameID was used to have the trouble to federate Entra ID, but now we don’t have these kind of troubles with new Azure Portal settings.
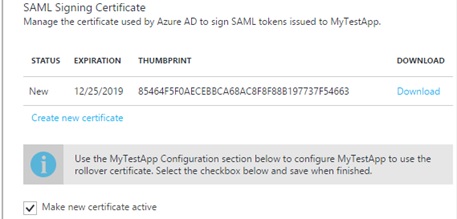
In the next “certificate” section, you can create the certificate and make the rollover certificate active. Here we create this certificate and make active for the following custom code.
Custom code by PHP (simpleSAMLphp)
Now let’s start to create the code and federate with Entra ID.
First we use PHP, and here we use simpleSAMLphp for the SAML federation.
You first install IIS and PHP in your dev machine, and make sure that the following extensions are set in PHP.ini file.
extension=php_openssl.dllextension=php_ldap.dllNext you download simpleSAMLphp (see here), and publish {simplesamplephp install location}/www folder using IIS manager.
Remember that the page is redirected to https://{published simpleSAMLphp site}/module.php/saml/sp/saml2-acs.php/default-sp, when the user is successfully logged-in to Entra ID with SAML federation. Then you must set this url as “Reply URL” in your app settings in Azure Portal. (see the following screenshot)
Open {simplesamplephp location}configconfig.php and change “baseurlpath” to your previously published url. Moreover you must change “auth.adminpassword” to your favorite password. (The default password value is “123”.)
<?php$config = array ( . . . 'baseurlpath' => 'simplesaml/', 'certdir' => 'cert/', 'loggingdir'=> 'log/', 'datadir' => 'data/', . . . 'auth.adminpassword'=> 'test', 'admin.protectindexpage' => false, 'admin.protectmetadata'=> false, . . .Edit {simplesamplephp location}configauthresources.php and make sure to change entityID with the previous application identifier.
$config = array( . . . 'default-sp' => array('saml:SP','entityID' => 'mytestapp','idp' => NULL,'discoURL' => NULL ), . . .Next you copy the federation information in Azure Portal beforehand, and set this information using simpleSAMLphp UI.
First you must click “Configure {your app name}” in your app single sign-on settings page in Azure Portal.
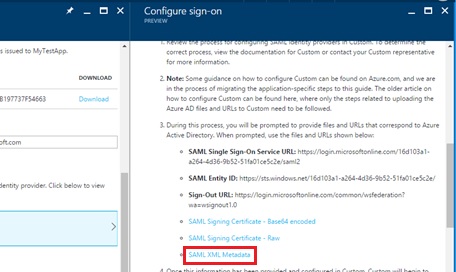
In the configuration page, click “SAML XML Metadata” link (see the following screenshot), and the metadata file is downloaded in your local machine. Please copy the content (text) in the downloaded text file.
Note that this string content includes the digital signature by the certificate. For this reason, you shouldn’t never change this text, even if it’s space character.
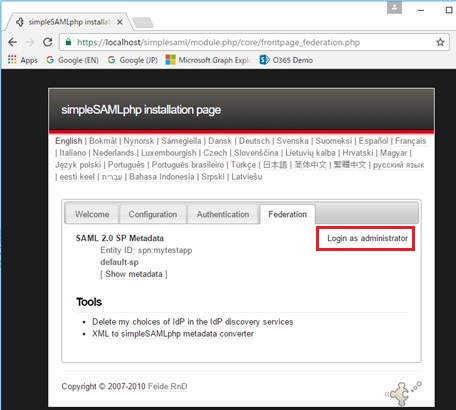
Next you go to the simpleSAMLphp www site (in this example, https://localhost/simplesaml/index.php) using your web browser.
In the simpleSAMLphp settings page, click “Federation” tab and “Login as administrator” link. When the login screen is prompted, you enter “admin” as user id and password which you specified above.
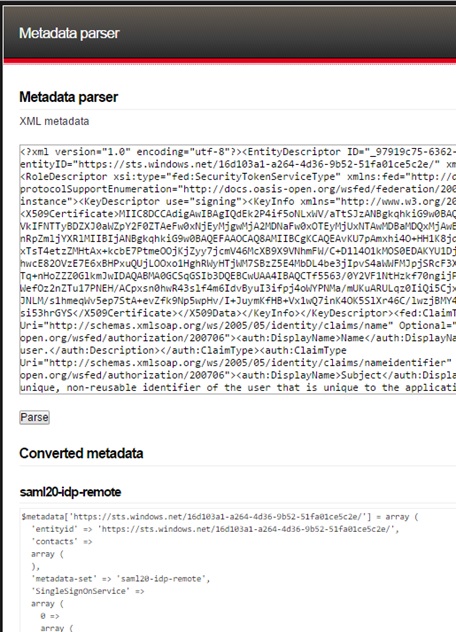
After logged-in, click “XML to simpleSAMLphp metadata converter” link in the page (see the above screenshot), and the following metadata parser page is displayed.
Please paste your metadata which is previously copied into this textbox, and push “Parse” button. Then the converted metadata settings (which is written with PHP) is displayed in the bottom of this page. (See the following screenshot.)
Copy this PHP code, and paste it into the code of {simplesamplephp location}metadatasaml20-idp-remote.php. (see the following code)
<?php...$metadata['https://sts.windows.net/16d103a1-a264-4d36-9b52-51fa01ce5c2e/'] = array ( 'entityid' => 'https://sts.windows.net/16d103a1-a264-4d36-9b52-51fa01ce5c2e/', 'contacts' => array ( ), 'metadata-set' => 'saml20-idp-remote', 'SingleSignOnService' => array (0 => array ( 'Binding' => 'urn:oasis:names:tc:SAML:2.0:bindings:HTTP-Redirect', 'Location' => 'https://login.windows.net/16d103a1-a264-4d36-9b52-51fa01ce5c2e/saml2',),1 => array ( 'Binding' => 'urn:oasis:names:tc:SAML:2.0:bindings:HTTP-POST', 'Location' => 'https://login.windows.net/16d103a1-a264-4d36-9b52-51fa01ce5c2e/saml2',), ), 'SingleLogoutService' => array (0 => array ( 'Binding' => 'urn:oasis:names:tc:SAML:2.0:bindings:HTTP-Redirect', 'Location' => 'https://login.windows.net/16d103a1-a264-4d36-9b52-51fa01ce5c2e/saml2',), ), 'ArtifactResolutionService' => array ( ), 'keys' => array (0 => array ( 'encryption' => false, 'signing' => true, 'type' => 'X509Certificate', 'X509Certificate' => 'MIIC8DC...',), ),);Note : On the contrary, if you want to set SAML federation SP (service provider) metadata (which includes the value of SingleLogoutService, etc) into Entra ID, you can get this XML from simpleSAMLphp and set it into Entra ID using the application manifest in Entra ID settings.
The settings of simpleSAMLphp has all done !
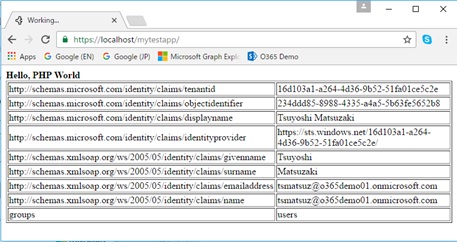
Let’s create your own PHP (.php) code with simpleSAMLphp like the following code. This sample code is just showing all claims returned by Entra ID.
<?php require_once("../simplesamlphp-1.11.0/lib/_autoload.php"); $as = new SimpleSAML_Auth_Simple('default-sp'); $as->requireAuth(); $attributes = $as->getAttributes();?>Hello, PHP World<table border="1"><?php foreach ($attributes as $key => $value): ?> <tr><td><?=$key;?></td><td><?=$value[0];?></td> </tr><?php endforeach;?></table>Let’s see how it works.
If you access to this PHP page with your web browser, the page is redirected to the idp selector. In this page, please select the metadata of Entra ID, and push “Select” button.

Then the page is redirected into the Entra ID login (sign-in) page. Please input your login id and password.
When the login is succeeded, the returned claims are shown as follows in your custom PHP page.
Custom code by Node.js (express, passport)
When you use Node.js, the concept is the same as before. You can just use your favorite SAML library with your custom code, and configure the library with the registered Entra ID app settings.
Here we use the famous passport module with express framework in Node.js.
First you start to install express framework and express command.
npm install express -gnpm install -g express-generatorCreate the project directory, and provision express project by the “express” command with the following commands. (The files and folders of template project are created, and all related packages are installed.)
After that, you can start and view the express project with your web browser. (Please run by “npm start“, and access with your web browser.)
mkdir sample01express -e sample01cd sample01npm installNext, install passport and related modules with the following commands.
npm install express-sessionnpm install passportnpm install passport-samlOpen and edit app.js (the start-up js file for this express framework), and please add the following code (of bold font).
I explain about this code later.
var express = require('express');var path = require('path');var favicon = require('serve-favicon');var logger = require('morgan');var cookieParser = require('cookie-parser');var bodyParser = require('body-parser');var passport = require('passport');var session = require('express-session');var fs = require('fs');var SamlStrategy = require('passport-saml').Strategy;passport.serializeUser(function (user, done) { done(null, user);});passport.deserializeUser(function (user, done) { done(null, user);});passport.use(new SamlStrategy( {path: '/login/callback',entryPoint: 'https://login.windows.net/16d103a1-a264-4d36-9b52-51fa01ce5c2e/saml2',issuer: 'mytestapp',cert: fs.readFileSync('MyTestApp.cer', 'utf-8'),signatureAlgorithm: 'sha256' }, function(profile, done) {return done(null,{ id: profile['nameID'], email: profile['http://schemas.xmlsoap.org/ws/2005/05/identity/claims/emailaddress'], displayName: profile['http://schemas.microsoft.com/identity/claims/displayname'], firstName: profile['http://schemas.xmlsoap.org/ws/2005/05/identity/claims/givenname'], lastName: profile['http://schemas.xmlsoap.org/ws/2005/05/identity/claims/surname']}); }));var index = require('./routes/index');var users = require('./routes/users');var app = express();// view engine setupapp.set('views', path.join(__dirname, 'views'));app.set('view engine', 'ejs');// uncomment after placing your favicon in /public//app.use(favicon(path.join(__dirname, 'public', 'favicon.ico')));app.use(logger('dev'));app.use(bodyParser.json());app.use(bodyParser.urlencoded({ extended: false }));app.use(cookieParser());app.use(session( {resave: true,saveUninitialized: true,secret: 'this shit hits' }));app.use(passport.initialize());app.use(passport.session());app.use(express.static(path.join(__dirname, 'public')));app.use('/', index);app.use('/users', users);app.get('/login', passport.authenticate('saml', {successRedirect: '/',failureRedirect: '/login' }) );app.post('/login/callback', passport.authenticate('saml', {failureRedirect: '/',failureFlash: true }), function(req, res) {res.redirect('/'); });// catch 404 and forward to error handlerapp.use(function(req, res, next) { var err = new Error('Not Found'); err.status = 404; next(err);});// error handlerapp.use(function(err, req, res, next) { // set locals, only providing error in development res.locals.message = err.message; res.locals.error = req.app.get('env') === 'development' ? err : {}; // render the error page res.status(err.status || 500); res.render('error');});module.exports = app;Here I explain about this sample code :
- When SAML authentication and idp redirection is needed, the entryPoint url (here,
https://login.windows.net/16d103a1-a264-4d36-9b52-51fa01ce5c2e/saml2) is used. Please copy this value from your app configuration page in Entra ID, and paste it. (see the following screenshot)
- Please see the routing code,
app.get('/login', ...);
When the user goes to/loginby the web browser, the SAML flow is proceeded and the user is redirected to the entryPoint URL. - The path
/login/callbackis the reply URL. When the authentication is succeeded in the identity provider (Entra ID), the results (SAML response) is returned to this URL and the claims (here nameID, emailaddress, displayname, givenname, and surname) are parsed. (seereturn done(null, { id: ..., email: ..., displayName:..., ... });in the above code.)
After that, the page is redirected to/. (Please see the routing code,app.post('/login/callback', ...);)
Thus please set this URL as reply URL in Entra ID app settings beforehand.
- Please copy the X509 cert in Entra ID app settings or download the cert (see the following screenshot), and you set this cert as the passport-saml strategy.
If you set this cert, the passport-saml module validates the incoming SAML response. (The passport-saml checks if the response is not altered by the malicious code.)
Finally let’s get the returned claims and show these values in your page.
Here, we edit routes/index.js, and modify as follows. We’re retrieving the user’s displayName and email address, and passing to the view page.
var express = require('express');var router = express.Router();router.get('/', function(req, res, next) { if(req.isAuthenticated())res.render('index', { username: req.user.displayName, mail: req.user.email }); elseres.render('index', { username: null});});module.exports = router;Edit views/index.ejs (which is the view page of the previous index.js), and modify as follows.
<!DOCTYPE html><html> <head><title>SAML Test</title><link rel='stylesheet' href='/stylesheets/style.css' /> </head> <body><% if (!username) { %><h2>Not logged in...</h2><% } else { %><h2>Hello, <%= username %>.</h2>(your e-mail is <%=mail %>)<% } %> </body></html>Your programming has finished !
Note : Your app must be hosted by https, and please configure to use https. (Here I don’t describe this steps.)
Please start your app using the following command.
npm startWhen you access to /login using your web browser, the page is redirected and the Entra ID sign-in page is displayed.
When you succeed your login, your display name and email are displayed in the top page (index.ejs) as follows.

If you’re ISV folks, you can submit your own custom app (which is federated with Entra ID) to Entra ID app gallery. Everyone can start and use your app (ISV app) federated with Entra ID with a few clicks !
Categories: Uncategorized

When I click “SAML XML Metadata” to download the IDP, I get a 401. The other links above work:
https://main.iam.ad.ext.azure.com/api/ApplicationSso/%5Bobject id]/GetCertificateByThumbprint/[signing cert thumbprint] — ok
https://main.iam.ad.ext.azure.com/api/ApplicationSso/%5Bobject id]/GetMetadataByThumbprint/[signing cert thumbprint] — fails, 401
I can get a sort-of working IDP here:
https://login.microsoftonline.com/%5Btenant id]/FederationMetadata/2007-06/FederationMetadata.xml
…but this does not include the Signing Certificate being used, so none of the Assertions are able to validate.
What am I doing wrong? Why do I get a 401 trying to download the metadata?
LikeLike
Sorry, but I don’t figure out why 401 occurs.
Is the Authorization header value assigned for calling https://main.iam.ad.ext.azure.com/api/ApplicationSso/… ? (You can see using the fiddler.)
The JavaScript calls this url using XMLHttpRequest, but if it’s blank, something in js isn’t going well and it might output the errors in js console…
LikeLike
In the NodeJS example:
You need HTTPS to make this work:
1. Create a Cert
a. openssl genrsa 1024 > key.pem
b. openssl req -x509 -new -key key.pem > key-cert.pem
2. Update bin/www
a. var http = require(‘http’);
to var http = require(‘https’);
var fs = require(‘fs’);
b. var server = http.createServer(options, app);
to var options = {
key: fs.readFileSync(‘key.pem’),
cert: fs.readFileSync(‘key-cert.pem’)
} ;
var server = http.createServer(options, app);
ERROR: pem_read_bio_pubkey failed
Use the Base64 encoded Certificate instead of the Raw one.
LikeLike
Note that you need Azure AD Premium for this settings.
LikeLike
In my case, after authenticating against Azure AD, in the /login/callback method, the script throws the following message:
error:0906D064:PEM routines:PEM_read_bio:bad base64 decode
Any hints regarding what may be the problem?
Thank you
LikeLike
do you have sample code or detailed steps for C# (asp.net) to integrate SAML 2.0?
LikeLike
Hi Tsuyoshi Matsuzaki,
Thank you for the reference artical.
I am trying to integrate it with my application
But after doing the necessary steps when i go to the site link
https://192.168.0.250/simplesaml/index.php
i get redirected to
https://192.168.0.250/simplesaml/module.php/core/frontpage_welcome.php
and get an error = No input file specified.
Instead i should get simpleSAMLphp settings/installation page
I am not able to figure out what is wrong? Is the issue because of simplesaml not published correctly?
Need Help…
Regards,
Rushikesh Salunke
LikeLike
‘./routes/users is missing what I will mention that part?
LikeLike
routes/user is missing
LikeLike
Hi, yeah this post is in fact nice and I have learned lot of things from it on the topic of blogging.
thanks.
LikeLike
Reblogged this on Nishant Rana's Weblog.
LikeLike
Hi Can you please provide implementation for Azure SSO using SAML for angular app using .net core web api at the backend.
LikeLike
Does the Node option not require an `entityid` (eg. `https://sts.windows.net/…`) like how there is for the PHP route?
LikeLike