
Hyperledger Fabric is popular consortium-based blockchain (i.e, enterprise blockchain) developed as an open source project under Linux Foundation (which is governed by a technical steering committee).
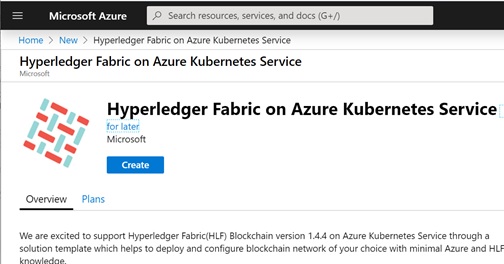
By using “Hyperledger Fabric on Azure Kubernetes Service” (HLF on AKS) template in Azure, you can soon start Hyperledger Fabric without spending time building out the infrastructure.
In this post, I show you both architecture and usage (how to use) for this template.
Hyperledger Fabric Overview
For the folks who are not familiar with Hyperledger Fabric, first I summarize Hyperledger Fabric.
Architecture
The brief architecture of Hyperledger Fabric is :
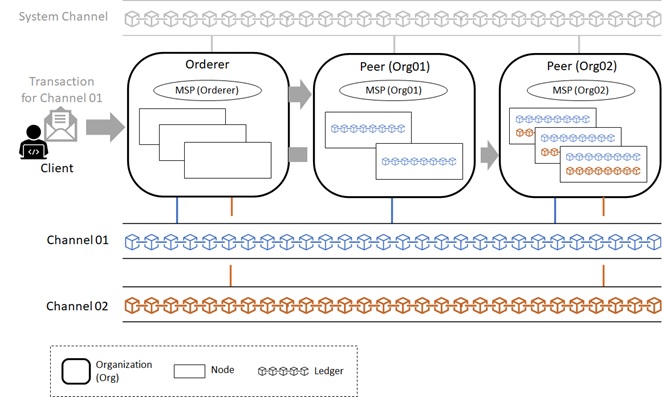
- Hyperledger Fabric is a consortium blockchain (on which each company can participate as members). The network of Hyperledger Fabric consists of each Organizations (Org) and CA. If needed, you can add new organization to consortium.
- The role of each organization is either of main 2 roles : Orderer (Ordering Service) or Peer (Peer Service).
- Each participant company consists of one Peer. In each Peer organization, you can have multiple Peer nodes. Each peer node maintains the state and a copy of distributed ledger (chain).
- Orderer is a special organization in consortium, which coordinates all transactions in the network. When transactions are published, the orderer service validates, orders, and bundles transactions into blocks. (This process is sometimes called “ordering”.) And it broadcasts to all Peers in a channel.
Orderer’s organization also has multiple nodes, on which all blocks are validated by a consensus protocol.
(See here for blockchain consensus.) - The entire network can have multiple ledgers and each ledger is maintained as Channel. Channel is like a virtual network, and physically it’s a ledger itself, which is distributed and decentralized in Peer’s nodes.
- Each organization (Peer) can participate multiple channels. For instance, channel01 has Org01, Org02, and Org03 as participant parties, whereas channel02 has only Org02 and Org03.
The participants, endorsements, and validation policies are maintained in each channel. - The network (consortium) has a special channel, called system channel.
This channel is for administrating the entire network. - As you know, a blockchain needs a set of certificates. In Hyperledger Fabric, these certificates (including Root CA certificate, keystore, OU, so on and so forth) are packaged as MSP (Membership Service Provider).
Each Peer organization has corresponding their own MSP. When some new organization joins in some channel, this organization first starts to enroll MSP in genesis block or channel. (All organizations participating in a network should be enrolled in consortium on system channel.)
Even when a client (SDK) connects to this organization, this client requires a connection profile, which is a part of MSP.
Now I illustrates the overall architecture as follows.
In “Hyperledger Fabric on Azure Kubernetes Service” (HLF on AKS) template, each organization corresponds to each AKS cluster and each node corresponds to the pod.
You don’t need to generate MSP manually, and all related setup is done by this template. All you have to do is to create channels and add each organization (i.e, Peer AKS cluster) to favorite channels.

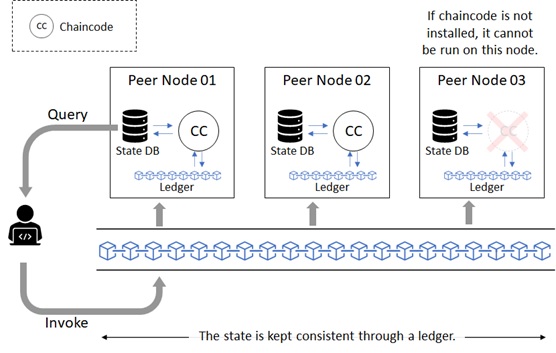
Chaincode
In Hyperledger Fabric and R3 Corda, the smart contract is authored in general-purpose programming languages (such as, Java and so forth) rather than domain-specific languages (DSL) such as solidity. (See here for smart contract with solidity.) The smart contract in Hyperledger Fabric is named chaincode, and currently that can be authored in Go (Golang), Java, or Node.js (JavaScript).
Note : The chaincode is often written by Go, but JavaScript (Node.js) is also supported in Fabric version 1.1.
When you want to execute chaincode in some node, of course, the code should be installed in this node. The result state is written in State Database (State DB), and its transaction (i.e, journal) is logged on a ledger.
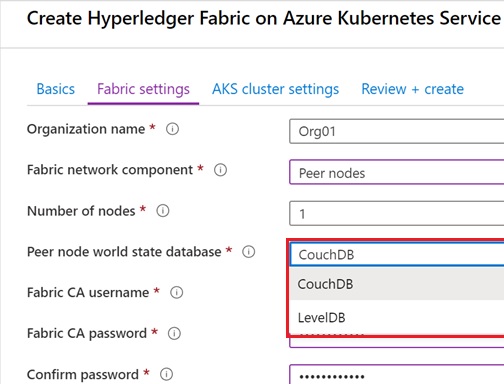
The state database is generic key-value database (you can choose LevelDB or CouchDB for state database) and might be easily modified, then you might think it’s not immutable. However, the transaction’s logs are immutably maintained in a decentralized ledger, then the state database can be regenerated from the chain at any time, and automatically get recovered (or generated if needed) upon peer startup.
Therefore the state is kept consistent through a ledger.
In “Hyperledger Fabric on Azure Kubernetes Service” (HLF on AKS) template, you can choose LevelDB or CouchDB for State Database in the wizard (see below), and you don’t need manually set up for database installation and configuration.
Consensus Algorithm
For blockchain network, it’s important to make secure and performant for maintaining the network consistency. And consensus protocol takes responsible for this mechanism. (See my early post “Consensus Algorithms in Blockchain“.)
Same like other enterprise blockchains, the consensus protocol is also pluggable in Hyperledger Fabric.
As I mentioned above (see “Architecture” section), Orderer (which runs multiple nodes) is responsible for consensus. On Hyperledger Fabric, you can choose from the following 3 options for consensus implementation. :
- Raft
Raft is based on byzantine fault tolerant (BFT) and the protocol is implemented by etcd library.
Here I don’t go so far for Raft details, but the article “Raft – Understandable Distributed Consensus” is a good infographical reading for understanding Raft. - Kafka
You can use Apache Kafka for BFT based protocol. Kafka implements Paxos protocol in Zookeeper and this mechanism is used for consensus.
Kafka provides more performative and reliable architecture (Kafka manages transactions for each channel by parallel with high availability. See here for details.), but you should care about management overheads for using Kafka in Orderer. - Solo
Strictly Solo is not consensus protocol. Solo works on a single node and it’s provided for only development and testing. (You should not use this protocol in production.)
On HLF on AKS template, the orderer runs RAFT-based algorithm for consensus. (You cannot choose Kafka or Solo.)
Then it’s better to set the number of orderer’s nodes as 3, 5, or 7.
Start Your Clusters (Both Orderer and Peer)
Now let’s start to create organization’s cluster using “Hyperledger Fabric on Azure Kubernetes Service” (HLF on AKS) template.
Here we create 2 clusters : orderer organization (named “OrdererOrg“) and one peer organization (named “Org01“).
Note : You should select different resource groups for orderer and peer.

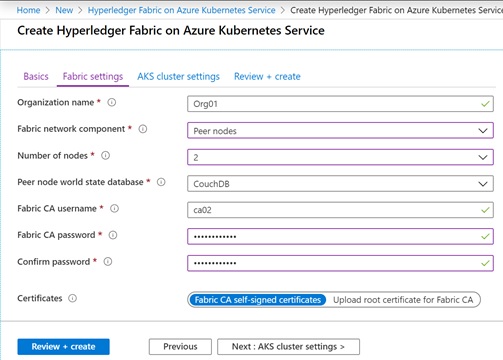
It takes several minutes for creation.
After the cluster starts, you can use ordinary kubectl command to interact with your cluster.
To switch your cluster (between OrdererOrg and Org01), you can use “az aks get-credentials” command in Azure CLI. (See below.)
Note : You can quickly run these commands using Azure Cloud Shell on your web browser. (Azure CLI is already installed on Azure Cloud Shell.)
Orderer Cluster (with 3 Orderer Pods)
# Set config to Orderer AKS clusteraz aks get-credentials --resource-group {Orderer's ResourceGroupName} \ --name {Orderer's AKSName} \ --subscription {SubscriptionID}# Get All Podskubectl get pods --all-namespacesNAMESPACENAMEca ca-5f85dc885f-2mxr2hlf orderer1-68d488f759-pc26lhlf orderer2-5b6f6567b7-6fwq2hlf orderer3-765fd674b7-vwzp7kube-system addon-http-application-routing-default-http-backend-75ffbd4xtbzkube-system addon-http-application-routing-external-dns-776f6fd884-ttng5kube-system addon-http-application-routing-nginx-ingress-controller-66nr9m6kube-system azure-cni-networkmonitor-kgrr4kube-system azure-cni-networkmonitor-n9rk8kube-system azure-cni-networkmonitor-wdlg9kube-system azure-ip-masq-agent-fg8ggkube-system azure-ip-masq-agent-mr5lbkube-system azure-ip-masq-agent-twcl2kube-system coredns-8697646b74-fjh8hkube-system coredns-8697646b74-qsgmlkube-system coredns-autoscaler-567dc76d66-s4wmzkube-system kube-proxy-4cxqlkube-system kube-proxy-nq5ftkube-system kube-proxy-xnv7qkube-system kubernetes-dashboard-9f5bf9974-ppwsqkube-system metrics-server-5695787788-vvf6rkube-system omsagent-6fjctkube-system omsagent-lr2fvkube-system omsagent-rs-64b94648c-x7qlwkube-system omsagent-sxghkkube-system tunnelfront-86b65c6fb6-tcvjwnginxnginx-ingress-controller-5bf5f9c879-bcpm6nginxnginx-ingress-default-backend-c4f45d88b-vm64ntoolsfabric-toolsPeer Cluster (with 2 Peer Pods)
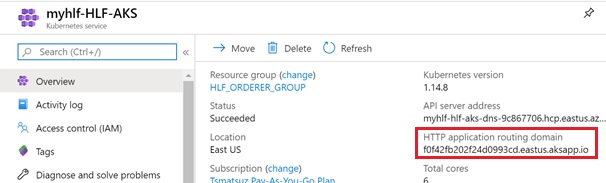
# Set config to Peer AKS clusteraz aks get-credentials --resource-group {Peer's ResourceGroupName} \ --name {Peer's AKSName} \ --subscription {SubscriptionID}# Get All Podskubectl get pods --all-namespacesNAMESPACENAMEca ca-5f85dc885f-mls7jhlf peer1-dcddb89d8-cvl5khlf peer2-65bc78dc56-fw244kube-system addon-http-application-routing-default-http-backend-75ffbdbc8rskube-system addon-http-application-routing-external-dns-5fcf59ff58-tdmh7kube-system addon-http-application-routing-nginx-ingress-controller-66mjkmxkube-system azure-cni-networkmonitor-8hqg9kube-system azure-cni-networkmonitor-rqcftkube-system azure-cni-networkmonitor-x4pc6kube-system azure-ip-masq-agent-jvtfpkube-system azure-ip-masq-agent-k55jdkube-system azure-ip-masq-agent-vcqmbkube-system coredns-8697646b74-75tb4kube-system coredns-8697646b74-mbxdpkube-system coredns-autoscaler-567dc76d66-xd7zgkube-system kube-proxy-4klx4kube-system kube-proxy-qpmmlkube-system kube-proxy-vd82rkube-system kubernetes-dashboard-9f5bf9974-j2dnfkube-system metrics-server-5695787788-vb2jmkube-system omsagent-7vvp8kube-system omsagent-9h968kube-system omsagent-jrppzkube-system omsagent-rs-6ffd76dcd4-vkz7nkube-system tunnelfront-66cc9d8b97-d26jjnginxnginx-ingress-controller-5bf5f9c879-dlv9dnginxnginx-ingress-default-backend-c4f45d88b-957lstoolsfabric-toolsYou can get (copy) your cluster’s routing domain in Azure Portal. (See below.)
For instance, the address of orderer1 might be orderer1.f0f42fb202f24d0993cd.eastus.aksapp.io:443 in public.
(Replace f0f42fb202f24d0993cd to your own domain prefix. Here we assume that we have chosen “eastus” for AKS region.)
Development Settings for Hyperledger Fabric binaries
Hyperledger Fabric on AKS is same as standard and open source Hyperledger Fabric, then you can use your familiar tools and commands.
Before starting, we setup our development (or admin) environment interacting with our clusters.
First we setup Hyperledger Fabric platform binary commands. (This is generic setup for all Hyperledger Fabric development.)
Note : As I describe later, we setup these in our own Kubernetes pod.
Before installing Fabric binaries, we should install and setup Go programming language (GOLang) as follows.
wget https://dl.google.com/go/go1.12.17.linux-amd64.tar.gz -O /tmp/go1.12.17.linux-amd64.tar.gztar -C /usr/local -xzf /tmp/go1.12.17.linux-amd64.tar.gzexport GOROOT=/usr/local/goexport GOPATH=$PWDexport PATH=/usr/local/go/bin:$PATHNow we install and setup platform binaries using bootstrap.sh as follows.
Using -d and -s options, we suppress clone and installation of sample images and repository. (We install only binary commands for Hyperledger Fabric.)
Please use Fabric version 1.4.4 (Not use version 2.0) for binary, since Hyperledger Fabric on AKS uses version 1.4.4.
mkdir /usr/local/hyperledgercd /usr/local/hyperledgercurl -sSL https://raw.githubusercontent.com/hyperledger/fabric/master/scripts/bootstrap.sh | sudo bash -s -- 1.4.4 1.4.4 0.4.18 -d -sexport PATH=/usr/local/hyperledger/bin:$PATHAfter the installation completed, please check if these are correctly installed (check if PATH is correctly set as follows).
# Check if GO is installedgo version# Check if Hyperledger commands are installedpeer versionNext download Hyperledger Fabric config files from your cluster (Orderer/Peer) and put these files in your development environment.
Note : From now, please replace
HLF_ORDERER_GROUP(resource group name),order-HLF-AKS(AKS cluster name),xxxxxxxx-xxxx-xxxx-xxxx-xxxxxxxxxxxx(Azure subscription id), andorderer1-68d488f759-pc26l(pod name) to values of your own.
# Set Orderer cluster configaz aks get-credentials --resource-group HLF_ORDERER_GROUP \ --name order-HLF-AKS \ --subscription xxxxxxxx-xxxx-xxxx-xxxx-xxxxxxxxxxxx# Download fabric config from my orderer nodekubectl cp -n hlf orderer1-68d488f759-pc26l:/etc/hyperledger/fabric /etc/hyperledger/fabric# Set Environment Variablesexport FABRIC_CFG_PATH=/etc/hyperledger/fabricThese installation and configuration is written by the following Dockerfile (docker container).
Now I’ve published this image as tsmatz/hyperledger-dev:0.1.0 in Docker Hub, and you can quickly start your development environment by running this container on your machine (pod).
FROM ubuntu:18.04USER root:rootENV LANG=C.UTF-8 LC_ALL=C.UTF-8ENV DEBIAN_FRONTEND=noninteractiveRUN apt-get update && \apt-get install -y wget curl jq# Install GoRUN wget --quiet https://dl.google.com/go/go1.12.17.linux-amd64.tar.gz -O /tmp/go1.12.17.linux-amd64.tar.gz && \tar -C /usr/local -xzf /tmp/go1.12.17.linux-amd64.tar.gz && \rm /tmp/go1.12.17.linux-amd64.tar.gzENV GOROOT=/usr/local/go \GOPATH=/usr/local/go \PATH=/usr/local/go/bin:$PATH# Install Hyperledger binaries# (Supress image-download and repo-clone)RUN mkdir /usr/local/hyperledger && \cd /usr/local/hyperledger && \curl -sSL https://raw.githubusercontent.com/hyperledger/fabric/master/scripts/bootstrap.sh | bash -s -- 1.4.4 1.4.4 0.4.18 -d -sENV PATH=/usr/local/hyperledger/bin:$PATH# Copy Fabric ConfigRUN mkdir /etc/hyperledger && \curl -sSL https://github.com/tsmatz/hyperledger-dev/raw/master/0.1.0/orderer_config.tar.gz | tar xvz -C /etc/hyperledgerENV FABRIC_CFG_PATH=/etc/hyperledger/fabricDevelopment Settings for Your Own Organizations
Here we configure several environment settings which depend on our own orderer and peer.
These settings are separately needed for each organization, then we should provision 2 pods (or machines) for development, one is for orderer and another is for peer.
First we needs a set of certificates (including MSP), which are automatically provisioned in cluster’s creation.
These are included as secret volumes (which namespace is all “hlf-admin“) in Kubernetes cluster.
You can list secret volumes using kubectl command as follows.
kubectl -n hlf-admin get secretsNAME TYPEdefault-token-84jj7kubernetes.io/service-account-tokenfabric-tools-secrets kubernetes.io/dockerconfigjsonhlf-admin-idcert Opaquehlf-admin-idkeyOpaquehlf-admin-tls-idcert Opaquehlf-admin-tls-idkeyOpaquehlf-ca-idcert Opaquehlf-tlsca-idcert OpaqueFor instance, when you want to see the file (name and size) in hlf-tlsca-idcert, run the following command. You can find ca.crt in this persistent volume.
Note : These files exist on Disk resource in AKS managed resource group.
kubectl -n hlf-admin describe secrets/hlf-tlsca-idcertName: hlf-tlsca-idcertNamespace:hlf-adminLabels: <none>Annotations:Type: OpaqueData====ca.crt: 883 bytesIn our development environment, we need the following secret volumes, then we should mount these volumes in our development pods.
In this post, we assume that we have mounted on the following target directories. (Note that each contents of these are different between orderer cluster and peer cluster.)
| secret volume | mount target | |
|---|---|---|
| hlf-admin-idcert | /var/hyperledger/admin/msp/admincerts /var/hyperledger/admin/msp/signcerts | These are used for admin MSP. Especially hlf-tlsca-idcert is used as certificate for TLS connection. And this MSP also includes the certificate information for the following client authentication (handshake). |
| hlf-ca-idcert | /var/hyperledger/admin/msp/cacerts | |
| hlf-admin-idkey | /var/hyperledger/admin/msp/keystore | |
| hlf-tlsca-idcert | /var/hyperledger/admin/msp/tlscacerts | |
| hlf-admin-tls-idkey | /var/hyperledger/admin/tls | When you connect to the node (orderer or peer) remotely, the client certificate is used as authentication (handshake) in HLF on AKS. These volumes include this client certificate. |
| hlf-admin-tls-idcert | /var/hyperledger/admin/tls |
Next we should set the following environment variables in each organization’s development pod. Notice that these environments look up previous mounted certificates.
(Please replace CORE_PEER_LOCALMSPID and CORE_PEER_ADDRESS to your own provisioned settings.)
Orderer
CORE_PEER_ADDRESS="orderer1.f0f42fb202f24d0993cd.eastus.aksapp.io:443"CORE_PEER_LOCALMSPID="OrdererOrg"CORE_PEER_TLS_ENABLED="true"CORE_PEER_TLS_ROOTCERT_FILE="/var/hyperledger/admin/msp/tlscacerts/ca.crt"CORE_PEER_MSPCONFIGPATH="/var/hyperledger/admin/msp"CORE_PEER_TLS_CLIENTAUTHREQUIRED="true"CORE_PEER_TLS_CLIENTCERT_FILE="/var/hyperledger/admin/tls/cert.pem"CORE_PEER_TLS_CLIENTKEY_FILE="/var/hyperledger/admin/tls/key.pem"Peer
CORE_PEER_ADDRESS="peer1.1dcd22b26a2d494d9f4e.eastus.aksapp.io:443"CORE_PEER_LOCALMSPID="Org01"CORE_PEER_TLS_ENABLED="true"CORE_PEER_TLS_ROOTCERT_FILE="/var/hyperledger/admin/msp/tlscacerts/ca.crt"CORE_PEER_MSPCONFIGPATH="/var/hyperledger/admin/msp"CORE_PEER_TLS_CLIENTAUTHREQUIRED="true"CORE_PEER_TLS_CLIENTCERT_FILE="/var/hyperledger/admin/tls/cert.pem"CORE_PEER_TLS_CLIENTKEY_FILE="/var/hyperledger/admin/tls/key.pem"Now we wrap up these settings.
These settings (volume mounts and environment variables) will be described using the following pod configuration (.yaml).
Notice that we’re using the previous image (tsmatz/hyperledger-dev:0.1.0) for base container images.
Pod Configuration – Orderer (devenv_orderer.yaml)
apiVersion: v1kind: Podmetadata: name: devenv labels: name: devenvspec: restartPolicy: Never volumes: - name: cacertssecret: secretName: hlf-ca-idcert - name: tls-cacertssecret: secretName: hlf-tlsca-idcert - name: admincertssecret: secretName: hlf-admin-idcert - name: keystoresecret: secretName: hlf-admin-idkey - name: signcertssecret: secretName: hlf-admin-idcert - name: tls-keysecret: secretName: hlf-admin-tls-idkey - name: tls-certsecret: secretName: hlf-admin-tls-idcert containers: - name: devenvimage: tsmatz/hyperledger-dev:0.1.0stdin: truetty: truecommand: ["/bin/bash"]volumeMounts:- mountPath: /var/hyperledger/admin/msp/tlscacerts name: tls-cacerts readOnly: true- mountPath: /var/hyperledger/admin/msp/admincerts name: admincerts readOnly: true- mountPath: /var/hyperledger/admin/msp/cacerts name: cacerts readOnly: true- mountPath: /var/hyperledger/admin/msp/keystore name: keystore readOnly: true- mountPath: /var/hyperledger/admin/msp/signcerts name: signcerts readOnly: true- mountPath: /var/hyperledger/admin/tls/key.pem name: tls-key readOnly: true subPath: key.pem- mountPath: /var/hyperledger/admin/tls/cert.pem name: tls-cert readOnly: true subPath: cert.pemenv:- name: CORE_PEER_TLS_ENABLED value: "true"- name: CORE_PEER_TLS_ROOTCERT_FILE value: /var/hyperledger/admin/msp/tlscacerts/ca.crt- name: CORE_PEER_TLS_CLIENTAUTHREQUIRED value: "true"- name: CORE_PEER_TLS_CLIENTCERT_FILE value: /var/hyperledger/admin/tls/cert.pem- name: CORE_PEER_TLS_CLIENTKEY_FILE value: /var/hyperledger/admin/tls/key.pem- name: CORE_PEER_TLS_CLIENTROOTCAS_FILES value: /var/hyperledger/admin/msp/tlscacerts/ca.crt- name: CORE_PEER_MSPCONFIGPATH value: /var/hyperledger/admin/msp- name: CORE_PEER_LOCALMSPID value: OrdererOrg- name: CORE_PEER_ADDRESS value: orderer1.f0f42fb202f24d0993cd.eastus.aksapp.io:443workingDir: /var/hyperledger/adminPod Configuration – Peer (devenv_peer.yaml)
apiVersion: v1kind: Podmetadata: name: devenv labels: name: devenvspec: restartPolicy: Never volumes: - name: cacertssecret: secretName: hlf-ca-idcert - name: tls-cacertssecret: secretName: hlf-tlsca-idcert - name: admincertssecret: secretName: hlf-admin-idcert - name: keystoresecret: secretName: hlf-admin-idkey - name: signcertssecret: secretName: hlf-admin-idcert - name: tls-keysecret: secretName: hlf-admin-tls-idkey - name: tls-certsecret: secretName: hlf-admin-tls-idcert containers: - name: devenvimage: tsmatz/hyperledger-dev:0.1.0stdin: truetty: truecommand: ["/bin/bash"]volumeMounts:- mountPath: /var/hyperledger/admin/msp/tlscacerts name: tls-cacerts readOnly: true- mountPath: /var/hyperledger/admin/msp/admincerts name: admincerts readOnly: true- mountPath: /var/hyperledger/admin/msp/cacerts name: cacerts readOnly: true- mountPath: /var/hyperledger/admin/msp/keystore name: keystore readOnly: true- mountPath: /var/hyperledger/admin/msp/signcerts name: signcerts readOnly: true- mountPath: /var/hyperledger/admin/tls/key.pem name: tls-key readOnly: true subPath: key.pem- mountPath: /var/hyperledger/admin/tls/cert.pem name: tls-cert readOnly: true subPath: cert.pemenv:- name: CORE_PEER_TLS_ENABLED value: "true"- name: CORE_PEER_TLS_ROOTCERT_FILE value: /var/hyperledger/admin/msp/tlscacerts/ca.crt- name: CORE_PEER_TLS_CLIENTAUTHREQUIRED value: "true"- name: CORE_PEER_TLS_CLIENTCERT_FILE value: /var/hyperledger/admin/tls/cert.pem- name: CORE_PEER_TLS_CLIENTKEY_FILE value: /var/hyperledger/admin/tls/key.pem- name: CORE_PEER_TLS_CLIENTROOTCAS_FILES value: /var/hyperledger/admin/msp/tlscacerts/ca.crt- name: CORE_PEER_MSPCONFIGPATH value: /var/hyperledger/admin/msp- name: CORE_PEER_LOCALMSPID value: Org01- name: CORE_PEER_ADDRESS value: peer1.1dcd22b26a2d494d9f4e.eastus.aksapp.io:443workingDir: /var/hyperledger/adminUsing this pod configuration, you can soon create a development (admin) pod with the following commands.
Create Dev Pod (Orderer)
# Switch to Orderer Clusteraz aks get-credentials --resource-group HLF_ORDERER_GROUP \ --name order-HLF-AKS \ --subscription xxxxxxxx-xxxx-xxxx-xxxx-xxxxxxxxxxxx# Create new dev (admin) pod for clusterkubectl -n hlf-admin apply -f ./devenv_orderer.yamlCreate Dev Pod (Peer)
# Switch to Peer Clusteraz aks get-credentials --resource-group HLF_PEER_GROUP \ --name peer1-HLF-AKS \ --subscription xxxxxxxx-xxxx-xxxx-xxxx-xxxxxxxxxxxx# Create new dev (admin) pod for clusterkubectl -n hlf-admin apply -f ./devenv_peer.yamlNow you can login to this generated working (dev/admin) pod.
Login to Dev Pod
# Login to dev (admin) podkubectl exec -n hlf-admin -it devenv /bin/bashI illustrate our development environments as follows.
Development Environment
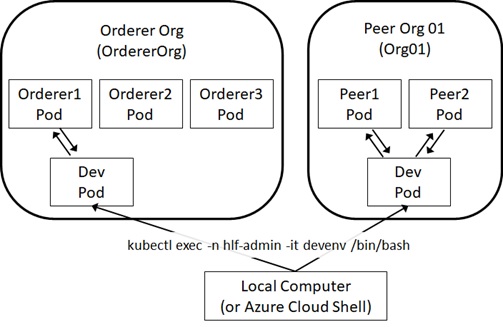
Note : For HLF on AKS development, Microsoft provides sample fabric-admin.yaml in GitHub, which is the same as previous configuration.
See official document “Hyperledger Fabric consortium on Azure Kubernetes Service (AKS)” for details.
Create New Channel
Now we’re ready to use our cluster (both Orderer and Peer).
First of all, we create a new channel in consortium network on orderer’s dev pod.
# Switch to Orderer Orgaz aks get-credentials --resource-group HLF_ORDERER_GROUP \ --name order-HLF-AKS \ --subscription xxxxxxxx-xxxx-xxxx-xxxx-xxxxxxxxxxxx# Login to Orderer's dev envkubectl exec -n hlf-admin -it devenv /bin/bashIn order to create a channel, we should create a transaction file using configtxgen command.
For running this command, we should prepare configtx.yaml file in the current directory as follows. (If you skip this configuration, configtxgen command looks at $FABRIC_CFG_PATH/configtx.yaml by default.)
Here we’re setting “OrderOrg” as orderer’s org name and id.
As I explained above, we’re mounting orderer’s MSP on /var/hyperledger/admin/msp. Then we’re setting the relative path “msp” for MSPDir as follows. (Since the default working directory is /var/hyperledger/admin on dev pod.)
configtx.yaml
## Sample Configuration for your First Start# (It should never be used in production)#---################################################################################## This section defines the organizational identities.#################################################################################Organizations:- &OrdererOrgName: OrdererOrgID: OrdererOrgMSPDir: mspPolicies:Readers:Type: SignatureRule: "OR('OrdererOrg.member')"Writers:Type: SignatureRule: "OR('OrdererOrg.member')"Admins:Type: SignatureRule: "OR('OrdererOrg.admin')"##### Write as follows when you set Peer orgs.##### (Now we don't need this, since Peer is configured later.)#- &Org01#Name: Org01#ID: Org01#MSPDir: org01_msp#Policies:#Readers:#Type: Signature#Rule: "OR('Org01.member')"#Writers:#Type: Signature#Rule: "OR('Org01.member')"#Admins:#Type: Signature#Rule: "OR('Org01.admin')"#AnchorPeers:#- Host: peer1.1dcd22b26a2d494d9f4e.eastus.aksapp.io# Port: 443################################################################################## This section defines the capabilities of fabric network.#################################################################################Capabilities:Channel: &ChannelCapabilitiesV1_4_3: trueV1_3: falseV1_1: falseOrderer: &OrdererCapabilitiesV1_4_2: trueV1_1: falseApplication: &ApplicationCapabilitiesV1_4_2: trueV1_3: falseV1_2: falseV1_1: false################################################################################## This section defines the values for application related parameters.#################################################################################Application: &ApplicationDefaultsOrganizations:Policies:Readers:Type: ImplicitMetaRule: "ANY Readers"Writers:Type: ImplicitMetaRule: "ANY Writers"Admins:Type: ImplicitMetaRule: "MAJORITY Admins"Capabilities:<<: *ApplicationCapabilities################################################################################## For channel creation, this is not needed.# (On Hyperledger Fabric on AKS, the orderer runs RAFT-based algorithm.)##################################################################################Orderer: &OrdererDefaults## Available types are "solo", "kafka" or "etcdraft"#OrdererType: solo#Addresses:#- orderer1.7bd6ca4c5b1540fe91bc.eastus.aksapp.io:443#BatchTimeout: 2s#BatchSize:#MaxMessageCount: 10#AbsoluteMaxBytes: 99 MB#PreferredMaxBytes: 512 KB#Kafka:#Brokers:#- 127.0.0.1:9092#EtcdRaft:#...################################################################################## This section defines the values for channel related parameters.#################################################################################Channel: &ChannelDefaultsPolicies:Readers:Type: ImplicitMetaRule: "ANY Readers"Writers:Type: ImplicitMetaRule: "ANY Writers"Admins:Type: ImplicitMetaRule: "MAJORITY Admins"Capabilities:<<: *ChannelCapabilities################################################################################## Profile List :# Each refers above configurations.#################################################################################Profiles:SampleChannel:Consortium: SampleConsortium<<: *ChannelDefaultsApplication:<<: *ApplicationDefaultsOrganizations:- *OrdererOrgCapabilities:<<: *ApplicationCapabilities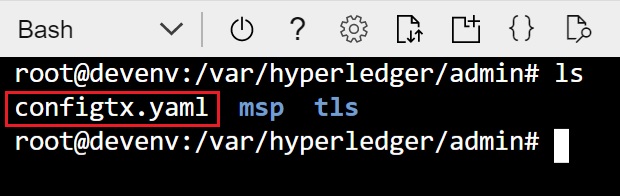
Now we can create a transaction file named “channel.tx” using configtxgen command.
Here we’re setting ch01 as channel name, and SampleChannel is the previous profile in configtx.yaml.
configtxgen -profile SampleChannel \ -outputCreateChannelTx ./channel.tx \ -channelID ch01 \ -configPath ./Using this channel.tx, we can request new channel creation to orderer node using peer command. (Then the genesis block of this channel is generated in the network.)
As you can see below, you should set certificates for both TLS connection (with --tls and --cafile options) and client authentication (with --clientauth, --certfile, and --keyfile options) for orderer node.
peer channel create -o orderer1.f0f42fb202f24d0993cd.eastus.aksapp.io:443 \ -c ch01 \ -f ./channel.tx \ --tls \ --cafile /var/hyperledger/admin/msp/tlscacerts/ca.crt \ --clientauth \ --certfile /var/hyperledger/admin/tls/cert.pem \ --keyfile /var/hyperledger/admin/tls/key.pemFor now, Peer (Org01) is not connected on this network.
Add Peer Org to Consortium
Next we’ll add our peer organization (Org01) to this consortium network by adding peer organization’s MSP.
As I mentioned above, Fabric network provides system channel for managing entire network. This id (id of system channel) is “testchainid” by default.
With the following steps, here we add Org01 by modifying the configuration of this testchainid channel.
- Generate Org01’s configuration json (including Org01’s MSP) on peer dev pod.
- Copy this json (Org01’s configuration) on orderer dev pod.
- Fetch (Download) system channel’s block configuration on orderer dev pod.
- Add Org01’s configuration in system channel’s block configuration on orderer dev pod.
- Compute difference between original configuration and modified configuration on orderer dev pod.
- Request for modifying system channel’s configuration using above computed configuration on orderer dev pod.
By changing configuration, Org01’s MSP will be registered in consortium network.
Every time when you need to add another peer organization, you can repeat this configuration changes.
Now let’s start.
First, for generating Org01’s configuration, we login to Org01’s (peer’s) dev pod as follows.
# Switch to Peer (Org01) clusteraz aks get-credentials --resource-group HLF_PEER_GROUP \ --name peer1-HLF-AKS \ --subscription xxxxxxxx-xxxx-xxxx-xxxx-xxxxxxxxxxxx# Login to dev envkubectl exec -n hlf-admin -it devenv /bin/bashNext we generate the following configtx.yaml in the current directory.
On the default working directory in peer’s dev pod, we have peer organization’s MSP in the relative path “msp”, then we’re setting “msp” as MSPDir as follows.
Note : As you can see later, here we just require organization’s information including MSP. Therefore we’re setting the minimal configuration as follows.
configtx.yaml
## Sample Configuration for your First Start# (It should never be used in production)#---################################################################################## This section defines the organizational identities.#################################################################################Organizations:- &Org01Name: Org01ID: Org01MSPDir: mspPolicies:Readers:Type: SignatureRule: "OR('Org01.member')"Writers:Type: SignatureRule: "OR('Org01.member')"Admins:Type: SignatureRule: "OR('Org01.admin')"##### This setting is not needed now, because we just print org definition#AnchorPeers:#- Host: peer1.1dcd22b26a2d494d9f4e.eastus.aksapp.io# Port: 443With configtxgen command, we create the organization’s configuration (Org01.json) including MSP as follows. (All required certificates in MSP is encoded and written in this json file.)
configtxgen -printOrg Org01 -configPath ./ > Org01.jsonNow we copy this Org01.json into orderer’s dev pod.
From here, we switch to orderer’s dev pod.
# Exit from podexit# Download Org01.json from peer's dev pod to localkubectl cp -n hlf-admin \ devenv:/var/hyperledger/admin/Org01.json \ Org01.json# Switch to Orderer (OrdererOrg)az aks get-credentials --resource-group HLF_ORDERER_GROUP \ --name order-HLF-AKS \ --subscription xxxxxxxx-xxxx-xxxx-xxxx-xxxxxxxxxxxx# Upload Org01.json into orderer's dev podkubectl cp -n hlf-admin Org01.json \ devenv:/var/hyperledger/admin/Org01.json# Login to orderer's dev podkubectl exec -n hlf-admin -it devenv /bin/bashNext we fetch (download) the block configuration for system channel (testchainid) as follows.
The generated block configuration (sys_config_block.pb) is configuration block binary (protobuf), then we convert this format to readable configuration with json representation (sys_config_block.json) using configtxlator command.
# Fetch system channel config into sys_config_block.pbpeer channel fetch config sys_config_block.pb \ -o orderer1.f0f42fb202f24d0993cd.eastus.aksapp.io:443 \ -c testchainid \ --tls \ --cafile /var/hyperledger/admin/msp/tlscacerts/ca.crt \ --clientauth \ --certfile /var/hyperledger/admin/tls/cert.pem \ --keyfile /var/hyperledger/admin/tls/key.pem# Decode fabric structures (.pb) into json config (.json)configtxlator proto_decode --input sys_config_block.pb \ --type common.Block > sys_config_block.jsonNext we extract only configuration phrase (cut a part written by bold font in the following envelop) from this decoded payload, and save as sys_config_block.json.
{ "data": {"data": [ {"payload": { "data": {"config":{<< here "channel_group": { << here... << here }, << here "sequence": 1 << here}, << here... }, ...},... }, ...},... }, "header": {...}, "metadata": {...}}This is also done by using jq as follows. (You don’t need to edit above manually.)
jq .data.data[0].payload.data.config sys_config_block.json > original_sys_config.jsonNow we add Org01’s configuration (previously generated Org01.json) in original_sys_config.json as follows (The following phrase in bold font is added in original_sys_config.json), and save as modified_sys_config.json.
{ "channel_group": {"groups": { "Application": {...}, "Consortiums": {"groups": { "SampleConsortium": {"groups": { "OrdererOrg": {...}, "Org01": {<<here... <<here } <<here} }} } "Orderer": {...}},... }, "sequence": 1}This is also done by using jq as follows. (You don’t need to edit above manually.)
jq -s ".[0] * {\"channel_group\":{\"groups\":{\"Consortiums\":{\"groups\": {\"SampleConsortium\": {\"groups\": {\"Org01\":.[1]}}}}}}}" original_sys_config.json Org01.json > modified_sys_config.jsonNow we compute the difference between original_sys_config.json and modified_sys_config.json using configtxlator command.
Note that original files are json representation, then you should convert to block binary (protobuf) for computing the difference.
# Convert original_sys_config.json to protobufconfigtxlator proto_encode --input original_sys_config.json \ --type common.Config > original_sys_config.pb# Convert modified_sys_config.json to protobufconfigtxlator proto_encode --input modified_sys_config.json \ --type common.Config > modified_sys_config.pb# Compute differenceconfigtxlator compute_update --channel_id testchainid \ --original original_sys_config.pb \ --updated modified_sys_config.pb > differed_sys_config.pb# Convert computed result to jsonconfigtxlator proto_decode --input differed_sys_config.pb \ --type common.ConfigUpdate > differed_sys_config.jsonWe convert this computed difference (differed_sys_config.json) to payload by adding headers as follows.
Finally we convert the generated json to block binary (protobuf) for requesting config modification.
echo '{"payload":{"header":{"channel_header":{"channel_id":"testchainid", "type":2}},"data":{"config_update":'$(cat differed_sys_config.json)'}}}' > modreqst_sys_config.jsonconfigtxlator proto_encode --input modreqst_sys_config.json \ --type common.Envelope > modreqst_sys_config.pbNow we request config modification for system channel (testchainid) using modreqst_sys_config.pb (update request payload) to orderer node.
peer channel update -f modreqst_sys_config.pb \ -o orderer1.f0f42fb202f24d0993cd.eastus.aksapp.io:443 \ -c testchainid \ --tls \ --cafile /var/hyperledger/admin/msp/tlscacerts/ca.crt \ --clientauth \ --certfile /var/hyperledger/admin/tls/cert.pem \ --keyfile /var/hyperledger/admin/tls/key.pemAs I mentioned above, you can repeat this configuration changes, every time when you need to add another peer organization.
Add Peer Org to Channel
Now Org01 is added in the corsortium, but not added in our channel ch01. Here we add Org01 to our channel ch01.
This process is similar to the previous steps and we continue to work on oderer’s dev pod.
Same like previous section, we fetch (download) the block config for ch01 (not for testchainid here) using peer channel fetch config command. (Now we save this config as ch01_config_block.pb.)
Then we convert this file to readable config with json representation (ch01_config_block.json) using configtxlator command.
# Fetch your channel (ch01) config into ch01_config_block.pbpeer channel fetch config ch01_config_block.pb \ -o orderer1.f0f42fb202f24d0993cd.eastus.aksapp.io:443 \ -c ch01 \ --tls \ --cafile /var/hyperledger/admin/msp/tlscacerts/ca.crt \ --clientauth \ --certfile /var/hyperledger/admin/tls/cert.pem \ --keyfile /var/hyperledger/admin/tls/key.pem# Decode fabric structures (.pb) into json config (.json)configtxlator proto_decode --input ch01_config_block.pb \ --type common.Block > ch01_config_block.jsonAs you saw in the previous section, extract channel config setting from ch01_config_block.json using jq, and save as original_ch01_config.json.
jq .data.data[0].payload.data.config ch01_config_block.json > original_ch01_config.jsonAdd peer organization (Org01.json) as new participant’s group into “Application” section in original_ch01_config.json as follows, and save as modified_ch01_config.json.
{ "channel_group": {"groups": { "Application": {"OrdererOrg": {...},"Org01": { << here ... << here} << here }, "Orderer": {...}}... }, ...}This is done by using jq as follows. (You don’t need to edit above manually.)
jq -s ".[0] * {\"channel_group\":{\"groups\":{\"Application\":{\"groups\": {\"Org01\":.[1]}}}}}" original_ch01_config.json Org01.json > modified_ch01_config.jsonAs you saw in the previous section, generate the config update’s request using both original config (original_ch01_config.json) and modified config (modified_ch01_config.json).
# Compute Updateconfigtxlator proto_encode --input original_ch01_config.json \ --type common.Config > original_ch01_config.pbconfigtxlator proto_encode --input modified_ch01_config.json \ --type common.Config > modified_ch01_config.pbconfigtxlator compute_update --channel_id ch01 \ --original original_ch01_config.pb \ --updated modified_ch01_config.pb > differed_ch01_config.pbconfigtxlator proto_decode --input differed_ch01_config.pb \ --type common.ConfigUpdate > differed_ch01_config.json# Create Modification Request using Computed Updateecho '{"payload":{"header":{"channel_header":{"channel_id":"ch01", "type":2}},"data":{"config_update":'$(cat differed_ch01_config.json)'}}}' > modreqst_ch01_config.jsonconfigtxlator proto_encode --input modreqst_ch01_config.json \ --type common.Envelope > modreqst_ch01_config.pbFinally, request modification for ch01 using peer command.
peer channel update -f modreqst_ch01_config.pb \ -o orderer1.f0f42fb202f24d0993cd.eastus.aksapp.io:443 \ -c ch01 \ --tls \ --cafile /var/hyperledger/admin/msp/tlscacerts/ca.crt \ --clientauth \ --certfile /var/hyperledger/admin/tls/cert.pem \ --keyfile /var/hyperledger/admin/tls/key.pemRepeat these steps for each peer organizations to add to ch01.
Note : See Hyperledger Fabric document “Adding an Org to a Channel” for details.
Join Each Peer Nodes to Channel
Now peer organization (Org01) is added to channel ch01. Next we join each peer nodes to channel ch01.
In this post, I proceed for only one node, but you should run this steps for all nodes in your peer organization.
Here we run these steps on peer’s dev pod, since peer’s MSP and settings are required.
By the previous steps, Org01’s MSP is registered in consortium and channel, then you can connect using Org01’s MSP.
However, TLS certificate for orderer organization (OrdererOrg) is needed, because we request config to orderer1 (one of orderer’s node).
Hence, we first copy this orderer’s TLS certificate (which is /var/hyperledger/admin/msp/tlscacerts/ca.crt on orderer’s dev pod) into our peer’s dev pod as follows.
Note : /var/hyperledger/admin/msp/tlscacerts/ca.crt is a symbolic link (symlink). Then we download physical file /var/hyperledger/admin/msp/tlscacerts/..data/ca.crt instead.
# Switch to Orderer clusteraz aks get-credentials --resource-group HLF_ORDERER_GROUP \ --name order-HLF-AKS \ --subscription xxxxxxxx-xxxx-xxxx-xxxx-xxxxxxxxxxxx# Download TLS cert from Orderer dev podkubectl cp -n hlf-admin \ devenv:/var/hyperledger/admin/msp/tlscacerts/..data/ca.crt \ ca_orderer.crt# Switch to Peer clusteraz aks get-credentials --resource-group HLF_PEER_GROUP \ --name peer1-HLF-AKS \ --subscription xxxxxxxx-xxxx-xxxx-xxxx-xxxxxxxxxxxx# Upload orderer's TLS cert into Peer dev podkubectl cp -n hlf-admin ca_orderer.crt \ devenv:/var/hyperledger/admin/ca_orderer.crt# Login to peer's dev podkubectl exec -n hlf-admin -it devenv /bin/bashNext we retreive genesis block (block 0) for ch01 (new channel) on peer dev pod.
Notice that we’re setting the previous CA cert file (ca_orderer.crt) for TLS connection in the following request. (However we use our Peer’s client certificate for handshake (authentication), because we’ve already registered Peer’s MSP.)
Note : We should explicitly retrieve block 0 (genesis block) with
peer channel fetchcommand as follows.
If we simply run this command without block number, the other recent block (which is most recent and describes other transactions) might be retrieved.
peer channel fetch 0 ch01.block \ -o orderer1.f0f42fb202f24d0993cd.eastus.aksapp.io:443 \ -c ch01 \ --tls \ --cafile /var/hyperledger/admin/ca_orderer.crt \ --clientauth \ --certfile /var/hyperledger/admin/tls/cert.pem \ --keyfile /var/hyperledger/admin/tls/key.pemNow we can join our peer node into channel using peer command.
The environment variables CORE_PEER_ADDRESS and CORE_PEER_LOCALMSPID are needed for joining. (In this dev pod, these environment variables are already set.)
Note : By running the following command (a command for joining), a new transaction is submitted and new block is added to your channel. (Please run “
peer channel fetch config” command and check the console ouput.)
peer channel join -b ch01.blockRepeat these steps for each peer’s nodes.
Change Channel Config to setup Anchor Peer
On Hyperledger Fabric, each Peer organizations has respective node called “anchor peer”. Through each anchor peers, a peer can discover all existing peers in channel and they can communicate each other across organizations.
In this section, we set peer1.1dcd22b26a2d494d9f4e.eastus.aksapp.io as an anchor peer in our Peer organization (Org01).
Here we run these steps on peer dev pod (on which Peer’s MSP exists).
Note : We use orderer’s TLS certificate ca_orderer.crt (which is copied in the previous steps) on peer dev env.
# Set Peer cluster configaz aks get-credentials --resource-group HLF_PEER_GROUP \ --name peer1-HLF-AKS \ --subscription xxxxxxxx-xxxx-xxxx-xxxx-xxxxxxxxxxxx# Login to peer dev podkubectl exec -n hlf-admin -it devenv /bin/bashFirst we get the recent config block in our channel ch01.
# Fetch your channel (ch01) config into recent_config_block.pbpeer channel fetch config recent_config_block.pb \ -o orderer1.f0f42fb202f24d0993cd.eastus.aksapp.io:443 \ -c ch01 \ --tls \ --cafile /var/hyperledger/admin/ca_orderer.crt \ --clientauth \ --certfile /var/hyperledger/admin/tls/cert.pem \ --keyfile /var/hyperledger/admin/tls/key.pem# Decode fabric structures (.pb) into json config (.json)configtxlator proto_decode --input recent_config_block.pb \ --type common.Block > recent_config_block.json# Extract only configjq .data.data[0].payload.data.config recent_config_block.json > original_recent_config.jsonNow we insert the following section (written by bold fonts) into original_recent_config.json.
{ "channel_group": {"groups": { "Application": {"groups": { "OrdererOrg": {...}, "Org01": {"groups": {},"mod_policy": "Admins","policies": {...},"values": { "MSP": {...} "anchor_peers": [ <<here{<<here "host": "peer1.1dcd22b26a2d494d9f4e.eastus.aksapp.io", <<here "port": 443<<here}<<here ] <<here},... }, ...} }, "Orderer": {...}},... }, ...}This is done by using jq as follows. (You don’t need to edit above manually.)
jq '.channel_group.groups.Application.groups.Org01.values += {"AnchorPeers":{"mod_policy": "Admins","value":{"anchor_peers": [{"host": "peer1.1dcd22b26a2d494d9f4e.eastus.aksapp.io","port": 443}]},"version": "0"}}' original_recent_config.json > modified_recent_config.jsonNext we generate the config update’s request using both original config (original_recent_config.json) and modified config (modified_recent_config.json).
# Compute Updateconfigtxlator proto_encode --input original_recent_config.json \ --type common.Config > original_recent_config.pbconfigtxlator proto_encode --input modified_recent_config.json \ --type common.Config > modified_recent_config.pbconfigtxlator compute_update --channel_id ch01 \ --original original_recent_config.pb \ --updated modified_recent_config.pb > differed_recent_config.pbconfigtxlator proto_decode --input differed_recent_config.pb \ --type common.ConfigUpdate > differed_recent_config.json# Create Modification Request using Computed Updateecho '{"payload":{"header":{"channel_header":{"channel_id":"ch01", "type":2}},"data":{"config_update":'$(cat differed_recent_config.json)'}}}' > modreqst_recent_config.jsonconfigtxlator proto_encode --input modreqst_recent_config.json \ --type common.Envelope > modreqst_recent_config.pbFinally, we request channel modification using peer command as follows.
peer channel update -f modreqst_recent_config.pb \ -o orderer1.f0f42fb202f24d0993cd.eastus.aksapp.io:443 \ -c ch01 \ --tls \ --cafile /var/hyperledger/admin/ca_orderer.crt \ --clientauth \ --certfile /var/hyperledger/admin/tls/cert.pem \ --keyfile /var/hyperledger/admin/tls/key.pemRepeat these steps for each Peer organizations.
Now Let’s Start !
Now you can start developing your applications with your own Hyperledger Fabric network.
Here we start trying to install and run chaincode on fabric. In the following example, we briefly use peer command, but you can also develop with SDKs (Node.js and Java).
Now we use the following sample chaincode (you can download from here on GitHub) written by Go programming language.
Note : In this sample, we’re running chaincode on Fabric version 1.4.4. (This sample cannot run on Fabric 2.0.)
package mainimport ( "fmt" "strconv" "github.com/hyperledger/fabric/core/chaincode/shim" pb "github.com/hyperledger/fabric/protos/peer")// SimpleChaincode example simple Chaincode implementationtype SimpleChaincode struct {}func (t *SimpleChaincode) Init(stub shim.ChaincodeStubInterface) pb.Response { fmt.Println("ex02 Init") _, args := stub.GetFunctionAndParameters() var A, B string // Entities var Aval, Bval int // Asset holdings var err error if len(args) != 4 {return shim.Error("Incorrect number of arguments. Expecting 4") } // Initialize the chaincode A = args[0] Aval, err = strconv.Atoi(args[1]) if err != nil {return shim.Error("Expecting integer value for asset holding") } B = args[2] Bval, err = strconv.Atoi(args[3]) if err != nil {return shim.Error("Expecting integer value for asset holding") } fmt.Printf("Aval = %d, Bval = %d\n", Aval, Bval) // Write the state to the ledger err = stub.PutState(A, []byte(strconv.Itoa(Aval))) if err != nil {return shim.Error(err.Error()) } err = stub.PutState(B, []byte(strconv.Itoa(Bval))) if err != nil {return shim.Error(err.Error()) } return shim.Success(nil)}func (t *SimpleChaincode) Invoke(stub shim.ChaincodeStubInterface) pb.Response { fmt.Println("ex02 Invoke") function, args := stub.GetFunctionAndParameters() if function == "invoke" {// Make payment of X units from A to Breturn t.invoke(stub, args) } else if function == "delete" {// Deletes an entity from its statereturn t.delete(stub, args) } else if function == "query" {// the old "Query" is now implemtned in invokereturn t.query(stub, args) } return shim.Error("Invalid invoke function name. Expecting \"invoke\" \"delete\" \"query\"")}// Transaction makes payment of X units from A to Bfunc (t *SimpleChaincode) invoke(stub shim.ChaincodeStubInterface, args []string) pb.Response { var A, B string // Entities var Aval, Bval int // Asset holdings var X int // Transaction value var err error if len(args) != 3 {return shim.Error("Incorrect number of arguments. Expecting 3") } A = args[0] B = args[1] // Get the state from the ledger // TODO: will be nice to have a GetAllState call to ledger Avalbytes, err := stub.GetState(A) if err != nil {return shim.Error("Failed to get state") } if Avalbytes == nil {return shim.Error("Entity not found") } Aval, _ = strconv.Atoi(string(Avalbytes)) Bvalbytes, err := stub.GetState(B) if err != nil {return shim.Error("Failed to get state") } if Bvalbytes == nil {return shim.Error("Entity not found") } Bval, _ = strconv.Atoi(string(Bvalbytes)) // Perform the execution X, err = strconv.Atoi(args[2]) if err != nil {return shim.Error("Invalid transaction amount, expecting a integer value") } Aval = Aval - X Bval = Bval + X fmt.Printf("Aval = %d, Bval = %d\n", Aval, Bval) // Write the state back to the ledger err = stub.PutState(A, []byte(strconv.Itoa(Aval))) if err != nil {return shim.Error(err.Error()) } err = stub.PutState(B, []byte(strconv.Itoa(Bval))) if err != nil {return shim.Error(err.Error()) } return shim.Success(nil)}// Deletes an entity from statefunc (t *SimpleChaincode) delete(stub shim.ChaincodeStubInterface, args []string) pb.Response { if len(args) != 1 {return shim.Error("Incorrect number of arguments. Expecting 1") } A := args[0] // Delete the key from the state in ledger err := stub.DelState(A) if err != nil {return shim.Error("Failed to delete state") } return shim.Success(nil)}// query callback representing the query of a chaincodefunc (t *SimpleChaincode) query(stub shim.ChaincodeStubInterface, args []string) pb.Response { var A string // Entities var err error if len(args) != 1 {return shim.Error("Incorrect number of arguments. Expecting name of the person to query") } A = args[0] // Get the state from the ledger Avalbytes, err := stub.GetState(A) if err != nil {jsonResp := "{\"Error\":\"Failed to get state for " + A + "\"}"return shim.Error(jsonResp) } if Avalbytes == nil {jsonResp := "{\"Error\":\"Nil amount for " + A + "\"}"return shim.Error(jsonResp) } jsonResp := "{\"Name\":\"" + A + "\",\"Amount\":\"" + string(Avalbytes) + "\"}" fmt.Printf("Query Response:%s\n", jsonResp) return shim.Success(Avalbytes)}func main() { err := shim.Start(new(SimpleChaincode)) if err != nil {fmt.Printf("Error starting Simple chaincode: %s", err) }}As I mentioned above, a chaincode must be installed on each Peer nodes, on which the code will be executed.
First, we login to Peer’s dev pod.
# Set Peer cluster configaz aks get-credentials --resource-group HLF_PEER_GROUP \ --name peer1-HLF-AKS \ --subscription xxxxxxxx-xxxx-xxxx-xxxx-xxxxxxxxxxxx# Login to peer's dev podkubectl exec -n hlf-admin -it devenv /bin/bashOn this dev pod in Peer cluster, we install chaincode on peer1.1dcd22b26a2d494d9f4e.eastus.aksapp.io as follows. (Notice that we’ve already set CORE_PEER_ADDRESS=peer1.1dcd22b26a2d494d9f4e.eastus.aksapp.io:443 on this dev pod.)
This command just installs this code (chaincode_example02.go) and not affects to a ledger.
# Download source code (chaincode_example02.go)export GOPATH=$PWDmkdir -p src/chaincodewget https://raw.githubusercontent.com/Azure/Hyperledger-Fabric-on-Azure-Kubernetes-Service/master/consortiumScripts/chaincode/chaincode_example02/go/chaincode_example02.go -O $GOPATH/src/chaincode/chaincode_example02.go# Install chaincode on peer1peer chaincode install -n mycc \ -v 1.0 \ -l golang \ -p chaincode/By instanting chaincode, this chaincode is recorded in a ledger and this chaincode becomes available on this channel.
Here we publish this command (instantiation) to the orderer as a transaction as follows.
# Instantiate chaincodepeer chaincode instantiate -o orderer1.f0f42fb202f24d0993cd.eastus.aksapp.io:443 \ --tls \ --cafile /var/hyperledger/admin/ca_orderer.crt \ --clientauth \ --certfile /var/hyperledger/admin/tls/cert.pem \ --keyfile /var/hyperledger/admin/tls/key.pem \ -C ch01 \ -n mycc \ -l golang \ -v 1.0 \ -c '{"Args":["init","a","1000","b","2000"]}'Now you can use this chaincode in this channel. (However you should install chaincode on all peer nodes to be run.)
You can invoke function and write new state in a ledger as follows. (This function is executed on peer1.1dcd22b26a2d494d9f4e.eastus.aksapp.io by the environment setting CORE_PEER_ADDRESS=peer1.1dcd22b26a2d494d9f4e.eastus.aksapp.io:443.)
# Invoke chaincodepeer chaincode invoke -o orderer1.f0f42fb202f24d0993cd.eastus.aksapp.io:443 \ --tls \ --cafile /var/hyperledger/admin/ca_orderer.crt \ --clientauth \ --certfile /var/hyperledger/admin/tls/cert.pem \ --keyfile /var/hyperledger/admin/tls/key.pem \ -C ch01 \ -n mycc \ -c '{"Args":["invoke","a","b","10"]}'Chaincode invoke successful. result: status:200Now you can query new value by running corresponding function as follows.
This query command doesn’t write any transaction on a ledger and it can simply be run on each peers without orderer.
# Query chaincodepeer chaincode query -C ch01 \ -n mycc \ -c '{"Args":["query","a"]}'990After you install this chaincode on peer2, you could also query and get the same value on peer2.
Now you have your own network and you can build your applications with Hyperledger Fabric SDKs (Node.js and Java).
See “Hyperledger Fabric consortium on Azure Kubernetes Service (AKS)” for more tutorials.
Categories: Uncategorized

mkdir /usr/local/hyperledger
While running this command, I am getting mkdir: cannot create directory ‘/usr/local/hyperledger’: Permission denied error. Can you please help me to fix this
LikeLike
When you run this command manually in Ubuntu host or VM, login with the user who has a privilege and run this command with “sudo” as follows. (Since /usr/local will be owned by root.)
“sudo mkdir /usr/local/hyperledger“
However, as you can see in this post, this command will be run in Dockerfile, because you will prepare this environment in AKS cluster. If you run this command in Dockerfile, there’s not needed to run with “sudo …”. (Just use my Dockerfile, tsmatz/hyperledger-dev:0.1.0, or use https://github.com/Azure/Hyperledger-Fabric-on-Azure-Kubernetes-Service/blob/master/consortiumScripts/fabric-admin.yaml in official repo.)
LikeLike
Thanks for the info .. However I am looking for other scenarios like:
* Add second orderer organization
* Remove peer from channel
and similar day-2 operational requirements. I cannot find any information online on such matters. Do you have any suggestions ?
Thanks
LikeLike