
Apache Spark officially includes Kubernetes support, and thereby you can run a Spark job on your own Kubernetes cluster. (See here for official document. Note that Kubernetes scheduler is currently experimental.)
Especially in Microsoft Azure, you can easily run Spark on cloud-managed Kubernetes, Azure Kubernetes Service (AKS).
In this post, I’ll show you step-by-step tutorial for running Apache Spark on AKS.
In this tutorial, artifacts, such as, source code, data, and container images are all protected by Azure credentials (keys).
Although managed services for Apache Spark, such as, Azure Databricks, Azure Synapse Analytics, and Azure HDInsight, will be the best place to run Spark workloads in Azure, you will get much flexibility by running workloads by your own on managed Kubernetes (AKS) – such as, spot VM support, start/stop cluster, private cluster support, confidential computing (Intel SGX) support, so on and so forth.
Preparation
Before starting, you should create new AKS resource in Azure Portal.
In the following steps, I’ll use Ubuntu 18.04 for my working client.
For preparation, please install az and kubectl command in your working client as follows.
# Install Az (Azure CLI command)sudo apt-get updatecurl -sL https://aka.ms/InstallAzureCLIDeb | sudo bash# Install kubectlcurl -LO "https://dl.k8s.io/release/$(curl -L -s https://dl.k8s.io/release/stable.txt)/bin/linux/amd64/kubectl"sudo install -o root -g root -m 0755 kubectl /usr/local/bin/kubectlAfter the installation, please login to your Azure subscription with az command. (The message will be prompted to login with your web browser, and then please proceed to login.)
az loginAfter you have logged-in, run the following az command in order to connect to your Kubernetes cluster. (Set your own resource group name, resource name, and subscription id in the following command.)
az aks get-credentials \ --resource-group SparkTest-rg \ --name mycluster \ --subscription xxxxxxxx-xxxx-xxxx-xxxx-xxxxxxxxxxxxThis will generate $HOME/.kube/config in your working client, and now your client is connected to your Kubernetes cluster.
Build Spark with Kubernetes Support
Before running Spark on your AKS cluster, you should download and build Apache Spark.
As you know, Apache Spark runs on Java language runtime (with Scala).
First you should install Java runtime and compiler as follows. (Now I install JDK version 8.)
# Install JDK 8sudo apt-get updatesudo apt-get install openjdk-8-jdk# Set JAVA_HOMEecho -e "export JAVA_HOME=/usr/lib/jvm/java-8-openjdk-amd64" >> ~/.bashrcsource ~/.bashrcInstall maven for building Apache Spark.
sudo apt install mavenNow let’s download and build the copy of Apache Spark. (In this post, I use Spark 3.1, which is stable release on Dec 2020.)
By running with -Pkubernetes as follows, this copy of Spark will be compiled with Kubernetes support.
git clone https://github.com/apache/sparkcd spark./build/mvn -Pkubernetes -DskipTests clean packagePrepare Data and Code
In this example, I will run decision tree algorithms to decide whether the air-plane’s arrival will defer over 15 minutes or not.
The following data (CSV) includes well-known air-flight history data and its weather data. In this data, the column ARR_DEL15 indicates whether the air-plane’s arrival deferred over 15 minutes or not.
(You can download this dataset from here.)
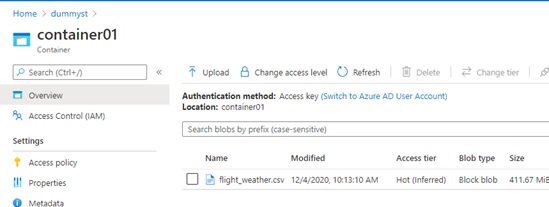
flight_weather.csv
"ID","MONTH","UNIQUE_CARRIER","ORIGIN","DEST","ARR_DEL15","VisibilityOrigin","DryBulbCelsiusOrigin", ...1,1,"AA","JFK","LAX",0,10,-3.9, ...2,3,"AA","SEA","LAX",0,10,0, ...3,9,"FQ","LAX","JFK",0,10,18.3, ...4,2,"FL","LAX","JFK",1,10,15.6, ...5,1,"AA","JFK","SEA",0,10,8.9, ...To make your Kubernetes pods to access this dataset, please create new Azure storage resource and put this data (flight_weather.csv) in this storage blob.
The following is our Python code to train with decision tree algorithm and save the trained model in Azure blob storage.
As you can see below, this source code will access to Azure storage with wasbs:// .
(Please replace wasbs://container01@dummyst.blob.core.windows.net with your own Azure storage container. dummyst should be your storage account name and container01 should be your container name.)
Note : When you put your file in Azure Data Lake Storage Gen2, the path string should be
abfss://container01@dummyst.dfs.core.windows.net.
This source code (test.py) itself can be reached from a Spark driver pod. However, as you can see later, this code will be uploaded dynamically in spark-submit() command. For now, you just save this source code as a local file (test.py).
test.py
from __future__ import print_functionfrom pyspark.sql import SparkSessionfrom pyspark.sql.functions import whenfrom pyspark.sql.functions import UserDefinedFunctionfrom pyspark.sql.types import IntegerTypefrom pyspark.mllib.regression import LabeledPointif __name__ == "__main__": spark = SparkSession.builder.appName("jobtest01").getOrCreate() sc=spark.sparkContext # # Load data from Azure Storage # df = spark.read.csv("wasbs://container01@dummyst.blob.core.windows.net/flight_weather.csv",header=True,nullValue="NA",inferSchema=True) # # Select only label and features # df = df.select("ARR_DEL15","MONTH","DAY_OF_MONTH","DAY_OF_WEEK","UNIQUE_CARRIER","ORIGIN","DEST","CRS_DEP_TIME","CRS_ARR_TIME","RelativeHumidityOrigin","AltimeterOrigin","DryBulbCelsiusOrigin","WindSpeedOrigin","VisibilityOrigin","DewPointCelsiusOrigin","RelativeHumidityDest","AltimeterDest","DryBulbCelsiusDest","WindSpeedDest","VisibilityDest","DewPointCelsiusDest") # # Drop rows having null field # df = df.dropna() # # Convert categorical value to numeric index (0, 1, ...) # # MONTH df = df.withColumn("MONTH",df.MONTH - 1) # DAY_OF_MONTH df = df.withColumn("DAY_OF_MONTH",df.DAY_OF_MONTH - 1) # DAY_OF_WEEK df = df.withColumn("DAY_OF_WEEK",df.DAY_OF_WEEK - 1) # UNIQUE_CARRIER rows_unique_carrier = df.select("UNIQUE_CARRIER").distinct().collect() list_unique_carrier = [i.UNIQUE_CARRIER for i in rows_unique_carrier] convUniqueCarrier = UserDefinedFunction(lambda x: list_unique_carrier.index(x), IntegerType()) df = df.withColumn("UNIQUE_CARRIER",when(df["UNIQUE_CARRIER"].isNotNull(), convUniqueCarrier(df.UNIQUE_CARRIER)).otherwise(len(list_unique_carrier))) # ORIGIN rows_origin = df.select("ORIGIN").distinct().collect() list_origin = [i.ORIGIN for i in rows_origin] convOrigin = UserDefinedFunction(lambda x: list_origin.index(x), IntegerType()) df = df.withColumn("ORIGIN",when(df["ORIGIN"].isNotNull(), convOrigin(df.ORIGIN)).otherwise(len(list_origin))) # DEST rows_dest = df.select("DEST").distinct().collect() list_dest = [i.DEST for i in rows_dest] convDest = UserDefinedFunction(lambda x: list_dest.index(x), IntegerType()) df = df.withColumn("DEST",when(df["DEST"].isNotNull(), convDest(df.DEST)).otherwise(len(list_dest))) # # Create LabeledPoint object (label is "ARR_DEL15") # rdd = df.rdd.map(lambda row: LabeledPoint( row.ARR_DEL15, [row.MONTH,row.DAY_OF_MONTH,row.DAY_OF_WEEK,row.UNIQUE_CARRIER,row.ORIGIN,row.DEST,row.CRS_DEP_TIME,row.CRS_ARR_TIME,row.RelativeHumidityOrigin,row.AltimeterOrigin,row.DryBulbCelsiusOrigin,row.WindSpeedOrigin,row.VisibilityOrigin,row.DewPointCelsiusOrigin,row.RelativeHumidityDest,row.AltimeterDest,row.DryBulbCelsiusDest,row.WindSpeedDest,row.VisibilityDest,row.DewPointCelsiusDest ])) # # Split data for training (70%) and testing (30%) # trainrdd, testrdd = rdd.randomSplit([0.7, 0.3], 17) # # Run Decision Tree algorithms in MLlib # from pyspark.mllib.tree import DecisionTree, DecisionTreeModel model = DecisionTree.trainClassifier(trainrdd,numClasses=2,categoricalFeaturesInfo={ 0: 12, 1: 31, 2: 7, 3: len(list_unique_carrier) + 1, 4: len(list_origin) + 1, 5: len(list_dest) + 1, 6: 24, 7: 24},impurity='entropy',maxDepth=15,maxBins=3000) # # Save model in Azure blob # model.save(sc, "wasbs://container01@dummyst.blob.core.windows.net/model/flightdelay") # # Predict using test data and set row index # preds = model.predict(testrdd.map(lambda p: p.features)) preds = preds.zipWithIndex() preds = preds.map(lambda x: (x[1], x[0])) # # Get actual label and set row index # labels = testrdd.map(lambda x: x.label) labels = labels.zipWithIndex() labels = labels.map(lambda x: (x[1], x[0])) # # Join and Get accuracy # labels_and_preds = labels.join(preds) accuracy = labels_and_preds.filter(lambda x: x[1][0] == x[1][1]).count() / float(testrdd.count()) print("Accuracy is %f" % accuracy) # output accuracy spark.stop()Note : In this code, I have used primitive RDD and MLlib libraries. (This code is the same one in my early post.)
To use Spark dataframe and SparkML is recommended now in Apache Spark, because the Spark dataframe can be optimized by Catalyst optimizer. Please see here (Databricks tutorial) for the example of Spark dataframe and SparkML pipeline framework. (This sample code for Databricks uses LightGBM in MMLSpark library, and you will get better accuracy.)
Test Azure Storage Integration in PySpark Shell
Before running a job on Kubernetes, please run and check on pyspark console.
The following command will start pyspark console. By setting --packages option, jar files for Azure Blob integration are downloaded in local host and you can then use wasbs:// or abfss:// . (Please see the following note for using Azure Data Lake Storage Gen2.)
In the following command,
- Replace
dummystwith your storage account name - Replace
SyTed2ezKy...with access key for your storage
./bin/pyspark \ --conf spark.hadoop.fs.azure.account.key.dummyst.blob.core.windows.net=SyTed2ezKy... \ --packages org.apache.hadoop:hadoop-azure:3.2.0,com.microsoft.azure:azure-storage:8.6.3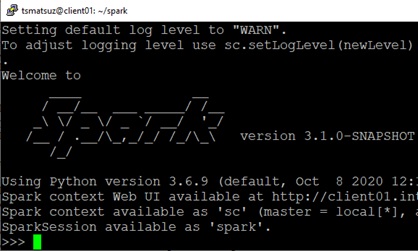
Note : When your file is on Azure Data Lake Storage Gen2, use the following package instead.
./bin/pyspark \ --conf spark.hadoop.fs.azure.account.key.dummyst.dfs.core.windows.net=SyTed2ezKy... \ --packages org.apache.hadoop:hadoop-azure:3.2.1,org.apache.hadoop:hadoop-azure-datalake:3.2.1
In pyspark console, please run the following code.
In the following command,
- Replace
dummystwith your storage account name - Replace
container01with your container name in storage blob
If it’s succeeded, you will see the number of rows in output result.
df = spark.read.csv( "wasbs://container01@dummyst.blob.core.windows.net/flight_weather.csv", header=True, nullValue="NA", inferSchema=True)df.count()1900875Note : When you put your file on Azure Data Lake Storage Gen2, the path string should be
abfss://container01@dummyst.dfs.core.windows.net/.
By setting --packages option as above, these two packages (hadoop-azure and azure-storage) and related dependencies are all downloaded and cached in $HOME/.ivy2/jars.
ls ~/.ivy2/jars/output
com.fasterxml.jackson.core_jackson-core-2.9.4.jarcom.google.guava_guava-20.0.jarcom.microsoft.azure_azure-keyvault-core-1.0.0.jarcom.microsoft.azure_azure-storage-8.6.3.jarcommons-codec_commons-codec-1.11.jarcommons-logging_commons-logging-1.1.3.jarorg.apache.commons_commons-lang3-3.4.jarorg.apache.hadoop_hadoop-azure-3.2.0.jarorg.apache.httpcomponents_httpclient-4.5.2.jarorg.apache.httpcomponents_httpcore-4.4.4.jarorg.codehaus.jackson_jackson-core-asl-1.9.13.jarorg.codehaus.jackson_jackson-mapper-asl-1.9.13.jarorg.eclipse.jetty_jetty-util-9.3.24.v20180605.jarorg.eclipse.jetty_jetty-util-ajax-9.3.24.v20180605.jarorg.slf4j_slf4j-api-1.7.12.jarorg.wildfly.openssl_wildfly-openssl-1.0.4.Final.jarIn the next section, I will create docker image with all these jar files installed.
Build Image for Pods
Now let’s create docker images for Kubernetes pods for both driver and executors in Spark.
First of all, you should prepare for Azure container registry (ACR) to save generated images. (You can also use docker hub instead.)
As you can see later, our docker images will also be protected by Kubernetes secret.

In order to build docker images, please install docker runtime in your working client as follows.
Afterwards, logout and login again to take effect for permission.
curl -fsSL https://download.docker.com/linux/ubuntu/gpg | sudo apt-key add -sudo add-apt-repository "deb [arch=amd64] https://download.docker.com/linux/ubuntu $(lsb_release -cs) stable"sudo apt-get -y updatesudo apt-get -y install docker-cesudo usermod -aG docker $USER# logout and login again to take effect for permissionNow let’s build images in local repository.
In this example, we should involve the previous jars (which are used for Azure Blob integration) and numpy package in docker images.
Hence, now we generate custom Dockerfile for pyspark image as follows. (Please see the following note.)
ARG base_imgFROM $base_imgWORKDIR /# Reset to root to run installation tasksUSER 0RUN mkdir ${SPARK_HOME}/pythonRUN apt-get update && \apt install -y wget python3 python3-pip && \pip3 install --upgrade pip setuptools && \pip3 install numpy && \rm -r /root/.cache && rm -rf /var/cache/apt/*COPY python/pyspark ${SPARK_HOME}/python/pysparkCOPY python/lib ${SPARK_HOME}/python/libWORKDIR /opt/spark/work-dir# Download hadoop-azure, azure-storage, and dependencies (See above)RUN wget --quiet https://repo1.maven.org/maven2/org/apache/hadoop/hadoop-azure/3.2.0/hadoop-azure-3.2.0.jar -O /opt/spark/jars/hadoop-azure-3.2.0.jarRUN wget --quiet https://repo1.maven.org/maven2/com/microsoft/azure/azure-storage/8.6.3/azure-storage-8.6.3.jar -O /opt/spark/jars/azure-storage-8.6.3.jarRUN wget --quiet https://repo1.maven.org/maven2/org/apache/httpcomponents/httpclient/4.5.2/httpclient-4.5.2.jar -O /opt/spark/jars/httpclient-4.5.2.jarRUN wget --quiet https://repo1.maven.org/maven2/org/eclipse/jetty/jetty-util-ajax/9.3.24.v20180605/jetty-util-ajax-9.3.24.v20180605.jar -O /opt/spark/jars/jetty-util-ajax-9.3.24.v20180605.jarRUN wget --quiet https://repo1.maven.org/maven2/org/codehaus/jackson/jackson-mapper-asl/1.9.13/jackson-mapper-asl-1.9.13.jar -O /opt/spark/jars/jackson-mapper-asl-1.9.13.jarRUN wget --quiet https://repo1.maven.org/maven2/org/codehaus/jackson/jackson-core-asl/1.9.13/jackson-core-asl-1.9.13.jar -O /opt/spark/jars/jackson-core-asl-1.9.13.jarRUN wget --quiet https://repo1.maven.org/maven2/org/wildfly/openssl/wildfly-openssl/1.0.4.Final/wildfly-openssl-1.0.4.Final.jar -O /opt/spark/jars/wildfly-openssl-1.0.4.Final.jarRUN wget --quiet https://repo1.maven.org/maven2/org/apache/httpcomponents/httpcore/4.4.4/httpcore-4.4.4.jar -O /opt/spark/jars/httpcore-4.4.4.jarRUN wget --quiet https://repo1.maven.org/maven2/commons-logging/commons-logging/1.1.3/commons-logging-1.1.3.jar -O /opt/spark/jars/commons-logging-1.1.3.jarRUN wget --quiet https://repo1.maven.org/maven2/commons-codec/commons-codec/1.11/commons-codec-1.11.jar -O /opt/spark/jars/commons-codec-1.11.jarRUN wget --quiet https://repo1.maven.org/maven2/org/eclipse/jetty/jetty-util/9.3.24.v20180605/jetty-util-9.3.24.v20180605.jar -O /opt/spark/jars/jetty-util-9.3.24.v20180605.jarRUN wget --quiet https://repo1.maven.org/maven2/com/fasterxml/jackson/core/jackson-core/2.9.4/jackson-core-2.9.4.jar -O /opt/spark/jars/jackson-core-2.9.4.jarRUN wget --quiet https://repo1.maven.org/maven2/org/slf4j/slf4j-api/1.7.12/slf4j-api-1.7.12.jar -O /opt/spark/jars/slf4j-api-1.7.12.jarRUN wget --quiet https://repo1.maven.org/maven2/org/apache/commons/commons-lang3/3.4/commons-lang3-3.4.jar -O /opt/spark/jars/commons-lang3-3.4.jarRUN wget --quiet https://repo1.maven.org/maven2/com/microsoft/azure/azure-keyvault-core/1.0.0/azure-keyvault-core-1.0.0.jar -O /opt/spark/jars/azure-keyvault-core-1.0.0.jarRUN wget --quiet https://repo1.maven.org/maven2/com/google/guava/guava/20.0/guava-20.0.jar -O /opt/spark/jars/guava-20.0.jarENTRYPOINT [ "/opt/entrypoint.sh" ]# Specify the User that the actual main process will run asARG spark_uid=185USER ${spark_uid}Note : Copy original pyspark Dockerfile in
resource-managers/kubernetes/docker/src/main/dockerfiles/spark/bindings/python/and modify this file as follows.
- Install
wgetbyaptcommand- Install
numpypackage bypip3command- Download all dependencies’ jars for Azure storage integration with
wgetcommand
In order to build images for Spark on Kubernetes, you can use an image building tool, bin/docker-image-tool.sh, in Apache Spark.
In the following command,
- Replace
sptest.azurecr.iowith your container registry server (which should be the same as the name for your ACR resource) - Replace
v1with tag name for your generating images
In this command, I set the option -p for generating pyspark images.
./bin/docker-image-tool.sh \ -r sptest.azurecr.io \ -t v1 \ -p ./Dockerfile buildBefore pushing the generated local images to your Azure container registry, please login to your repository server by running the following command. (In above steps, you have already logged-in to your Azure subscription.)
In the following command, replace sptest with your repository server name.
az acr login --name sptestNow let’s push the previous local images to your ACR repository.
In the following command,
- Replace
sptest.azurecr.iowith your repository server name - Replace
v1with your previously created tag name
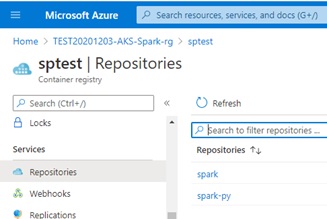
./bin/docker-image-tool.sh -r sptest.azurecr.io -t v1 pushWhen you go to your ACR resource in Azure Portal, you will find that the following 2 repositories (spark:v1 and spark-py:v1) exist in your ACR.
Create Secret for Image-Pulling
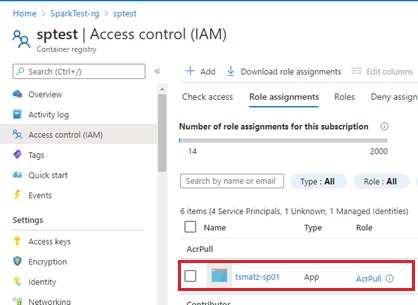
As you saw above, our generated image is protected by container registry (ACR).
In order to allow Spark to pull images, you should generate Kubernetes secret in AKS cluster.
First, create a service principal in Azure Active Directory, and generate client secret (password).
Then assign “AcrPull” role for this generated service principal in container registry (ACR) resource. (See below.)
Now let’s create the Kubernetes secret with this service principal as follows.
In the following command,
- Replace
sptest.azurecr.iowith your container registry server - Replace
0658708a-ca4f-471b-8f36-0e79ea7f0b49with client id (application id) of your service principal - Replace
GM_dUi6n~G...with client secret of your service principal
kubectl create secret docker-registry my-secret \ --docker-server=sptest.azurecr.io \ --docker-username=0658708a-ca4f-471b-8f36-0e79ea7f0b49 \ --docker-password=GM_dUi6n~G...Submit a Spark Job with Secured Manners
For running Spark cluster on Kubernetes, run the proxy for Kubernetes API server.
By running this proxy, you can access the API server by http://127.0.0.1:8001.
kubectl proxyTo access and edit your cluster, create service’s account (which name is “spark“) and assign the role for editing for this account.
kubectl create serviceaccount sparkkubectl create clusterrolebinding spark-role \ --clusterrole=edit \ --serviceaccount=default:spark \ --namespace=defaultFinally, let’s submit and run our application (test.py) as a Spark job. (See below.)
By running this command,
- Retrieve container image (
sptest.azurecr.io/spark-py:v1) from ACR repository, which is protected by the Kubernetes secret,my-secret. - Run driver pod and executor pods with this container image.
- Local python application,
/home/tsmatz/test.py, will be uploaded into Azure blob storage (wasbs://container01@dummyst.blob.core.windows.net/) by the followingspark.kubernetes.file.upload.pathconfiguration.
As you saw above, this job can access this blob storage with access key in the followingspark.hadoop.fs.azure.account.key.dummyst.blob.core.windows.net=SyTed2ezKy...configuration. - The driver pod will extract and run this application (test.py).
- The distributed jobs will run on each executor pods.
All executors can also access to Azure blob storage with access key.
./bin/spark-submit \ --master k8s://http://127.0.0.1:8001 \ --deploy-mode cluster \ --name jobtest01 \ --class org.apache.spark.examples.SparkPi \ --conf spark.executor.instances=3 \ --conf spark.kubernetes.authenticate.driver.serviceAccountName=spark \ --conf spark.kubernetes.container.image=sptest.azurecr.io/spark-py:v1 \ --conf spark.hadoop.fs.azure.account.key.dummyst.blob.core.windows.net=SyTed2ezKy... \ --conf spark.kubernetes.container.image.pullSecrets=my-secret \ --packages org.apache.hadoop:hadoop-azure:3.2.0,com.microsoft.azure:azure-storage:8.6.3 \ --conf spark.driver.extraJavaOptions="-Divy.cache.dir=/tmp -Divy.home=/tmp" \ --conf spark.kubernetes.file.upload.path=wasbs://container01@dummyst.blob.core.windows.net/ \ file:///home/tsmatz/test.pyNote : Currently package jar files won’t be installed on executor pods by
--packagesoption. As you saw above, we then manually downloaded all packages (all dependencies) in container image.
(You can also set different container images between driver and executors by specifyingspark.kubernetes.driver.container.imageandspark.kubernetes.executor.container.imageconfiguration. Otherwise the same container image will be used.)Note : If you have multiple Python files to run, please archive mutiple files to zip and specify using
--py-filesoption. (Then set relative path for the entry code location.)
When you run this command, you can see 1 driver pod and 3 executor pods in your Kubernetes cluster as follows. (Here we use “default” namespace.)
kubectl get podNAMEREADY STATUSRESTARTS AGEjobtest01-a3769b763c61c1de-driver 1/1 Running 0 6m23sjobtest01-c9a1bc763c620059-exec-2 1/1 Running 0 6m9sjobtest01-c9a1bc763c620059-exec-3 1/1 Running 0 6m9sjobtest01-c9a1bc763c620059-exec-4 1/1 Running 0 6m9sWhen the job has successfully completed, you can see the pod’s status as follows.
kubectl get podNAMEREADY STATUS RESTARTS AGEjobtest01-a3769b763c61c1de-driver 0/1 Completed 0 13mNote : When you have encountered some errors, please see the driver logs.
kubectl logs jobtest01-a3769b763c61c1de-driver
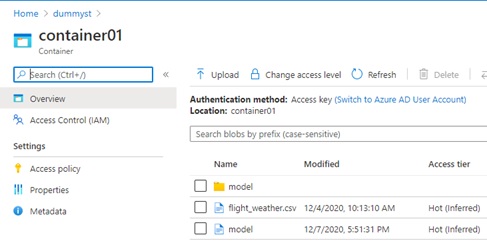
When you go to storage account, you will be able to see the trained model in your container.
Reference :
Apache Spark : Running Spark on Kubernetes
https://spark.apache.org/docs/latest/running-on-kubernetes.html
Microsoft Azure : Running Apache Spark jobs on AKS
https://docs.microsoft.com/en-us/azure/aks/spark-job
Categories: Uncategorized

You are still exposing your sas key for azure storage which seems not secured. But overall looks good.
LikeLike
Hello,
Thank you very much for this excellent tutorial.
It’s perfect.
Anyway, I just have an error when I run the test.py code on my AKS cluster because this line :
model.save(sc, “wasbs://container01@dummyst.blob.core.windows.net/model/flightdelay”)
It seems that sc is unknown.
In fact it’s a Spark Context issue but I don’t know how I can resolve it.
Do you have any idea.
Thank you very much.
Have a great day.
LikeLike
In the latest spark, it seems that you should explicitly assign sc (Spark context) as follows.
I have changed my source code in this post, and thank you for your feedback.
sc=spark.sparkContext
LikeLike
Hello Tsuyoshi,
Thank you very much for your fast reply.
Your website is just excellent.
Thank you very much.
Have an excellent day.
LikeLike