
In my last post, I showed you tutorial for running Apache Spark on managed kubernetes, Azure Kubernetes Service (AKS).
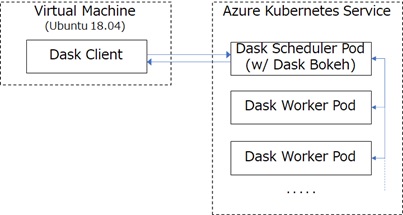
In this post, I’ll show you the tutorial for running distributed workloads of Dask on AKS.
By using Dask, you can run Scikit-Learn compliant functions and jobs for data which cannot fit in memory, or run in distributed manners. For simplicity, here I’ll use built-in Dask ML function (dask_ml.linear_model.LinearRegression) in this tutorial. (With the same manners, you can also run regular sklearn functions.)
Cloud managed kubernetes will make you speed up this large ML workloads.
Prerequisite
For running this tutorial, please prepare as follows beforehand.
- Prepare your working machine (client).
In this post, I’ll use Ubuntu 18.04 VM on Azure. - Install Python3 and pip on your working client. I note that installed Python version on your client should match with the one of distributed pods. (Otherwise, object serialization/deserialization won’t work correctly between different versions in ML tasks.)
In this tutorial, I’ll use daskdev/dask:2021.4.1 for pod’s images, in which Python 3.8 is used. You should then install Python 3.8 for running this example.
sudo apt update# install python3.8sudo apt install software-properties-commonsudo apt install python3.8# install pip3sudo apt-get -y install python3-pippython3.8 -m pip install --upgrade pip- In order to control managed kubernetes on your client, install Azure CLI (
azcommand) on your working client. - Install
kubectlon your working client. (Sincedask-kubernetesruns on kubernetes client.)
Prepare AKS Resource
First, please create a AKS (Azure Kubernetes Service) resource in Azure Portal. (Please proceed creation wizard with default settings.)

After the installation, please login to your Azure subscription with az command in your client. (The message will be prompted to login with your web browser, and then proceed to login.)
az loginAfter you have logged-in, run the following az command on your client in order to connect to your Kubernetes cluster. (This command will generate kubeconfig files in your client.)
I note that you should replace the each following placeholders with brackets.
az aks get-credentials \ --resource-group {YOUR-RESOURCE-GROUP-NAME} \ --name {YOUR-CLUSTER-NAME} \ --subscription {YOUR-SUBSCRIPTION-ID}Run Your First Dask Cluster
Now let’s run your Dask cluster.
Dask provides helm cofigured cluster (HelmCluster) and natively cofigured cluster (KubeCluster). In this tutorial, I’ll use KubeCluster (latter one).
First, please install dask packages on your working client (Ubuntu). This command will also install other dependencies.
python3.8 -m pip install dask-kubernetes==2021.3.1Now let’s enter into Python console.
python3.8In Python console, please create KubeCluster with the following commands.
Here I’ve created pod configuration by make_pod_spec() function, but you can also configure and use yaml file by your own.
If extra pip packages are needed, please add packages in the following EXTRA_PIP_PACKAGES or EXTRA_CONDA_PACKAGES environment’s settings.
>>> from dask_kubernetes import KubeCluster, make_pod_spec>>> worker_pod_spec = make_pod_spec(... image='daskdev/dask:latest',... memory_limit='4G', memory_request='4G',... cpu_limit=1, cpu_request=1,... env={'EXTRA_PIP_PACKAGES': 'distributed'})>>> cluster = KubeCluster(worker_pod_spec)In another shell, let’s type kubectl command as follows in order to see the running pods in your cluster.
As you can see below, you will find that the dask scheduler pod is running in default namespace.
kubectl get podNAME READY STATUSRESTARTS AGEdask-tsmatz-b5455558-67nsnl 1/1 Running 0 71sIn Python console, let’s start 2 workers as follows.
>>> cluster.scale(2)When you see pods with kubectl command as follows, you will find that 2 workers are running in your cluster.
kubectl get podNAME READY STATUSRESTARTS AGEdask-tsmatz-b5455558-67nsnl 1/1 Running 0 4m35sdask-tsmatz-b5455558-68xg47 1/1 Running 0 57sdask-tsmatz-b5455558-6sz4ws 1/1 Running 0 57sExit Python console.
>>> exit()Note : When you don’t use cluster, you can stop a cluster with the following command and save your cost.
az aks stop --name {YOUR-CLUSTER-NAME} --resource-group {YOUR-RESOURCE-GROUP-NAME}
Run Machine Learning Workloads on Distributed Cluster
Now let’s run and scale your ML workloads on this cluster.
In this example, I will generate a regression model with primitive sample data.
Before starting, please install dask-ml and its dependencies.
python3.8 -m pip install llvmlite==0.36.0 dask-ml==1.9.0As you saw above, let’s start a cluster to begin with.
(You’ll find that the settings are a bit different from previous example, and I’ll show you several notice below)
from dask_kubernetes import KubeCluster, make_pod_specworker_pod_spec = make_pod_spec( image='daskdev/dask:2021.4.1', memory_limit='4G', memory_request='4G', cpu_limit=1, cpu_request=1, env={'EXTRA_PIP_PACKAGES': 'distributed==2021.5.0','EXTRA_CONDA_PACKAGES': 'dask-ml==1.9.0' })cluster = KubeCluster(worker_pod_spec)cluster.scale(2)For running this tutorial, you should use the same version of distributed packages between your client and distributed pods.
Hence please check the package version of distributed in your client as follows, and set the same version like above.
python3.8 -m pip freeze | grep distributeddistributed==2021.5.0Furthermore, as I mentioned above, the Python version between client and cluster should also be same. For this reason, here I set the specific version of dask dev image (daskdev/dask:2021.4.1) in this example.
Next, let’s connect to this cluster from your client (Ubuntu) as follows.
from dask.distributed import Client# Connect to a clusterclient = Client(cluster)In this tutorial, I create regression sample dataset with 4 dimensional features.
The generated dataframe is not Pandas dataframe, but it’s dask dataframe, which is similar to your familiar Pandas and ready for distribution.
from dask_ml.datasets import make_regressionfrom dask_ml.model_selection import train_test_split# Generate 100,000 samples for regression with 4 dimensional features# (X and y is Dask array)X, y = make_regression( n_samples=100000, n_features=4, chunks=50)# Split data (train:test = 9:1)X_train, X_test, y_train, y_test = train_test_split(X, y, test_size=0.1)Next, I train with linear (Gaussian) regression as follows.
In this example, I used dask built-in regressor (dask_ml.linear_model.LinearRegression) for training, but you should remember that Dask can talk to native scikit-learn (via joblib) in distributed manners. For instance, if you want to run deep learning tasks with Keras (or TensorFlow), you can also use sklearn-compatible SciKeras on dask distributions.
You can also parallelize custom algorithms using the simpler dask.delayed() interface. (The custom function executions can also be distributed.)
from dask_ml.linear_model import LinearRegressionlr = LinearRegression()lr.fit(X_train, y_train)In this tutorial, let’s see the evaluation result of trained model on standard output console.
score_res = lr.score(X_test, y_test)print('Result : {}'.format(score_res))Result : 0.9999999997281678I’ll show you the entire source code in this example as follows.
test01.py
from dask_kubernetes import KubeCluster, make_pod_specfrom dask.distributed import Clientfrom dask_ml.datasets import make_regressionfrom dask_ml.model_selection import train_test_splitfrom dask_ml.linear_model import LinearRegressionworker_pod_spec = make_pod_spec( image='daskdev/dask:2021.4.1', memory_limit='4G', memory_request='4G', cpu_limit=1, cpu_request=1, env={'EXTRA_PIP_PACKAGES': 'distributed==2021.5.0','EXTRA_CONDA_PACKAGES': 'dask-ml==1.9.0' })cluster = KubeCluster(worker_pod_spec)cluster.scale(2)# Connect to a clusterclient = Client(cluster)# Generate 100,000 samples for regression with 4 dimensional features# (X and y is Dask array)X, y = make_regression( n_samples=100000, n_features=4, chunks=50)# Split data (train:test = 9:1)X_train, X_test, y_train, y_test = train_test_split(X, y, test_size=0.1)lr = LinearRegression()lr.fit(X_train, y_train)print(lr.score(X_test, y_test))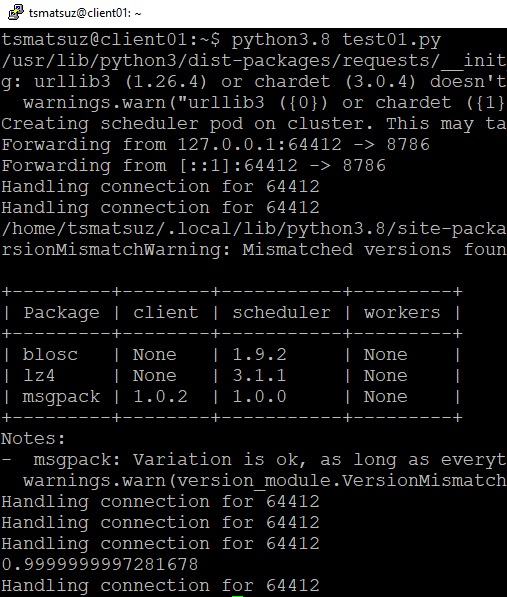
Note : When you encounter errors (such like, “
KilledWorker“, “CancelledError“, etc) and need debugging, see pod’s logs for further information (error reasons) bykubectl logscommand for both scheduler and workers.kubectl logs {POD_NAME}
For your introduction, here I’ve showed you primitive machine learning example on Dask with cloud managed Kubernetes.
Dask also supports for running on Azure VMs (without Kubernetes cluster) by built-in dask_cloudprovider.azure.AzureVMCluster class. (See here.)
Using Dask, you can transparently run scaled AI workloads with a variety of libraries – such as, NVIDIA RAPIDS (used with multiple GPUs), modin.pandas, etc – by the manner of familiar Pandas, Numpy, or Scikit-Learn.
Note : See here for the example of running ML jobs on Dask distributions with Azure Machine Learning (AML).
Categories: Uncategorized

1 reply»