
Important Note (on Dec 2018) :
Azure Batch AI (Preview) will be retired on 03/31/2019. Please use Azure Machine Learning service (AmlCompute) for alternatives.
In my previous post, I showed how to setup and configure for the training with multiple machines.
Using Azure Batch AI, you’ll find that it’s very straightforward and simplifying many tasks for AI workloads, especially when it’s distributed training workloads.
Azure Batch AI is built on top of Azure Batch (see my early post), and then you can easily understand this mechanism when you’re familiar with Azure Batch.
Now let’s see how Batch AI works and how you can use it !
Here we use Azure CLI (Command Line Interface), but it’s also integrated with tool’s UI like Azure Portal, Visual Studio, or Visual Studio Code.
Note (Added June 2018) : New Azure Batch AI API introduces new resources named “workspace” and “experiment” to make it easier to manage Batch AI resources. If you manage old resources with Azure CLI 2.0.37 or prior versions, please ignore the following “workspace” and “experiment” options.
See “Migrate to the updated Batch AI API” to use new API for managing old resources.
Simplifies the distributed training
First, we assume that you are familiar with the basic concepts of distributed training with Cognitive Toolkit (CNTK). In this post we use the following distributed-training sample code (Train_MNIST.py) with training data (Train-28x28_cntk_text.txt), which is the exactly same sample code in my previous post. (See “Walkthrough – Distributed training with CNTK” for details.)
This sample trains the convolutional neural network (LeNet) with distributed manners and save the trained model (ConvNet_MNIST.dnn) after the training is done.
Train_MNIST.py
import numpy as npimport sysimport osimport cntkfrom cntk.train.training_session import *# folder which includes "Train-28x28_cntk_text.txt"data_path = sys.argv[1]# folder for model outputmodel_path = sys.argv[2]# Creates and trains a feedforward classification model for MNIST imagesdef train_mnist(): # variables denoting the features and label data input_var = cntk.input_variable((1, 28, 28)) label_var = cntk.input_variable(10) # instantiate the feedforward classification model with cntk.layers.default_options(init = cntk.layers.glorot_uniform(),activation=cntk.ops.relu):h = input_var/255.0h = cntk.layers.Convolution2D((5,5), 32, pad=True)(h)h = cntk.layers.MaxPooling((3,3), (2,2))(h)h = cntk.layers.Convolution2D((3,3), 48)(h)h = cntk.layers.MaxPooling((3,3), (2,2))(h)h = cntk.layers.Convolution2D((3,3), 64)(h)h = cntk.layers.Dense(96)(h)h = cntk.layers.Dropout(0.5)(h)z = cntk.layers.Dense(10, activation=None)(h) # create source for training data reader_train = cntk.io.MinibatchSource(cntk.io.CTFDeserializer( os.path.join(data_path, 'Train-28x28_cntk_text.txt'), cntk.io.StreamDefs(features = cntk.io.StreamDef(field='features', shape=28 * 28),labels = cntk.io.StreamDef(field='labels', shape=10) )), randomize=True, max_samples = 60000, multithreaded_deserializer=True) # create trainer epoch_size = 60000 minibatch_size = 64 max_epochs = 40 lr_schedule = cntk.learning_rate_schedule(0.2,cntk.UnitType.minibatch) learner = cntk.sgd(z.parameters,lr_schedule) dist_learner = cntk.train.distributed.data_parallel_distributed_learner(learner = learner,num_quantization_bits=32, # non-quantized SGDdistributed_after=0) # all data is parallelized progress_printer = cntk.logging.ProgressPrinter(tag='Training',num_epochs=max_epochs,freq=100,log_to_file=None,rank=cntk.train.distributed.Communicator.rank(),gen_heartbeat=True,distributed_freq=None) ce = cntk.losses.cross_entropy_with_softmax(z,label_var) pe = cntk.metrics.classification_error(z,label_var) trainer = cntk.Trainer(z,(ce, pe),dist_learner,progress_printer) # define mapping from reader streams to network inputs input_map = {input_var : reader_train.streams.features,label_var : reader_train.streams.labels } cntk.logging.log_number_of_parameters(z) ; print() session = training_session(trainer=trainer,mb_source = reader_train,model_inputs_to_streams = input_map,mb_size = minibatch_size,progress_frequency=epoch_size,checkpoint_config = CheckpointConfig( frequency = epoch_size, filename = os.path.join(model_path, "ConvNet_MNIST"), restore = False),test_config = None ) session.train() # save model only by one process if 0 == cntk.Communicator.rank():z.save( os.path.join(model_path,"ConvNet_MNIST.dnn")) # clean-up distribution cntk.train.distributed.Communicator.finalize(); returnif __name__=='__main__': train_mnist()Train-28x28_cntk_text.txt
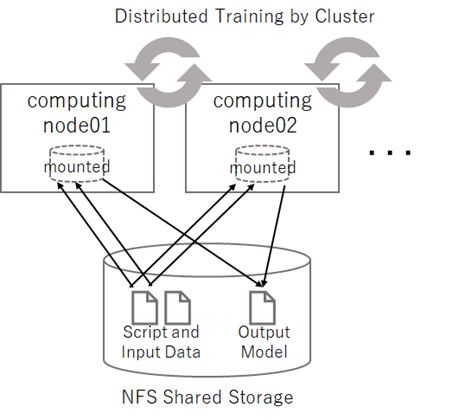
|labels 0 0 0 0 0 0 0 1 0 0 |features 0 3 18 18 126... (784 pixel data)|labels 0 1 0 0 0 0 0 0 0 0 |features 0 0 139 0 253... (784 pixel data)...Azure Batch AI uses shared script and data (both input data and model output) for the distributed training. Therefore it uses the shared storage like Azure blob, Azure file share, or NFS file servers as following illustrated.
In this post we use Azure Blob Storage and we assume that the storage account name is “batchaistore01” and the container name is “share01”.
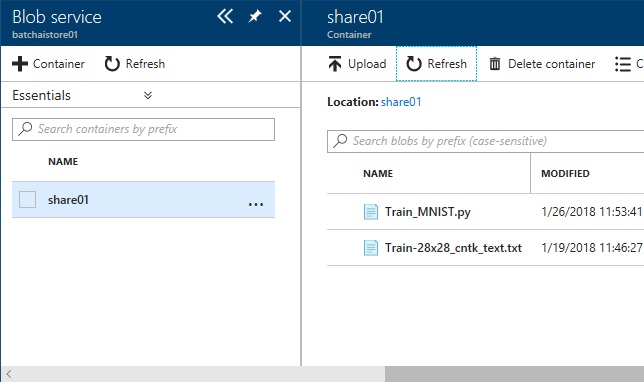
Before starting, locate the previous Train_MNIST.py (script) and Train-28x28_cntk_text.txt (input data) in the blob container.
Now let’s create the cluster (multiple computing nodes) with the following CLI command.
Here we’re creating 2 nodes of Data Science Virtual Machines (DSVM), in which the required software is all pre-configured including GPU-accelerated drivers, OpenMPI and deep learning libraries (TensorFlow, Cognitive Toolkit, Caffe, Keras, etc) with GPU utilized.
Instead of using DSVM, you can also use simple Ubuntu 16.04 LTS (use “UbuntuLTS” instead of “UbuntuDSVM” in the following command) and create a job with the container image, in which the required software is configured. (Later I’ll show you how to use the container image in the job.)
Note : When you don’t need the distributed training (you only use one single node for the training), you can just specify “--min 1” and “--max 1” in the following command.
Note : Currently (in preview) the supported regions are EastUS, WestUS2, WestEurope and available VM Size (pricing tier) is D-series, E-series, F-series, NC-series, ND-series.
# create workspaceaz batchai workspace create --workspace ws01 \ --resource-group testrg01 \ --location eastus# create cluster (computing nodes)az batchai cluster create --name cluster01 \ --workspace ws01 \ --resource-group testrg01 \ --vm-size STANDARD_NC6 \ --image UbuntuDSVM \ --min 2 --max 2 \ --storage-account-name batchaistore01 \ --storage-account-key ciUzonyM... \ --bfs-name share01 \ --user-name tsmatsuz --password P@ssw0rdPlease remember my previous post, in which we manually configured the computing node.
Using Batch AI, the only one command runs all configuration tasks including MPI and inter-node’s communication settings. It significantly simplifies the distributed training !
After you’ve created the cluster, please wait until “allocationState” is steady without any errors using “az batchai cluster show” command. (See the following results.)
# show status for cluster creationaz batchai cluster show \ --name cluster01 \ --workspace ws01 \ --resource-group testrg01{ "allocationState": "steady", "creationTime": "2017-12-18T07:01:00.424000+00:00", "currentNodeCount": 1, "errors": null, "location": "EastUS", "name": "cluster01", "nodeSetup": {"mountVolumes": { "azureBlobFileSystems": null, "azureFileShares": [{ "accountName": "batchaistore01", "azureFileUrl": "https://batchaistore01.file.core.windows.net/share01", "credentials": {"accountKey": null,"accountKeySecretReference": null }, "directoryMode": "0777", "fileMode": "0777", "relativeMountPath": "dir01"} ], "fileServers": null, "unmanagedFileSystems": null},"setupTask": null }, ...}You can get the access information for the computing nodes with the following command.
As you can see, here’s 2 computing nodes : one is accessed by ssh with port 50000 and another with port 50001. (The inbound NAT is used for accessing nodes with public addresses.)
# show endpointsaz batchai cluster node list \ --cluster cluster01 \ --workspace ws01 \ --resource-group testrg01[ {"ipAddress": "52.168.68.25","nodeId": "tvm-4283973576_1-20171218t070031z","port": 50000.0 }, {"ipAddress": "52.168.68.25","nodeId": "tvm-4283973576_2-20171218t070031z","port": 50001.0 }]Please login to the computing node with ssh client, and you can find that the storage container “share01” is mounted as path “$AZ_BATCHAI_MOUNT_ROOT/bfs” (/mnt/batch/tasks/shared/LS_root/mounts/bfs in my environment) in your computing node. (You can change the mount point “bfs” with the cluster creation option.)

When you set the same value for minimum (min) and maximum (max) as cluster nodes’ count with cluster creation option, the auto-scale setting is disabled and it uses the fixed nodes for the cluster.
When you set the different values, the auto-scale setting is enabled automatically. (See the following result.)
You can check whether the auto-scaling is enabled with “az batchai cluster show” command.
Note : When using the fixed nodes, you can change the node count with “az batchai cluster resize“. When using auto-scaling, you can change the auto-scale configuration with “az batchai cluster auto-scale“.
Note : As you can see, the running workload won’t be scaled out on-the-fly, even if you enabled auto-scaling. Auto-scale settings will effect, when you run multiple workloads on the cluster.
# creating fixed nodes...az batchai cluster create --name cluster01 \ --workspace ws01 \ --resource-group testrg01 \ --min 2 --max 2 ...{ "allocationState": "steady", "scaleSettings": {"autoScale": null,"manual": { "nodeDeallocationOption": "requeue", "targetNodeCount": 2} }, ...}# creating auto-scaling nodes...az batchai cluster create --name cluster01 \ --workspace ws01 \ --resource-group testrg01 \ --min 1 --max 3 ...{ "allocationState": "steady", "scaleSettings": {"autoScale": { "initialNodeCount": 0, "maximumNodeCount": 3, "minimumNodeCount": 1},"manual": null }, ...}When your cluster is ready, now you can publish the training job !
Before starting your job, you must first create the following json for the job definition.
With this definition, the command “python Train_MNIST.py {dir for training data} {dir for model output}” will be launched on MPI (on “mpirun” command). Therefore the training workloads will run on all nodes in parallel and the results are exchanged each other.
Note : When you set 2 as “nodeCount” as follows, 2 computing nodes are set in the host file for MPI (located as $AZ_BATCHAI_MPI_HOST_FILE) and the file is used by “mpirun” command.
Note : Here we use the settings for CNTK (Cognitive Toolkit), but you can also specify the framework settings for TensorFlow, Caffe (incl. Caffe2) and Chainer with Batch AI.
Later I’ll explain more about job definition file…
job.json
{ "properties": {"nodeCount": 2,"cntkSettings": { "pythonScriptFilePath": "$AZ_BATCHAI_MOUNT_ROOT/bfs/Train_MNIST.py", "commandLineArgs": "$AZ_BATCHAI_MOUNT_ROOT/bfs $AZ_BATCHAI_MOUNT_ROOT/bfs/model"},"stdOutErrPathPrefix": "$AZ_BATCHAI_MOUNT_ROOT/bfs/output" }}You can run this job with the following command.
As I mentioned in my early post (see my post “Azure Batch – Walkthrough and How it works“), the job runs under an auto-user account named “_azbatch”, and not used the provisioned user account (“tsmatsuz” in my sample).
Like Azure ML services, you create an “experiment” resource for grouping jobs, and later you can experiment such as hyper-parameter tuning across jobs.
# create experimentaz batchai experiment create --name ex01 \ --workspace ws01 \ --resource-group testrg01# run job !az batchai job create --name job01 \ --cluster cluster01 \ --experiment ex01 \ --workspace ws01 \ --resource-group testrg01 \ --config-file job.jsonAfter you published the job, you can see the job processing state (queued, running, succeeded, etc) with the following command.
# see the job statusaz batchai job list -o table \ --experiment ex01 \ --workspace ws01 \ --resource-group testrg01NameResource GroupClusterCluster RGTool Nodes StateExit code------ ---------------- --------- ------------ ------ ------- --------- -----------job01 testrg01 cluster01 testrg01 cntk 2 succeeded0The result (the generated model and console output) is located in the shared (mounted) folder and you can download these files. (As I’ll explain later, you can also get the download url with CLI command.)
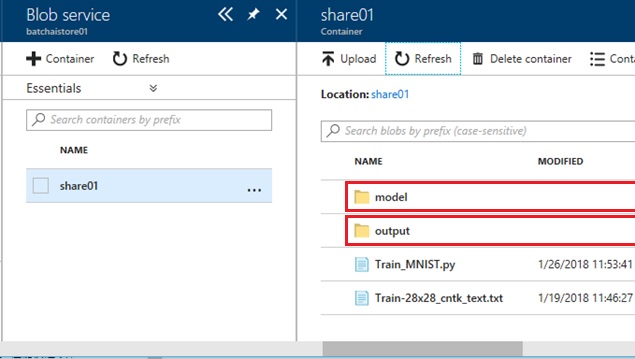
When you want to terminate the queued job, you can run the following command.
# terminate jobaz batchai job terminate --name job01 \ --experiment ex01 \ --workspace ws01 \ --resource-group testrg01After all operations have done, you can soon delete your cluster (incl. all computing nodes) with the following command.
# delete cluster (all computing nodes)az batchai cluster delete --name cluster01 \ --workspace ws01 \ --resource-group testrg01
More about job definitions
Here I show you more about job definitions (job.json).
When you use your own favorite framework like Keras, MXNet, etc except for BatchAI-supported frameworks, you can use customToolkitSettings in job definitions.
For example, you can define the previous CNTK distributed training using “customToolkitSettings” as follows. (The result is the same as before.)
Using custom settings (job.json)
{ "properties": {"nodeCount": 2,"customToolkitSettings": { "commandLine": "mpirun --mca btl_tcp_if_include eth0 --hostfile $AZ_BATCHAI_MPI_HOST_FILE python $AZ_BATCHAI_MOUNT_ROOT/bfs/Train_MNIST.py $AZ_BATCHAI_MOUNT_ROOT/bfs $AZ_BATCHAI_MOUNT_ROOT/bfs/model"},"stdOutErrPathPrefix": "$AZ_BATCHAI_MOUNT_ROOT/bfs/output" }}In my previous example, I configured command with only “$AZ_BATCHAI_MOUNT_ROOT” in job definition (job.json). But you can also write the definition as follows with good modularity. (Here we’re defining extra variables “AZ_BATCHAI_INPUT_MYSCRIPT”, “AZ_BATCHAI_INPUT_MYDATA”, and “AZ_BATCHAI_OUTPUT_MYMODEL”.)
With inputDirectories and outputDirectories (job.json)
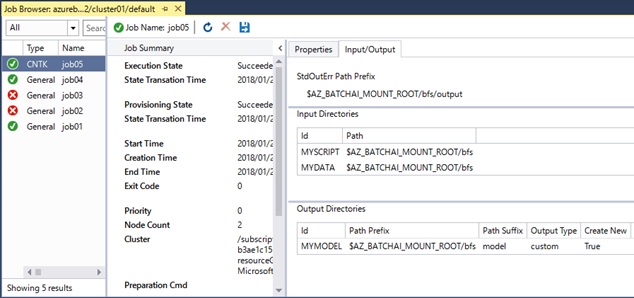
{ "properties": {"nodeCount": 2,"inputDirectories": [ {"id": "MYSCRIPT","path": "$AZ_BATCHAI_MOUNT_ROOT/bfs" }, {"id": "MYDATA","path": "$AZ_BATCHAI_MOUNT_ROOT/bfs" }],"outputDirectories": [ {"id": "MYMODEL","pathPrefix": "$AZ_BATCHAI_MOUNT_ROOT/bfs","pathSuffix": "model" }],"cntkSettings": { "pythonScriptFilePath": "$AZ_BATCHAI_INPUT_MYSCRIPT/Train_MNIST.py", "commandLineArgs": "$AZ_BATCHAI_INPUT_MYDATA $AZ_BATCHAI_OUTPUT_MYMODEL"},"stdOutErrPathPrefix": "$AZ_BATCHAI_MOUNT_ROOT/bfs/output" }}The benefit of this writing is not only for modularity.
When you write with “outputDirectories” as above, you can get the details about output files with this id of “outputDirectories” as follows. Here are 3 files (ConvNet_MNIST, ConvNet_MNIST.ckp, ConvNet_MNIST.dnn) in the directory AZ_BATCHAI_OUTPUT_MYMODEL.
(When you access job stdout and stderr, use “stdouterr” for directory id.)
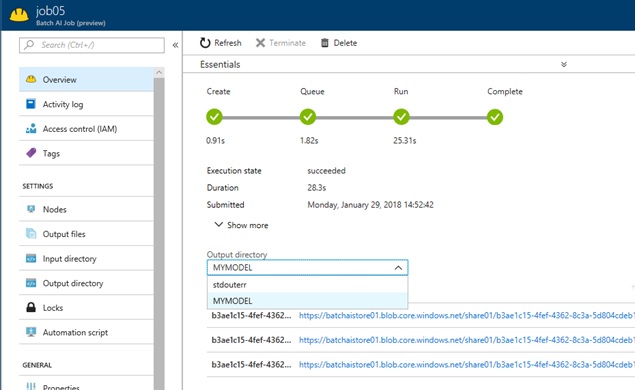
# list files in "MYMODEL"az batchai job file list \ --job job03 \ --experiment ex01 \ --workspace ws01 \ --output-directory-id MYMODEL \ --resource-group testrg01[ {"contentLength": 415115,"downloadUrl": "https://batchaistore01.blob.core.windows.net/share01/b3a...","name": ".../outputs/model/ConvNet_MNIST" }, {"contentLength": 1127,"downloadUrl": "https://batchaistore01.blob.core.windows.net/share01/b3a...","name": ".../outputs/model/ConvNet_MNIST.ckp" }, {"contentLength": 409549,"downloadUrl": "https://batchaistore01.blob.core.windows.net/share01/b3a...","name": ".../outputs/model/ConvNet_MNIST.dnn" }]You can also view the results with integrated UI in Azure Portal or AI tools, etc.
Azure Portal
AI tools for Visual Studio
In my previous example, we used only built-in modules in python.
If you want to install some additional module, please use the job preparation as follows.
Invoking pre-task (job.json)
{ "properties": {"nodeCount": 1,"jobPreparation": { "commandLine": "pip install mpi4py"},... }}You can also specify commands using sh file as follows.
Invoking pre-task (job.json)
{ "properties": {"nodeCount": 1,"jobPreparation": { "commandLine": "bash $AZ_BATCHAI_MOUNT_ROOT/myprepare.sh"},... }}As I mentioned earlier, you can use the docker image without DSVM provisioning.
With the following definition, you can use simple Ubuntu VM for cluster creation and use docker image for provisioning.
With docker image (job.json)
{ "properties": {"nodeCount": 2,"cntkSettings": { "pythonScriptFilePath": "$AZ_BATCHAI_MOUNT_ROOT/bfs/Train_MNIST.py", "commandLineArgs": "$AZ_BATCHAI_MOUNT_ROOT/bfs $AZ_BATCHAI_MOUNT_ROOT/bfs/model"},"stdOutErrPathPrefix": "$AZ_BATCHAI_MOUNT_ROOT/bfs/output","containerSettings": { "imageSourceRegistry": {"image": "microsoft/cntk:2.1-gpu-python3.5-cuda8.0-cudnn6.0" }} }}
Next I show you Azure Distributed Data Engineering Toolkit (aztk), which is also built on top of Azure Batch and provides Spark cluster with docker images.
Enjoy your AI works with Azure !
[Reference]
Github – Azure Batch AI recipes
https://github.com/Azure/BatchAI/tree/master/recipes
[Update history]
06/21/2018 : Updated for new Azure Batch AI API. (see https://docs.microsoft.com/en-us/azure/batch-ai/migrate-to-new-api)
Categories: Uncategorized

6 replies»