
Batch is another side of the benefits of massive cloud computing. With this post, I focus on Azure Batch fundamentals and show you how to use and how it works.
When you use cloud computing resource for the purpose of critical batch execution, you should consider all the work yourself, such as constructing infrastructure (Virtual Machines, Virtual Networks, etc with ARM template), provisioning libraries and applications, providing queue, scaling, security, monitoring, collecting results, or clean-up, etc etc. Using Azure Batch, it helps you to do these batch provision or execution workloads with cloud massive computing scale.
In this post, we mainly use Azure CLI for your easy tracing and checking. But you must remember that you can also use UI (Azure Portal), PowerShell, REST API or language’s SDKs such as .NET (C#), Java, Python, and R (doAzureParallel and rAzureBatch package).
Before starting …
Before starting, select “New” – “Batch Service” in Azure Portal and create a batch account. (You can also create a batch account with Azure CLI.)
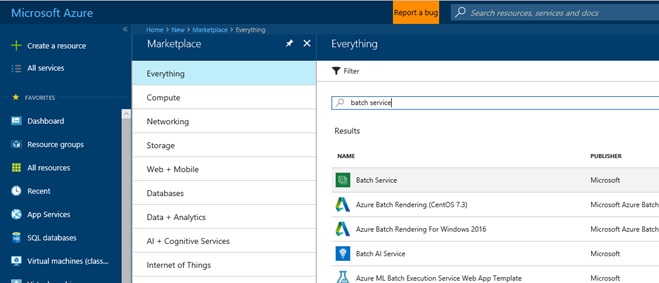
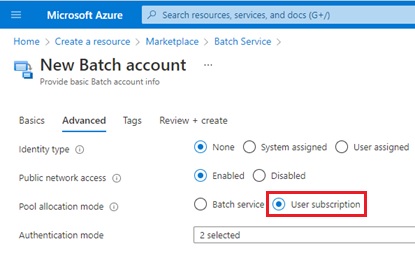
Note : There exist 2 options in Azure Batch account for pool allocation mode – batch service mode and user subscription mode.
In order to use Spot VM in Azure Batch, you should specify “user subscription mode” on the detailed settings in Azure Batch account creation.
Once you have created a batch account, you can log-in to Azure batch with Azure CLI as follows. (In this post we’re using batch account named “test01” in the resource group “testrg01”.)
Here we’re using interactive login UI, but you can also login silently with service principal and password (see my old post “How to use Azure REST API with Certificate programmatically (without interactive UI)“).
# you login Azure with interactive UIaz login# you login batch accountaz batch account login \ --resource-group testrg01 \ --name test01Preparing batch pool (computing nodes)
Before executing batch, you must prepare the application package and batch pool.
The application package is the archived executables (and related other files) with compressed zip format. Now you compress executable applications (.exe, .dll, etc) into zip file, and upload this zipped file (myapp-exe.zip) as the batch application package with the following command.
# Upload and register your archive as application packageaz batch application package create \ --resource-group testrg01 \ --name test01 \ --application-id app01 \ --package-file myapp-exe.zip \ --version 1.0# Set this version of package as default versionaz batch application set \ --resource-group testrg01 \ --name test01 \ --application-id app01 \ --default-version 1.0Next you must provision the batch pool with application packages as follows.
The batch pool is the computing nodes in Microsoft Azure. Here we’re creating 3 nodes with Windows image (Publisher “MicrosoftWindowsServer”, Offer “WindowsServer”, Sku “2016-Datacenter”, Node agent SKU ID “batch.node.windows amd64”), but of course, you can use Linux computing nodes for the batch pool.
As you can see below, here we are using virtual machine with Standard A1, but you can also use GPU instances for machine learning workloads. You can use Data Science Virtual Machine (DSVM) for Azure Batch, which is the pre-configured machine (including Python, R, CNTK, Tensorflow, MXNet, etc with GPU utilized) for machine learning and deep learning.
You can also use spot VM for batch pool, which is very low pricing virtual machine.
Please see “Azure Batch – List of virtual machine images” for the supported machine images.
az batch pool create \ --id pool01 \ --target-dedicated 3 \ --image MicrosoftWindowsServer:WindowsServer:2016-Datacenter:latest \ --node-agent-sku-id "batch.node.windows amd64" \ --vm-size Standard_A1 \ --application-package-references app01#1.0Note : To use spot VM, set
--target-low-priority-nodesoption. In order to use spot VM, make sure to use the user subscription mode. (See above.)
Here I use the dedicated VMs in this example.
On batch pool creation, the packaged application is extracted in the directory “D:\batch\tasks\apppackages\{folder name derived from your package name}” (/mnt/batch/tasks/apppackages/{…} in Linux), and this path string is referred by the environment variable %AZ_BATCH_APP_PACKAGE_app01#1.0% (“app01” is your app package name and “1.0” is the version) on your batch process.
For the details about environment variables, please refer “Azure Batch compute node environment variables“.
When some set-up is needed in each nodes, you can use the start-task setting.
For example, when you need your package installation instead of extracting zip archive, you can specify the following installation task (see --start-task-command-line option) on pool’s creation. This setting copies https://mystorage.blob.core.windows.net/fol01/myapp.msi as myapp.msi in current working directory and run msiexec with silent installation process.
Note : The error or output is written in the file (stderr.txt or stdout.txt) on %AZ_BATCH_NODE_STARTUP_DIR% directory (D:\batch\tasks\startup\ in Windows, /mnt/batch/tasks/startup in Linux) on each computing nodes.
az batch pool create \ --id pool08 \ --target-dedicated 3 \ --image MicrosoftWindowsServer:WindowsServer:2016-Datacenter:latest \ --node-agent-sku-id "batch.node.windows amd64" \ --vm-size Standard_A1 \ --application-package-references app08#1.0 \ --start-task-command-line "cmd /c msiexec /i myapp.msi /quiet" \ --start-task-resource-files "myapp.msi=https://mystorage.blob.core.windows.net/fol01/myapp.msi" \ --start-task-wait-for-successWhen you want to setup distributed training environments with some deep learning libraries (CNTK etc), you should setup MPI with admin elevated installation. But unfortunately there’s no command options in Azure Bath CLI for admin elevated execution.
In such a case, you can specify the detailed parameters with json format as follows. This json is the same format as batch rest api or ARM template. (See the reference for details.)
Note : See “Cognitive Toolkit : Multiple GPUs and Machines” for distributed training with CNTK. For distributed trainig with MXNetR, see my old post “Accelerate MXNet R training by multiple machines and GPUs“.
For the distributed training, some kind of mechanism for inter-node communication must be needed.
command
# Install MPI in start-task with admin elevated privileges# (see the following "pooldef.json")az batch pool create --json-file pooldef.jsonpooldef.json (parameter’s definition)
{ "id": "pool01", "virtualMachineConfiguration": {"imageReference": { "publisher": "MicrosoftWindowsServer", "offer": "WindowsServer", "sku": "2016-Datacenter", "version": "latest"},"nodeAgentSKUId": "batch.node.windows amd64" }, "vmSize": "Standard_A1", "targetDedicatedNodes": "3", "enableInterNodeCommunication": true, "maxTasksPerNode": 1, "applicationPackageReferences": [{ "applicationId": "app01", "version": "1.0"} ], "startTask": {"commandLine": "cmd /c MSMpiSetup.exe -unattend -force","resourceFiles": [ {"blobSource": "https://mystorage.blob.core.windows.net/fol01/MSMpiSetup.exe","filePath": "MSMpiSetup.exe" }],"userIdentity": { "autoUser": {"elevationLevel": "admin" }},"waitForSuccess": true }}When you want to deploy with pre-configured images, you can use custom VM images or docker images (containerized machine image) with batch pool.
Note : There’re two ways to use docker container for Azure Batch.
The first approach is to use start task for setting up docker on host machine (and run your batch task commands with “docker run” command).
The second approach is to create pool with machine image running docker and containerized image setting withcontainerConfigurationparameter. When you use the second approach, you can run batch task commands in docker containers, not directly on virtual machine. See “Run container applications on Azure Batch” for details.
When pool’s status gets “steady” and the each computing nodes’ state gets “idle” without any errors, it’s ready for your job execution !
# show pool's statusaz batch pool show --pool-id pool01{ "id": "pool01", "allocationState": "steady", "applicationPackageReferences": [{ "applicationId": "app07", "version": "1.0"} ], "currentDedicatedNodes": 3, "currentLowPriorityNodes": 0, "enableAutoScale": false, "enableInterNodeCommunication": false, "state": "active", ...}# show node's stateaz batch node list --pool-id pool01[ {"id": "tvm-1219235766_1-20171207t021610z","affinityId": "TVM:tvm-1219235766_1-20171207t021610z","state": "idle","errors": null,"endpointConfiguration": { "inboundEndpoints": [{ "backendPort": 3389, "frontendPort": 50000, "name": "SSHRule.0", "protocol": "tcp", "publicFqdn": "dnsazurebatch-7e6395de-5c8f-444a-9cb6-f7bd809e2d3c-c.westus.cloudapp.azure.com", "publicIpAddress": "104.42.129.75"} ]},"ipAddress": "10.0.0.4",... }, {"id": "tvm-1219235766_2-20171207t021610z","affinityId": "TVM:tvm-1219235766_2-20171207t021610z","state": "idle","errors": null,"endpointConfiguration": { "inboundEndpoints": [{ "backendPort": 3389, "frontendPort": 50002, "name": "SSHRule.2", "protocol": "tcp", "publicFqdn": "dnsazurebatch-7e6395de-5c8f-444a-9cb6-f7bd809e2d3c-c.westus.cloudapp.azure.com", "publicIpAddress": "104.42.129.75"} ]},"ipAddress": "10.0.0.6",... }, {"id": "tvm-1219235766_3-20171207t021610z","affinityId": "TVM:tvm-1219235766_3-20171207t021610z","state": "idle","errors": null,"endpointConfiguration": { "inboundEndpoints": [{ "backendPort": 3389, "frontendPort": 50001, "name": "SSHRule.1", "protocol": "tcp", "publicFqdn": "dnsazurebatch-7e6395de-5c8f-444a-9cb6-f7bd809e2d3c-c.westus.cloudapp.azure.com", "publicIpAddress": "104.42.129.75"} ]},"ipAddress": "10.0.0.5",... }]Manage your pool (computing nodes)
Batch pool is based on Azure Virtual Machine Scale Sets (VMSS) technology and you can manage these nodes like VMSS with batch cli.
For example, you can easily change the number of nodes (scale-out and scale-in) with the following command. Here we’re changing the number of node to 5.
az batch pool resize \ --pool-id pool01 \ --target-dedicated-nodes 5Only nodes are charged as usage prices in Azure Batch. Then if you want to configure for cost-effective consumption, you can also enable automatic scaling (auto-scaling) for pool.
By default, tasks will run under an auto-user account (named “_azbatch”). This account is a built-in user account and is created automatically by Batch service. When you want to login to each computing nodes, you can add the named user account instead of using auto-user account.
The following is adding the named user account into the node, which node id is “tvm-1219235766_1-20171207t021610z”. (This operation can also be done by Azure Portal UI.)
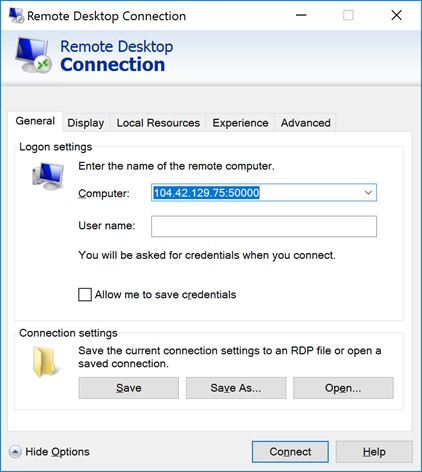
az batch node user create \ --pool-id pool07 \ --node-id tvm-1219235766_1-20171207t021610z \ --name tsmatsuz \ --password P@ssw0rd \ --is-adminUsing named user account, you can connect to each computing node with RDP (Windows) or SSH (Linux).
With the previous “az batch node list” command, you can get the public ip and public port by inbound NAT for RDP (port 3389). (See the previous command results.) Or use “az batch node remote-login-settings show” command for the remote access addresses.
Job and Tasks
The one batch execution is controlled by the logical operation called “job”, and each process (command execution) is managed by “task”. One job has many tasks, and each tasks are launched by parallel or having dependencies.
The typical flow of batch execution is as follows :
- Create job (which is associated with the pool)
- Add tasks to the previous job
- Each tasks are automatically queued and scheduled for execution on computing nodes.
You can also assign job manager task, which determines the completion of all other tasks in the job. In this post, we don’t use the job manager task (jobManagerTask=null) for simplicity and we only use directly executed tasks under the job.
Now let’s see the following example. (As I mentioned above, %AZ_BATCH_APP_PACKAGE_app01#1.0% is the environment variable for batch task.)
After you add a task in a job, the task are automatically scheduled for execution. Even when all tasks are completed, no action is occurred by default. Then you must set “terminateJob” in --on-all-tasks-complete option, and the job is automatically completed after all tasks are completed.
Note : You can also run your task as admin elevated process same like previous start-task. (Please specify the json file and set the detailed parameters same like previous start-task.)
# Create Jobaz batch job create \ --id job01 \ --pool-id pool01# Create Tasksaz batch task create \ --job-id job01 \ --task-id task01 \ --application-package-references app01#1.0 \ --command-line "cmd /c %AZ_BATCH_APP_PACKAGE_app01#1.0%\\myapp.exe"az batch task create \ --job-id job01 \ --task-id task02 \ --application-package-references app01#1.0 \ --command-line "cmd /c %AZ_BATCH_APP_PACKAGE_app01#1.0%\\myapp.exe"az batch task create \ --job-id job01 \ --task-id task03 \ --application-package-references app01#1.0 \ --command-line "cmd /c %AZ_BATCH_APP_PACKAGE_app01#1.0%\\myapp.exe"az batch task create \ --job-id job01 \ --task-id task04 \ --application-package-references app01#1.0 \ --command-line "cmd /c %AZ_BATCH_APP_PACKAGE_app01#1.0%\\myapp.exe"az batch task create \ --job-id job01 \ --task-id task05 \ --application-package-references app01#1.0 \ --command-line "cmd /c %AZ_BATCH_APP_PACKAGE_app01#1.0%\\myapp.exe"az batch task create \ --job-id job01 \ --task-id task06 \ --application-package-references app01#1.0 \ --command-line "cmd /c %AZ_BATCH_APP_PACKAGE_app01#1.0%\\myapp.exe"# When all tasks are completed, the job will completeaz batch job set \ --job-id job01 \ --on-all-tasks-complete terminateJobYou can monitor the state (“active”, “completed”, etc) of your job and task as follows.
# show job's stateaz batch job show --job-id job01{ "creationTime": "2017-12-12T05:41:31.254257+00:00", "executionInfo": {"endTime": null,"poolId": "pool01","schedulingError": null,"startTime": "2017-12-12T05:41:31.291277+00:00","terminateReason": null }, "id": "job01", "previousState": null, "previousStateTransitionTime": null, "state": "active", ...}# show task's stateaz batch task show --job-id job01 --task-id task01{ "id": "task01", "commandLine": "cmd /c %AZ_BATCH_APP_PACKAGE_app01#1.0%\\\\myapp.exe", "constraints": {"maxTaskRetryCount": 0,"maxWallClockTime": "10675199 days, 2:48:05.477581","retentionTime": "10675199 days, 2:48:05.477581" }, "creationTime": "2017-12-12T05:42:08.762078+00:00", "executionInfo": {"containerInfo": null,"endTime": null,"exitCode": null,"failureInfo": null,"lastRequeueTime": null,"lastRetryTime": null,"requeueCount": 0,"result": null,"retryCount": 0,"startTime": null }, "previousState": null, "previousStateTransitionTime": null, "state": "active", "stateTransitionTime": "2017-12-12T05:42:08.762078+00:00", ...}In order to pass some arguments (parameters) into each tasks, you can take either of the following approaches :
- When some data is commonly used in all tasks, you can include such data in the application package.
- If some data is different in each tasks, you can pass such data with
--resource-filesoptions in “az batch task create“.
For instance, the following setting copieshttps://mystorage.blob.core.windows.net/fol01/myapp.msiasmyapp.msiin current working directory.--resource-files "myapp.msi=https://mystorage.blob.core.windows.net/fol01/myapp.msi" - If the data shouldn’t be copied and directly accessed, you can also pass the location (URL) information with command’s arguments in
--command-lineoption.
With .NET SDK (library), you can also mount Azure storage (container or file system) on your pool and directly access blobs in Azure storage account.
How to retrieve the execution results ? It also depends on your design.
- The task can write the result into the file or task’s standard output is written in the text file. After all tasks complete, you can collect (download) these outputs from VMs and create one mashed-up result.
- Another approach is that you pass the connection (connection string, credentials, etc) for accessing storage (blob, db, etc) to tasks, and all tasks write results into this shared storage.
In this post, we use the first approach. Let’s see the following example.
The task’s standard output is written in the file on the computing node. You can download these files with the following command.
Here the output file (stdout.txt) is saved (downloaded) as C:\tmp\node01-stdout.txt on the local computer (which is running your Azure CLI). You can view the all files on the computing node using “az batch node file list --recursive” command.
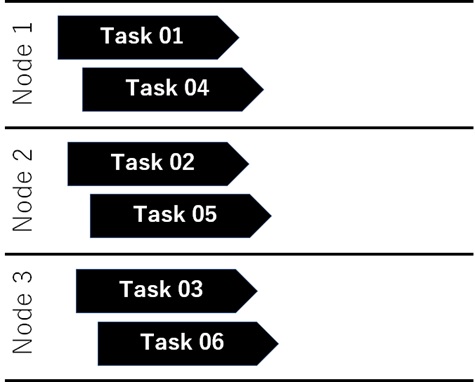
az batch node file download \ --file-path "D:\\batch\\tasks\\workitems\\job01\\job-1\\task01\\stdout.txt" \ --destination "C:\\tmp\\node01-stdout.txt" \ --node-id tvm-1219235766_1-20171207t021610z \ --pool-id pool01The task is randomly assigned to the computing node, and the maximum number of concurrent task execution in each node is 1 by default.
As a result, each tasks are scheduled and executed as follows.
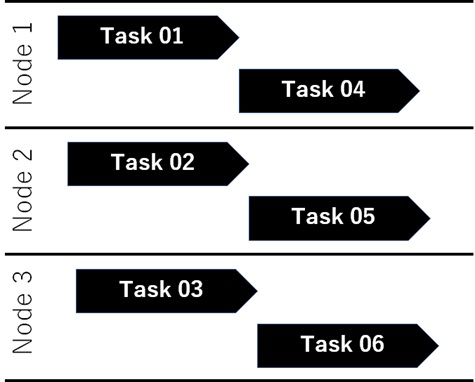
If you set “2” as maxTasksPerNode in pool creation (see the previous pooldef.json in above), each tasks will be executed as follows.
If the task is having relations between its results and inputs, you can also run each tasks with dependencies. (Use usesTaskDependencies option on job creation and use dependsOn parameter on task creation.)
Categories: Uncategorized

Hi I am Trying to do a CICD of my spring batch application to AZURE BATCH using AZURE CLI. when I am creating a task it says container is not specified. Can any one help me on how to add container.
LikeLike
Fantastic post. The MS documentation for the Azure Batch CLI is woefully thin.
LikeLike