
こんにちは。
Azure の Virtual Machine Scale Sets (仮想マシン スケール セット。以降、VM Scale Sets、VMSS と記載) は、Azure Container Service (ACS)、Azure Batch (Batch Pool)、Azure Service Fabric など、Azure における大量ノードの PaaS を支えるベースインフラとして設計された Scalable な Computing 基盤であり、「Azure (ARM) の Load Balancer, Auto Scaling の構成方法」でも紹介したように Auto Scaling などと組み合わせて単独で使うこともできます。
今回は、この VM Scale Sets を IaaS の Azure Resource として構成・管理する方法や、考え方を紹介します。
VM Scale Sets 概要
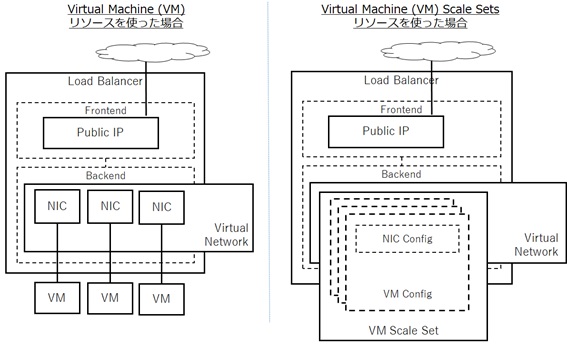
負荷分散構成、クラスタ構成などのように複数台の同一構成を展開する場合、従来の Virtual Machine (VM) を使用したアプローチでは、Resource Loop を使うなどして、多数の Virtual Machine リソースを構成する必要がありました。
ここで紹介する Azure の Virtual Machine Scale Sets (VM Scale Sets、VMSS) を使うと、こうした一括の構成を単一リソースとして定義し、大量の Virtual Machine インスタンスの管理を Azure 側で最適化できます。(下図の通り、複数台の VM を VM Scale Set という単一のリソースで定義します。)
VM Scale Sets を使う具体的メリット (恩恵) は多数ありますが、大まかに書くと下記の通りです。
- Auto Scaling のような “大量ノードにありがちなシナリオ” に対して、専用の機能を使って対応できます (Virtual Machine などを駆使して複雑な構成を自前でおこなう必要はありません)
- 管理負荷を軽減できます
- 専用のインフラを使って高速化できます (実際に、Scale-in / Scale-out の速度などを試してみてください。NIC、Storage なども Scale を前提に構成されています。)
このあと管理方法でも述べますが、逆に、こうした Mass な構成を扱わない場合 (単に「複数台である」という理由のみで使用する場合など) には、Virtual Machine リソースのように 1 台 1 台 細やかな構成ができるわけではないので、柔軟性の観点から VM Scale Sets (VMSS) を使用すべきではありません。(もちろん、明確に役割の異なる複数台のマシンを VMSS で構成することもできません。)
同一構成の負荷分散や、Azure 自体が PaaS で利用しているような大量ノードのクラスタ (同等の関係にある Slave ノード群) といった場面で活用すると良いでしょう。
追記 : VMSS の Orchestration mode を使用して、異なる VM family を同一の Scale Set 内に構成可能になりました。
VM Scale Sets の構成 (基本)
VM Scale Sets は Azure Portal を使って UI から作成できますが、細かな構成・管理をおこなうには、ARM template やコマンド (PowerShell, Azure CLI)、REST API を使います。なお、今後、Azure Portal (UI) にも、徐々に機能追加される予定です。(2016/04/07 変更 : Azure Portal から作成可能になりました。)
以前紹介した「Azure (ARM) の Load Balancer, Auto Scaling の構成方法」の復習になりますが、例えば、下記の ARM template のように VM Scale Set を展開すると、単純な 5 台の (同一構成の) Virtual Machine インスタンスが作成されます。
なお、Scaling Set で使用するマシン群 (各 VM) は、それぞれ異なる Storage Account が必要ですので、下記の通り、必要な Virtual Machine (インスタンス) の数だけ Storage Account を用意しておきます。
また、下記の通り作成すると、それぞれの Virtual Machine インスタンスには mycomputer-0、mycomputer-1、mycomputer-2、mycomputer-3、mycomputer-4 というマシン名が割り当てられます。
補足 : 本投稿では Unmanagd Disk を使用していますが、可能な限り「Azure Resource Manager の template の How-to」のように Managed Disk を使用してください。(VMSS でも Managed Disk がサポートされました。)
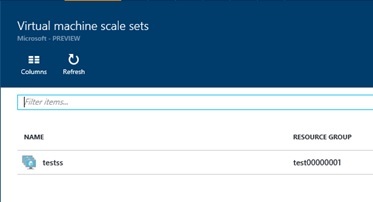
{ "$schema": "https://schema.management.azure.com/schemas/2015-01-01/deploymentTemplate.json#", "contentVersion": "1.0.0.0", "parameters": { }, "variables": { }, "resources": [{ "name": "[concat('matsustorage', copyIndex())]", "type": "Microsoft.Storage/storageAccounts", "location": "East US", "apiVersion": "2015-06-15", "properties": {"accountType": "Standard_LRS" }, "copy": {"name": "teststoragecopy","count": 5 }},{ "name": "testvnet", "type": "Microsoft.Network/virtualNetworks", "location": "East US", "apiVersion": "2016-03-30", "properties": {"addressSpace": { "addressPrefixes": ["10.0.0.0/16" ]},"subnets": [ {"name": "testsubnet0","properties": { "addressPrefix": "10.0.0.0/24"} }] }},{ "name": "testss", "type": "Microsoft.Compute/virtualMachineScaleSets", "location": "East US", "apiVersion": "2016-03-30", "dependsOn": ["teststoragecopy","Microsoft.Network/virtualNetworks/testvnet" ], "sku": {"name": "Standard_D1","tier": "Standard","capacity": "5" }, "properties": {"upgradePolicy": { "mode": "Manual"},"virtualMachineProfile": { "storageProfile": {"osDisk": { "vhdContainers": ["http://matsustorage0.blob.core.windows.net/vhds","http://matsustorage1.blob.core.windows.net/vhds","http://matsustorage2.blob.core.windows.net/vhds","http://matsustorage3.blob.core.windows.net/vhds","http://matsustorage4.blob.core.windows.net/vhds" ], "name": "testdisk", "caching": "ReadOnly", "createOption": "FromImage"},"imageReference": { "publisher": "MicrosoftWindowsServer", "offer": "WindowsServer", "sku": "2012-R2-Datacenter", "version": "latest"} }, "osProfile": {"computerNamePrefix": "mycomputer","adminUsername": "demouser","adminPassword": "P@ssw0rd01" }, "networkProfile": {"networkInterfaceConfigurations": [ {"name": "testnic0","properties": { "primary": "true", "ipConfigurations": [{ "name": "ipconfig0", "properties": {"subnet": { "id": "[concat(resourceId('Microsoft.Network/virtualNetworks', 'testvnet'), '/subnets/testsubnet0')]"} }} ]} }] }} }} ], "outputs": { }}上述の通り、VM Scale Sets は単一の Azure Resource なので Azure Portal 上では 1 つに見えます。(下図参照)
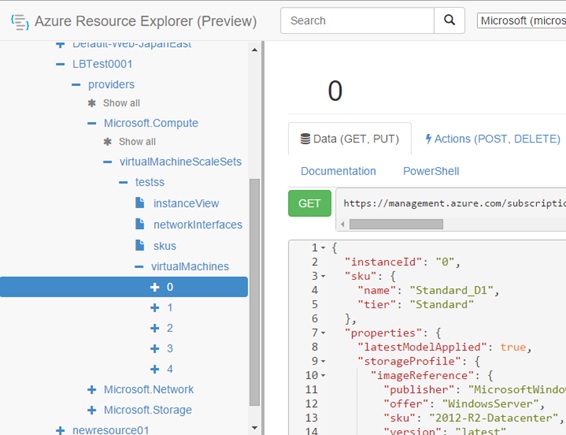
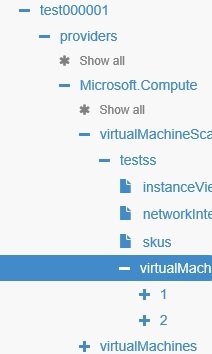
しかし、Azure の REST API や、Azure Resource Explorer で見ると、下図の通り、複数の Virtual Machine が作成されていることが確認できます。(0 から 4 までの 5 台の VM が作成されています。)
マルチインスタンスやクラスタの構成
VM Scale Sets では、Virtual Machine リソース同様、CoreOS などの Custom Image や、Extension を使用できます。(Extension については「Azure Resource Manager の template の How-to」を参照してください。) 例えば、VM Scale Sets に下記の通り Extension を設定すると、インスタンス化された Virtual Machine すべてにその Extension (Custom Script Extension など) が適用されます。
このため、Extension を使ってオープンソースのクラスタ製品のインストールや構成などをおこなって、VM Scale Sets を使った自前のクラスタ環境なども構成できます。(ちょうど、HDInsight クラスタ (Azure の Hadoop クラスタ) の Script Action のような感じです。)
ただし、Custom Script Extension を使って大規模なセットアップをおこなうと、リサイズなどのタイミングで長時間のプロビジョニングが走ることになるので、こうした場合は、あらかじめセットアップ済の Custom Image を使って VMSS を構成すると良いでしょう。
{ "$schema": "https://schema.management.azure.com/schemas/2015-01-01/deploymentTemplate.json#", "contentVersion": "1.0.0.0", "parameters": { }, "variables": { }, "resources": [{ "name": "[concat('matsustorage', copyIndex())]", "type": "Microsoft.Storage/storageAccounts", ...},{ "name": "testvnet", "type": "Microsoft.Network/virtualNetworks", ...},{ "name": "testss", "type": "Microsoft.Compute/virtualMachineScaleSets", ... "properties": {..."virtualMachineProfile": { "storageProfile": {... }, "osProfile": {... }, "networkProfile": {... }, "extensionProfile": {"extensions": [ { ... }, { ... }, { ... }, ...] }} }} ], "outputs": { }}作成された VMSS の各 Virtual Machine インスタンスには、下図のように Private IP が割り当てられます。

このため、VM Scale Sets とは別に、Public IP と接続された Virtual Machine などを立て、ここをキックポイント (Jump Box) として、VM Scale Sets の各 Virtual Machine インスタンスにアクセスすることもできます。よくある Master / Slave のクラスタ構成をおこなう場合は、こうしたパターンを使うと良いでしょう。
例えば下記は、実際に、Jump Box となる Virtual Machine (jumpboxvm) と VM Scale Sets の各 VM インスタンスを構成したサンプルです。実際に展開 (配置) をおこない、Remote Desktop などで下記の jumpboxvm にログインして、VM Scale Sets で作成された各 VM インスタンスの RDP ポート (3389) などに psping してみましょう。(Linux の場合、ssh を使った接続確認でも OK です。) 下記は単に Virtual Machine (VM) や Virtual Network (VNET) を構成しただけですが、実際には、Extension などでソフトウェアをインストール・構成して、用途に応じたクラスタ環境を構築すると良いでしょう。
例えば、「Github : azure-myriad / mesos-vmss-simple-cluster.json」のサンプルでは、VM Scale Sets を使って Master / Slave の Mesos クラスタを構成しています。(このサンプルでは、Extension ではなく、Master 側の customData を使ってクラスタ全体を構成しています。)
{ "$schema": "https://schema.management.azure.com/schemas/2015-01-01/deploymentTemplate.json#", "contentVersion": "1.0.0.0", "parameters": { }, "variables": { }, "resources": [{ "name": "[concat('matsustorage', copyIndex())]", "type": "Microsoft.Storage/storageAccounts", "location": "East US", "apiVersion": "2015-06-15", "properties": {"accountType": "Standard_LRS" }, "copy": {"name": "teststoragecopy","count": 5 }},{ "name": "testnsg", "type": "Microsoft.Network/networkSecurityGroups", "apiVersion": "2016-03-30", "location": "East US", "properties": {"securityRules": [ {"name": "Allow_Subnet","properties": { "description": "Allow Subnet", "protocol": "*", "sourcePortRange": "*", "destinationPortRange": "*", "sourceAddressPrefix": "Internet", "destinationAddressPrefix": "*", "access": "Allow", "priority": 100, "direction": "Inbound"} }] }},{ "name": "testvnet", "type": "Microsoft.Network/virtualNetworks", "location": "East US", "apiVersion": "2016-03-30", "dependsOn": ["Microsoft.Network/networkSecurityGroups/testnsg" ], "properties": {"addressSpace": { "addressPrefixes": ["10.0.0.0/16" ]},"subnets": [ {"name": "testsubnet0","properties": { "addressPrefix": "10.0.0.0/24", "networkSecurityGroup": {"id": "[resourceId('Microsoft.Network/networkSecurityGroups', 'testnsg')]" }} }] }},{ "name": "testss", "type": "Microsoft.Compute/virtualMachineScaleSets", "location": "East US", "apiVersion": "2016-03-30", "dependsOn": ["teststoragecopy","Microsoft.Network/virtualNetworks/testvnet" ], "sku": {"name": "Standard_D1","tier": "Standard","capacity": "5" }, "properties": {"upgradePolicy": { "mode": "Manual"},"virtualMachineProfile": { "storageProfile": {"osDisk": { "vhdContainers": ["http://matsustorage0.blob.core.windows.net/vhds","http://matsustorage1.blob.core.windows.net/vhds","http://matsustorage2.blob.core.windows.net/vhds","http://matsustorage3.blob.core.windows.net/vhds","http://matsustorage4.blob.core.windows.net/vhds" ], "name": "testdisk", "caching": "ReadOnly", "createOption": "FromImage"},"imageReference": { "publisher": "MicrosoftWindowsServer", "offer": "WindowsServer", "sku": "2012-R2-Datacenter", "version": "latest"} }, "osProfile": {"computerNamePrefix": "mycomputer","adminUsername": "demouser","adminPassword": "P@ssw0rd01" }, "networkProfile": {"networkInterfaceConfigurations": [ {"name": "testnic0","properties": { "primary": "true", "ipConfigurations": [{ "name": "ipconfig0", "properties": {"subnet": { "id": "[concat(resourceId('Microsoft.Network/virtualNetworks', 'testvnet'), '/subnets/testsubnet0')]"} }} ]} }] }} }},{ "name": "jumpboxtestst", "type": "Microsoft.Storage/storageAccounts", "location": "East US", "apiVersion": "2015-06-15", "properties": {"accountType": "Standard_LRS" }},{ "apiVersion": "2016-03-30", "type": "Microsoft.Network/publicIPAddresses", "name": "jumpboxip", "location": "East US", "properties": {"publicIPAllocationMethod": "Dynamic","dnsSettings": { "domainNameLabel": "testpubdomain"} }},{ "name": "jumpboxnic", "type": "Microsoft.Network/networkInterfaces", "location": "East US", "apiVersion": "2016-03-30", "dependsOn": ["Microsoft.Network/virtualNetworks/testvnet","Microsoft.Network/publicIPAddresses/jumpboxip" ], "properties": {"ipConfigurations": [ {"name": "ipconfig1","properties": { "privateIPAllocationMethod": "Dynamic", "subnet": {"id": "[concat(resourceId('Microsoft.Network/virtualNetworks', 'testvnet'), '/subnets/testsubnet0')]" }, "publicIPAddress": {"id": "[resourceId('Microsoft.Network/publicIPAddresses', 'jumpboxip')]" }} }] }},{ "name": "jumpboxvm", "type": "Microsoft.Compute/virtualMachines", "location": "East US", "apiVersion": "2016-03-30", "dependsOn": ["Microsoft.Storage/storageAccounts/jumpboxtestst","Microsoft.Network/networkInterfaces/jumpboxnic" ], "properties": {"hardwareProfile": { "vmSize": "Basic_A1"},"osProfile": { "computername": "jumpbox-server", "adminUsername": "demouser", "adminPassword": "P@ssw0rd01"},"storageProfile": { "imageReference": {"publisher": "MicrosoftWindowsServer","offer": "WindowsServer","sku": "2012-R2-Datacenter","version": "latest" }, "osDisk": {"name": "testdisk","vhd": { "uri": "http://jumpboxtestst.blob.core.windows.net/vhds/test.vhd"},"caching": "ReadWrite","createOption": "FromImage" }},"networkProfile": { "networkInterfaces": [{ "id": "[resourceId('Microsoft.Network/networkInterfaces', 'jumpboxnic')]"} ]} }} ], "outputs": { }}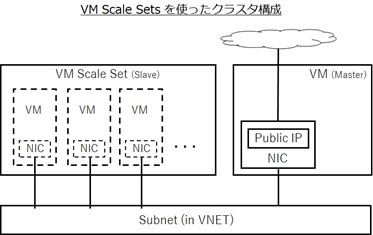
また、VM Scale Sets と外界 (インターネット) をつなぐ手段として Azure Load Balancer も使えます。
「Azure (ARM) の Load Balancer, Auto Scaling の構成方法」で解説したように、VM Scale Sets を Azure Load Balancer と組み合わせて一般的な負荷分散構成 (Load Balance 構成) をおこなえますが (Jump Box 用の VM なども不要です)、Azure Load Balancer を使う もう 1 つの利点として、inboundNatPools を設定することで (VM インスタンスごとに Inbound Port を割り当てることで)、VM Scale Sets の各 Virtual Machine に個別の Public IP を割り当てられるという使い方もあります。(例えば、インターネットから、SSH、RDP などを使って、個々の Virtual Machine インスタンスに接続できます。)
補足 : Azure Load Balancer だけでなく、Azure Application Gateway も組み合わせることができます。
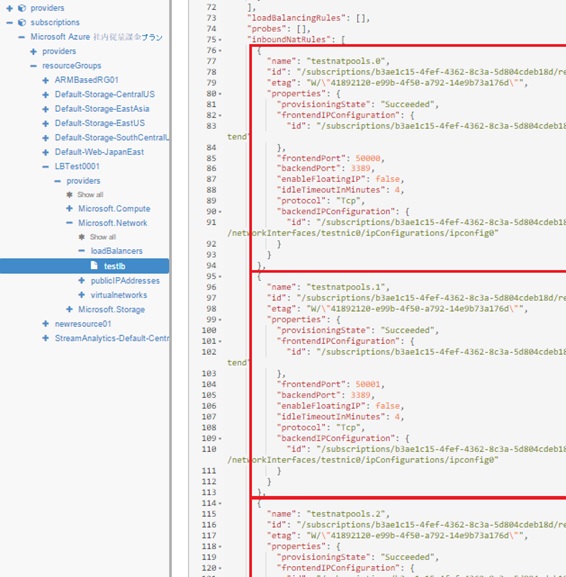
例えば、下記のサンプルでは、5 つの Virtual Machine インスタンスごとに 50000, 50001, 50002, 50003, 50004 の Load Balancer FrontEnd Port が Load Balancer BackEnd の 3389 (RDP の既定のポート) に割り当てられるため、matsuendpoint.eastus.cloudapp.azure.com:{port number (50000 – 50004)} のアドレスを使って、各 VM インスタンスに RDP (Remote Desktop) で接続できます。
逆に、この方法を使わずに、VM Scale Sets の Virtual Machine インスタンスに個別の Public IP を割り当てることはできないので注意してください。VM Scale Sets の NIC 構成 (networkInterfaceConfigurations) では publicIPAddress は設定できません。
(2017/07/11 追記) VM Scale Sets の Network Update で、VM Scale Sets の個別のインスタンスに Public IP の割り当てが可能になりました。
{ "$schema": "https://schema.management.azure.com/schemas/2015-01-01/deploymentTemplate.json#", "contentVersion": "1.0.0.0", "parameters": { }, "variables": { }, "resources": [{ "name": "[concat('matsustorage', copyIndex())]", "type": "Microsoft.Storage/storageAccounts", "location": "East US", "apiVersion": "2015-06-15", "properties": {"accountType": "Standard_LRS" }, "copy": {"name": "teststoragecopy","count": 5 }},{ "name": "testvnet", "type": "Microsoft.Network/virtualNetworks", "location": "East US", "apiVersion": "2016-03-30", "properties": {"addressSpace": { "addressPrefixes": ["10.0.0.0/16" ]},"subnets": [ {"name": "testsubnet0","properties": { "addressPrefix": "10.0.0.0/24"} }] }},{ "name": "testss", "type": "Microsoft.Compute/virtualMachineScaleSets", "location": "East US", "apiVersion": "2016-03-30", "dependsOn": ["teststoragecopy","Microsoft.Network/virtualNetworks/testvnet" ], "sku": {"name": "Standard_D1","tier": "Standard","capacity": "5" }, "properties": {"upgradePolicy": { "mode": "Manual"},"virtualMachineProfile": { "storageProfile": {"osDisk": { "vhdContainers": ["http://matsustorage0.blob.core.windows.net/vhds","http://matsustorage1.blob.core.windows.net/vhds","http://matsustorage2.blob.core.windows.net/vhds","http://matsustorage3.blob.core.windows.net/vhds","http://matsustorage4.blob.core.windows.net/vhds" ], "name": "testdisk", "caching": "ReadOnly", "createOption": "FromImage"},"imageReference": { "publisher": "MicrosoftWindowsServer", "offer": "WindowsServer", "sku": "2012-R2-Datacenter", "version": "latest"} }, "osProfile": {"computerNamePrefix": "mycomputer","adminUsername": "demouser","adminPassword": "P@ssw0rd01" }, "networkProfile": {"networkInterfaceConfigurations": [ {"name": "testnic0","properties": { "primary": "true", "ipConfigurations": [{ "name": "ipconfig0", "properties": {"subnet": { "id": "[concat(resourceId('Microsoft.Network/virtualNetworks', 'testvnet'), '/subnets/testsubnet0')]"},"loadBalancerBackendAddressPools": [ {"id": "[concat(resourceId('Microsoft.Network/loadBalancers','testlb'), '/backendAddressPools/testbackend')]" }],"loadBalancerInboundNatPools": [ {"id": "[concat(resourceId('Microsoft.Network/loadBalancers','testlb'), '/inboundNatPools/testnatpools')]" }] }} ]} }] }} }},{ "apiVersion": "2016-03-30", "type": "Microsoft.Network/publicIPAddresses", "name": "testip", "location": "East US", "properties": {"publicIPAllocationMethod": "Dynamic","dnsSettings": { "domainNameLabel": "matsuendpoint"} }},{ "name": "testlb", "type": "Microsoft.Network/loadBalancers", "location": "East US", "apiVersion": "2016-03-30", "dependsOn": ["Microsoft.Network/publicIPAddresses/testip" ], "properties": {"frontendIPConfigurations": [ {"name": "testfrontend","properties": { "publicIPAddress": {"id": "[resourceId('Microsoft.Network/publicIPAddresses','testip')]" }} }],"backendAddressPools": [ {"name": "testbackend" }],"inboundNatPools": [ {"name": "testnatpools","properties": { "frontendIPConfiguration": {"id": "[concat(resourceId('Microsoft.Network/loadBalancers','testlb'),'/frontendIPConfigurations/testfrontend')]" }, "protocol": "tcp", "frontendPortRangeStart": "50000", "frontendPortRangeEnd": "50099", "backendPort": "3389"} }] }} ], "outputs": { }}なお、Azure Load Balancer を使って各 VM インスタンスに割り当てられた Port 番号は、REST API や Azure Resource Explorer で確認できます。(下図)
なお、1 VM Scale Set あたりで作成可能な VM 数の上限を超えて、さらに大量のノードを構成する場合は、複数の VM Scale Sets を作成して、単一の VNET (および Subnet) に接続してください。(Azure Batch などは、こうした方法で構成されています。)
VM Scale Sets の管理 (Management)
上述の通り、VM Scale Sets では、各 Virtual Machine の生存や起動などのライフサイクル管理を VM Scale Sets がおこなっています。
このため、VM Scale Sets の Virtual Machine を構成する場合は、Virtual Machine に個別に構成するのではなく、コマンド (PowerShell, Azure CLI) や REST API を使って、VM Scale Sets のリソース自体に直接構成すると良いでしょう。(この方法だと、例えば、Auto Scaling などで縮退・拡張された場合でも、構成内容が保証されます。)
なお、VM Scale Sets (VMSS) を直接管理するコマンド (Cmdlets) が、BUILD 2016 のタイミングにあわせ、AzureRM.Compute Version 1.2.5 として正式にリリースされました。最新の Azure PowerShell をインストールすると、下記の通り、VM Scale Sets がコマンドで管理 (自動化など) できます。
PS C:> get-command -Name *vmss*CommandType Name VersionSource----------- ---- -------------Cmdlet Add-AzureRmVmssAdditionalUnattendContent 1.2.5 AzureRM.ComputeCmdlet Add-AzureRmVmssExtension 1.2.5 AzureRM.ComputeCmdlet Add-AzureRmVMSshPublicKey 1.2.5 AzureRM.ComputeCmdlet Add-AzureRmVmssNetworkInterfaceConfiguration 1.2.5 AzureRM.ComputeCmdlet Add-AzureRmVmssSecret 1.2.5 AzureRM.ComputeCmdlet Add-AzureRmVmssSshPublicKey1.2.5 AzureRM.ComputeCmdlet Add-AzureRmVmssWinRMListener 1.2.5 AzureRM.ComputeCmdlet Get-AzureRmVmss1.2.5 AzureRM.ComputeCmdlet Get-AzureRmVmssSku 1.2.5 AzureRM.ComputeCmdlet Get-AzureRmVmssVM 1.2.5 AzureRM.ComputeCmdlet New-AzureRmVmss1.2.5 AzureRM.ComputeCmdlet New-AzureRmVmssConfig 1.2.5 AzureRM.ComputeCmdlet New-AzureRmVmssIpConfig1.2.5 AzureRM.ComputeCmdlet New-AzureRmVmssVaultCertificateConfig 1.2.5 AzureRM.ComputeCmdlet Remove-AzureRmVmss 1.2.5 AzureRM.ComputeCmdlet Remove-AzureRmVmssExtension1.2.5 AzureRM.ComputeCmdlet Remove-AzureRmVmssNetworkInterfaceConfiguration1.2.5 AzureRM.ComputeCmdlet Restart-AzureRmVmss1.2.5 AzureRM.ComputeCmdlet Set-AzureRmVmss1.2.5 AzureRM.ComputeCmdlet Set-AzureRmVmssOsProfile 1.2.5 AzureRM.ComputeCmdlet Set-AzureRmVmssStorageProfile 1.2.5 AzureRM.ComputeCmdlet Set-AzureRmVmssVM 1.2.5 AzureRM.ComputeCmdlet Start-AzureRmVmss 1.2.5 AzureRM.ComputeCmdlet Stop-AzureRmVmss 1.2.5 AzureRM.ComputeCmdlet Update-AzureRmVmss 1.2.5 AzureRM.ComputeCmdlet Update-AzureRmVmssInstance 1.2.5 AzureRM.ComputePS C:> Get-AzureRmVmss -ResourceGroupName test000001 -VMScaleSetName testssSku : { "name": "Standard_D1", "tier": "Standard", "capacity": 5}UpgradePolicy : { "mode": "Manual"}VirtualMachineProfile : { "osProfile": {"computerNamePrefix": "mycomputer","adminUsername": "demouser","adminPassword": null,"customData": null, . . . (以下省略)例えば、VM Scale Sets の Virtual Machine を手動で Scale Out / Scale In する場合も、個別のマシンを起動・停止するのではなく、下記の通りコマンドを使って VM Scale Sets の構成 (VM の台数) を変更します。(下記の通り capacity プロパティを変えれば OK ですので、Azure CLI や、上述の Virtual Machine Scale Set の PowerShell コマンドなどを使っても構いません。)
同様に、特定の Virtual Machine だけ止めたい場合でも、VM Scale Sets に対して Virtual Machine の deallocate を命令します。(VM Scale Sets にそうしたコマンドが用意されています。)
New-AzureRmResourceGroupDeployment -name scaletest -vmSSName testss -instanceCount 2 -ResourceGroupName testgroup01 -TemplateUri C:\Demo\vmss-scale-in-out.jsonvmss-scale-in-out.json
{ "$schema": "http://schema.management.azure.com/schemas/2015-01-01-preview/deploymentTemplate.json", "contentVersion": "1.0.0.0", "parameters" : {"vmSSName": { "type": "string"},"instanceCount" : { "type": "int", "metadata": {"description": "Number of VM instances" }} }, "resources": [{ "type": "Microsoft.Compute/virtualMachineScaleSets", "apiVersion": "2016-03-30", "name": "[parameters('vmSSName')]", "location": "[resourceGroup().location]", "sku": {"name": "Standard_D1","tier": "Standard","capacity": "[parameters('instanceCount')]" }} ]}REST API や Azure Resource Explorer で見ると、下図の通り、2 インスタンスに縮小されているのがわかります。
HA を維持したまま、スケール アウト / スケール インが高速に実施できます。
補足 : VMSS を使った Auto Scaling については、「Azure (ARM) の Load Balancer, Auto Scaling の構成方法」を参照してください。(ここでは説明しません。) Auto Scale された Scale out、Scale in の履歴をログで確認したり、Alert で通知させることができます。
同様に、展開する Virtual Machine インスタンスに OS Patch を適用する場合は、個別の Virtual Machine インスタンスではなく、VM Scale Sets 自体に OSPatchingForLinux Extension などを設定すると良いでしょう。(OSPatchingForLinux を使った計画 Patching、One-Off Patching などは「Microsoft Azure : Automate Linux VM OS Updates Using OSPatching Extension」を参照してください。)
上記の VM Scale Set の resource template では、upgradePolicy を Manual に設定していました。この設定では、VM の Guest レベル (上記のような Extension によるセットアップ) だけでなく、VM Image のレベルで手動の Upgrade が可能であり、「Azure Resource Manager の template の How-to」で解説した Custom Image (User Image) を使用している場合は、VMSS の Image を変更して (Set-AzureRmVmssStorageProfile, Update-AzureRmVmss)、ダウンタイムを発生させることなく Virtual Machine インスタンスごとに順番に新しい Image を適用できます。(なお、現在、VMSS の imageReference の変更は許可されていないようです。Custom Image を使用してください。)
..."properties": { "upgradePolicy": {"mode": "Manual" }, "virtualMachineProfile": {"storageProfile": { "osDisk": {"name": "testdisk","caching": "ReadOnly","createOption": "FromImage","osType": "windows","image": { "uri": "http://sourcestorage01.blob.core.windows.net/vhds/originalsource.vhd"} },},... }}...例えば、下記は、0 番目の Virtual Machine インスタンスに Image を適用する場合の PowerShell コマンドです。(VMSS 全体への自動 Rolling Update は今後提供予定です。)
Update-AzureRmVmssInstance -ResourceGroupName test000001 -VMScaleSetName testss -InstanceId 0また、構成変更を伴う場合や、大規模な構成を扱う場合は、VM Scale Sets と組み合わせて Azure Automation DSC も使用可能です。Azure Automation の DSC Pull Server に構成を登録することで、構成変更時に Virtual Machine を簡単に追従させることが可能で、構成のトラッキング、ノード間の依存関係や可用性要件などによる構成順序の指定なども Azure Automation DSC で一元的に管理できます。
下記は、VM Sacle Sets に DSC を設定し、その Pull Server として Azure Automation DSC の Repository 等を指定している ARM template のサンプルですので、是非参考にしてみてください。
Github : azure-quickstart-templates / 201-vmss-automation-dsc
https://github.com/Azure/azure-quickstart-templates/tree/master/201-vmss-automation-dsc
Virtual Machine Scale Sets (VMSS) は、今後ますます多くの場面で、そのベースとして使われるようになるはずです。一見 地味なコンポーネントですが、いざという時に困らないよう、基本的な考え方を紹介しました。
2016/03/31 追記 : Azure Virtual Machine Scale Set (VM Scale Sets, VMSS) は GA しました !
Categories: Uncategorized
