
こんにちは。
「Active Directory & Security Conference 2016」で紹介した Azure Active Directory B2C (Azure AD B2C) は、実運用の際のカスタマイズを前提としており、パイプライン レベルも含む さまざまな機能変更や拡張が可能になる予定です。(現在は、一部機能が Public Preview として提供されています。)
今回は、B2C のカスタマイズ手法 (How-To) の 1 つである Page UI Customization を紹介します。
Page UI Customization の概要
Azure AD B2C が提供する既定の画面は、下図の通り、何とも殺風景な UI です。(下図は Sign-up の際の Identity Provider の Seletor 画面の例です。)
Default Page (No Customization)
上述の通り、現実の利用ではカスタマイズを前提としていて、Azure AD B2C では、下記の通り、使用する Page のほとんどをカスタマイズ可能です。
- Sign-up 時の Identity Provider (IdP) の選択ページ
- Sign-in 時の Identity Provider (IdP) の選択ページ
- Local Account (IdP と連携しない場合) の Sign-up ページ
- Social Account (IdP と連携した場合) の Sign-up ページ
- Multi-factor Authentication (MFA) ページ
- Sign-In 時の Error ページ
- Sign-Up 時の Error ページ
補足 : Local Account の Sign-In Page などのカスタマイズが提供されていませんが、現状、これらについては、従来の Azure AD の Branding Customize を使用します。また、よくある IdP Selector と Local Account Sign-In の混合 UI (下図) なども、現状は不可能です。
Page UI Customization の基本的な考え方は、HTML の Custom Page を作成してインターネット上の見える場所に置いておき、この URL を B2C に設定するだけです。(ただし、サーバーサイド ロジックは記述できません。)
しかし、実際にカスタマイズするとわかりますが、HTML を変更しただけでは素直に反映されず、いろいろと理解しておくポイントやコツがあります。以降で、さまざまなカスタマイズのケースを想定し、この具体的方法を解説します。
基本手順
まずは基本手順に沿って、とにかくカスタマイズをしてみましょう。
今回は、「Sign-up 時の Identity Provider (IdP) の選択ページ」を例に紹介します。(今回は、Identity Provider として、Microsoft Account と Facebook が設定されていると仮定します。)
まずは下記のような簡単な Custom Page の HTML ソースを作成し、インターネット上の見える場所に公開します。特に、下記の data-name="IdpSelections" は重要な属性なので、必ず含めておいてください。
<!DOCTYPE html><html> <head><title>Home</title><meta http-equiv="X-UA-Compatible" content="IE=edge"/> </head> <body><div id="caption"> Welcome to B2C Demo !</div> <div id="api" data-name="IdpSelections" /> </body></html>
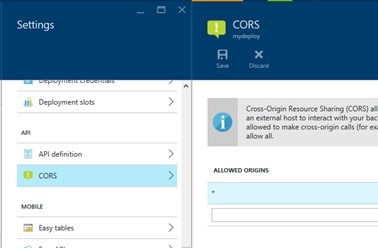
なお、B2C の Page 上の JavaScript (実際には RequireJS) がこの HTML を取得するので、配置の際は CORS を有効にしておきます。
例えば、Azure Web App (Azure App Services) を使用してホストする場合は、下図の通り Azure Portal 上で CORS を有効にしておきます。
上記の Custom Page を B2C に反映するため、Azure Portal 上の Azure AD B2C の管理画面で、今回対象となる SignUp Policy を選択して、[Page UI customization] – [Identity provider selection page] を選択します。(下図)
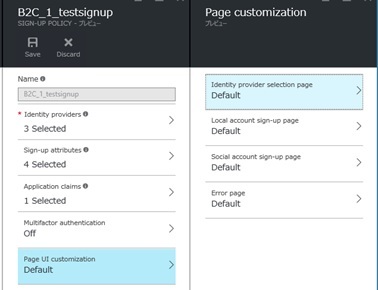
補足: おそらく Preview 段階のバグだと思いますが、もし上図の [Page UI customization] がクリックできない場合 (Disable の場合) は、いったん [Run Now] ボタンを押してから設定してください。
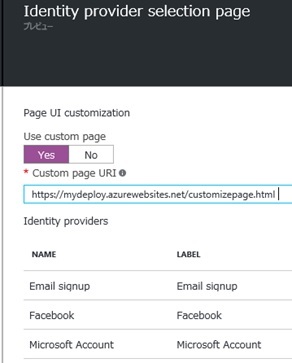
表示される設定画面で、上記で作成した Custom page の URI を入力して (下図)、設定を保存します。
動作を確認するには、下図の [Run Now] ボタンを押すか、ブラウザーを起動して下記の URL にアクセスします。
なお、下記の b2cdemo01.onmicrosoft.com (テナント名)、B2C_1_testsignup (Policy 名)、b8485bfb-3178-4041-bb2c-7cee34652a72 (Client Id)、https://localhost/test01 は、皆さんの環境にあわせて適宜設定してください。
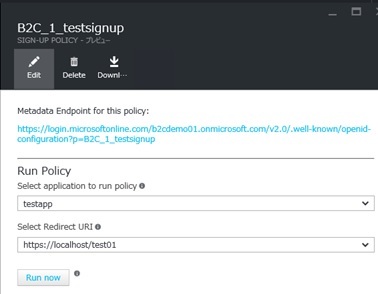
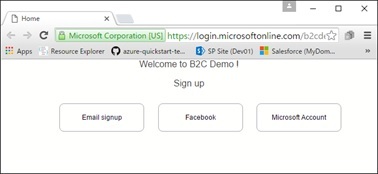
https://login.microsoftonline.com/b2cdemo01.onmicrosoft.com/oauth2/v2.0/authorize?p=B2C_1_testsignup&client_Id=b8485bfb-3178-4041-bb2c-7cee34652a72&nonce=testtest&redirect_uri=https%3A%2F%2Flocalhost%2Ftest01&scope=openid&response_type=id_token&prompt=loginアクセスすると、下図の Sign-up 画面が表示されるはずです。
Default Customization UI (No Design Customization)
Design カスタマイズ
ブラウザーの F12 開発者ツールなどを使って、生成された HTML のソースを見ると、最終的に下記ソースが生成されているのがわかります。(ただし、下記は一部を省略しています。)
この Simple な HTML と、Azure AD B2C の既定の Style (下記の hrd.styles-1.0.1.css など) によって、上図のような UI が構築されています。
<!DOCTYPE html><html> <head><title>Home</title><link type="text/css" rel="stylesheet" href="https://login.microsoftonline.com/static/elements/homerealm/hrd.styles-1.0.1.css"><link type="text/css" rel="stylesheet" href="https://login.microsoftonline.com/static/css/simplemodal-1.0.1.css"><meta http-equiv="X-UA-Compatible" content="IE=edge"/> </head> <body> <div id="caption">Welcome to B2C Demo ! </div><div id="api" data-name="IdpSelections"><div class="intro"><p>Sign Up</p></div><div><ul> <li> <button class="accountButton" id="MicrosoftAccountExchange">Email signup</button> </li> <li> <button class="accountButton" id="FacebookExchange">Facebook</button> </li> <li> <button class="accountButton" id="SignUpWithLogonEmailExchange">Microsoft Account</button> </li></ul></div> </div> </body></html>
上記の通り、今回は、Microsoft、Facebook、Local Account の SignUp の 3 種類のボタンが表示され、これらボタンに MicrosoftAccountExchange、FacebookExchange、SignUpWithLogonEmailExchange の id が付与されています。CSS では、これらボタンの DOM の id を使って style が適用されています。
即ち、要素の Design をおこなう際は、これら既定の style の override をおこないます。(Custom Page の HTML ソースを変えても、上記の既定の style によって強制的にスタイルが適用されてしまうので注意してください。)
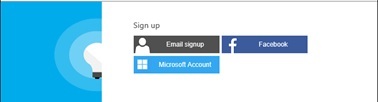
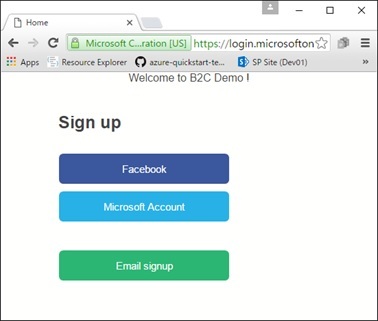
例えば、Custom Page を下記の通り構築してみましょう。今回は、inline style を使って、ボタンのそれぞれに色を付け、縦に配置しています。
<!DOCTYPE html><html> <head><title>Home</title><meta http-equiv="X-UA-Compatible" content="IE=edge"/><style type="text/css"> .intro {position:absolute;left:83px;font-weight:bold;font-style:normal;font-size:25px;text-align:center;line-height:normal; }#FacebookExchange {position:absolute;left:83px;top:118px;width:250px;height:46px;margin:0px;font-weight:400;font-style:normal;font-size:15px;color:#FFFFFF;text-align:center;border:none;background-color: rgba(59, 87, 156, 1); } #MicrosoftAccountExchange {position:absolute;left:83px;top:173px;width:250px;height:46px;margin:0px;font-weight:400;font-style:normal;font-size:15px;color:#FFFFFF;text-align:center;border:none;background-color: rgba(40, 176, 229, 1); } #SignUpWithLogonEmailExchange {position:absolute;left:83px;top:259px;width:250px;height:46px;margin:0px;font-weight:400;font-style:normal;font-size:15px;color:#FFFFFF;text-align:center;border:none;background-color: rgba(43, 181, 115, 1); }</style> </head> <body><div id="caption"> Welcome to B2C Demo !</div><div id="api" data-name="IdpSelections" /> </body></html>結果は、下図の通り表示されます。それっぽい感じになってきましたね。
Design Customization
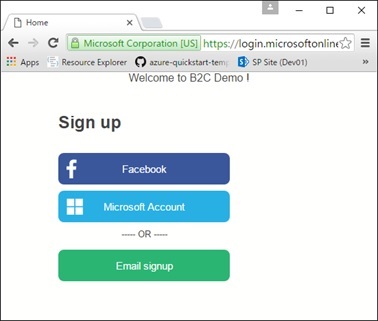
例えば、下記太字の通り、Social Account (Facebook, Microsoft Account 等) と Local Account の間に「or」を入れてみましょう。
<!DOCTYPE html><html> <head><title>Home</title><meta http-equiv="X-UA-Compatible" content="IE=edge"/><style type="text/css"> .intro {position:absolute;left:83px;font-weight:bold;font-style:normal;font-size:25px;text-align:center;line-height:normal; }#FacebookExchange {position:absolute;left:83px;top:118px;width:250px;height:46px;margin:0px;font-weight:400;font-style:normal;font-size:15px;color:#FFFFFF;text-align:center;border:none;background-color: rgba(59, 87, 156, 1); } #MicrosoftAccountExchange {position:absolute;left:83px;top:173px;width:250px;height:46px;margin:0px;font-weight:400;font-style:normal;font-size:15px;color:#FFFFFF;text-align:center;border:none;background-color: rgba(40, 176, 229, 1); } #paragraph1 {position:absolute;left:83px;top:216px;width:250px;text-align:center;font-size:13px;white-space:nowrap; } #SignUpWithLogonEmailExchange {position:absolute;left:83px;top:259px;width:250px;height:46px;margin:0px;font-weight:400;font-style:normal;font-size:15px;color:#FFFFFF;text-align:center;border:none;background-color: rgba(43, 181, 115, 1); }</style> </head> <body><div id="caption"> Welcome to B2C Demo !</div><div id="api" data-name="IdpSelections" /><div id="paragraph1"> <p><span>----- OR -----</span></p></div> </body></html>下図の通り表示されます。
Inserted Paragraph

外部ファイルも指定できますので、上記のような inline style を使わず、下記太字の通り css file を使っても構いません。
<!DOCTYPE html><html> <head><title>Home</title><meta http-equiv="X-UA-Compatible" content="IE=edge"/><link href="https://www.contoso.com/test.css" type="text/css" rel="stylesheet"/> </head> <body><div id="caption"> Welcome to B2C Demo !</div> <div id="api" data-name="IdpSelections" /> </body></html>
また同様に、外部のイメージ ファイル (jpg, png, 等) も使用できるので、下図の通りボタンにアイコンを付けたり、デモでお見せしたようにヘッダー (サービス名など) を装飾するなど、細かな Design が可能です。
B2C では RequireJS を使って Page を取得しているため、この辺りは、普通の HTML Page 同等の編集が可能です。
Inserted Image Icon
なお、ボタンのラベルは Policy のプロパティとして指定可能ですので、下図のように B2C の設定画面を使って変更可能です。(B2C のポリシー定義ファイル (XML) を編集して、アップロードしても構いません。)
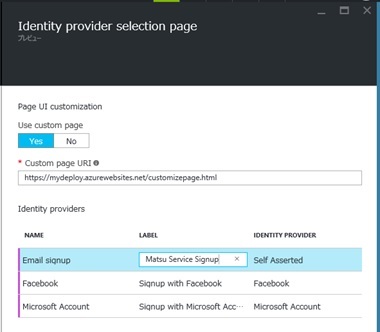
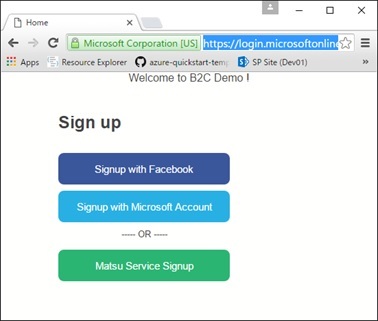
ラベルを変えた際の実行結果は、下図の通りです。
Label Customization
今回は Sign-Up 時の IdP (Identity Provider) Selector 画面を例に紹介しましたが、他の Page カスタマイズについても同様に柔軟に編集できるので、裏側でスケーラブルな Azure AD B2C が使われていることを利用者に意識させずに、ID 統合環境をアプリに組み込めます。
著名な Real Madrid C.F. のファン サイトは、こんな感じです。(Azure AD B2C を使用しています。)
“Real” Example (Madridista Fan Clubs – Real Madrid CF)

Categories: Uncategorized
