
WIF 4.5 (.NET Framework 4.5) をお使いの方は、System.IdentityModel.dll、System.IdentityModel.Services.dll を参照追加してください。名前空間も、Microsoft.IdentityModel ではなく、System.IdentityModel を使用してください。
また、下記のコメント (コメント アウト) に従って、ソースコードを WIF 4.5 のコードに変更してください。
環境 :
Windows Azure Active Directory – Access Control Service 2.0
Visual Studio 2010
Windows Azure SDK for .NET 1.6
WIF SDK 3.5 (Windows Identity Foundation SDK 3.5)
Azure Active Directory ACS における Custom STS (ID Provider) の作成
- WS-Federation 編
- OpenID 編
こんにちは。
Windows Azure Active Directory の Access Control Service (ACS) を使って、Windows Live、Google、Facebook、AD FS など既存の ID Provider を使用せず、まったく独自のユーザー情報を使用したい場合、ACS の Service ID (ACS が持っている ID 管理の仕組み) を使う方法 以外に、カスタムの ID Provider を作成し、これを ACS で使用することができます。ここでは、この方法について紹介します。
今回は、WS-Federation と SAML トークンを使用したカスタム プロバイダーを作成してみましょう。ここでの考え方のエッセンスは、「MSDN Magazine : カスタム セキュリティ トークン サービスを構築する」に記載されているので、是非参考にしてみてください。
補足 : ただし、上記の MSDN Magazine の記事では、以前の Windows Cardspace によるクレーム ベースの処理を前提としていますので注意してください。(Cardspace UI を受けて、WCF で処理するサンプル コードです。)
今回のサンプル コードでは、ACS v2 から使用するため、Web アプリケーションとして ID プロバイダーを構築し、フォーム認証を使ってブラウザーによる Passive SSO を実現します。
ここで紹介するようなカスタムな Claim Base のプロバイダーを使用すると、例えば、SQL Server (Windows Azure SQL Database) などで統一的にユーザー情報を管理し、Web アプリケーション用には Claim Base の SSO の基盤を提供し、API などから接続をおこなう場合 (Web API など) には Basic 認証のアクセス ポイントを提供するなど、認証基盤を利用した柔軟なインターネット アプリケーションを構築できます。
補足 : Windows Azure SQL Database に Membership Provider データベースを構築して使用する こともできます。
Custom STS (ID Provider) のプログラミング
Visual Studio を起動し、[ASP.NET Web アプリケーション] のプロジェクトを新規作成します。(考え方さえ押さえておけば、無論、ASP.NET MVC プロジェクトでも OK です。)
System.ServiceModel.dll, System.IdentityModel.dll, %programfiles%\Reference Assemblies\Microsoft\Windows Identity Foundation\v3.5\Microsoft.IdentityModel.dll のアセンブリ参照を追加します。
まず、ASP.NET のフォーム認証を使って、この ID プロバイダーのサイトに来た場合、認証されていなければ、必ずログイン画面を表示するようにします。
プロジェクトに Login.aspx を追加し、ユーザー ID, パスワードの入力をおこなえるようにデザインしておきます (下図)。
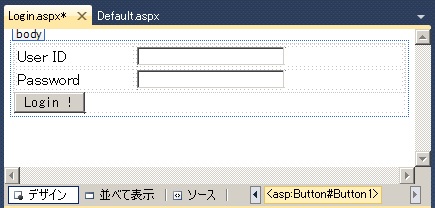
Web.config を開き、下記の通り、リダイレクト先の Login.aspx を設定します。この設定により、認証されていない場合 (formauth クッキーに Ticket が設定されていない場合)、強制的に Login.aspx にリダイレクトされます。
<?xml version="1.0"?><configuration>. . .<system.web> . . . <authorization><deny users="?"/> </authorization> <authentication mode="Forms"><forms name="formauth" defaultUrl="Default.aspx" loginUrl ="Login.aspx" requireSSL="false"/> </authentication></system.web>. . .
上図のログイン ボタンが押された場合の処理を構築します。
今回は、下記の通り、ユーザー ID「demouser1」、パスワード「Password」の場合のみ、ログイン成功とします。ログインに成功すると、RedirectFromLoginPage メソッドによって、フォーム認証用の Cookie (上述の「formauth」) を設定し、リダイレクト元の URL に戻ります。
補足 : フォーム認証では、Login.aspx?ReturnUrl=%2fDefault.aspx の形式で、戻り先の URI (パラメーターも含む) がクエリー文字列 ReturnUrl に設定されます。下記の RedirectFromLoginPage メソッドは、内部で、FormsAuthenticationTicket インスタンスの作成と formauth クッキーへの書き込み (Request[FormsAuthentication.FormsCookieName] で取得できます)、context.User への GenericPrincipal の設定などをおこない、この ReturnUrl に遷移します。
. . .using System.Web.Security;using System.Security.Principal;. . .protected void LoginButton_Click(object sender, EventArgs e){if (UseridTextBox.Text == "demouser1" && PasswdTextBox.Text == "Password"){// Login Success : Redirect to ReturnUrlFormsAuthentication.RedirectFromLoginPage(UseridTextBox.Text, false);}else{// Login Failthrow new Exception("Login failed");}}. . .認証に成功したら、いよいよ、Passive による WS-Federation の処理を構築します。
この処理を構築するために、WS-Federation の仕様にしたがって すべて自前のプログラミングをおこなう必要はありません。例によって、WIF (Windows Indentity Foundation) を使用します。
WIF が提供する SecurityTokenService クラスと、その構成情報を扱う SecurityTokenServiceConfiguration クラスを使うと、WS-Federation に沿った Sign In の処理を簡単に実装できます。(SecurityTokenService クラスは、STS の処理をおこなうサービス本体で、SecurityTokenServiceConfiguration クラスは、使用する証明書の情報など、いわゆる .config ファイルに記述するような構成情報を扱います。)
まず、WS-Federation を使用するため、署名用のキーを作成しておきます。(今回、トークンの暗号化はおこないませんが、署名は添付する必要があります。)
Visual Studio コマンド プロンプトを開き、下記の通り、秘密キーの入った .pfx ファイルと、公開キー用の .cer ファイルを作成します。
makecert.exe -r -pe -n "CN=MyTestSTS" -sky exchange "MySTS_Sign.cer" -sv "MySTS_Sign.pvk"pvk2pfx -pvk "MySTS_Sign.pvk" -spc "MySTS_Sign.cer" -pfx "MySTS_Sign.pfx" -pi <password>rem -- なんちゃって CA の作成makecert -r -pe -n "CN=My Root Authority" -ss CA -sr CurrentUser -a sha1 -sky signature -cy authority -sv CA.pvk CA.cerrem -- なんちゃって server 証明書の作成makecert -pe -n "CN=MyTestSTS" -a sha1 -sky Exchange -eku 1.3.6.1.5.5.7.3.1 -ic CA.cer -iv CA.pvk -sp "Microsoft RSA SChannel Cryptographic Provider" -sy 12 -sv MySTS_Sign.pvk MySTS_Sign.cerpvk2pfx -pvk MySTS_Sign.pvk -spc MySTS_Sign.cer -pfx MySTS_Sign.pfx -pi <password>つぎに SecurityTokenService クラスを使用して処理をおこないますが、SecurityTokenService は抽象クラスであり、実装内容に応じたカスタムの SecurityTokenService クラスを作成して使用する必要があります。このため、まず、プロジェクトにクラスを追加して、下記の通り、カスタムの SecurityTokenService クラスを作成します。
下記では、Windows Azure Active Directory の ACS に返すトークンの内容を設定しています。(引数の RequestSecurityToken は、ACS から渡される要求トークンの内容です。) 今回は、Claim として、ユーザーID、名前、E メールアドレス を返しています。(また、トークンの暗号化はおこないません。)
また、下記の http://localhost:82/CustomSTSWeb/ は、この Custom STS のアドレスです。(後ほど、このアドレスに配置をおこないます。)
補足 : 下記で、scope.ReplyToAddress には、戻り先の URL (この場合、ACS v2.0 用のアドレス) を設定します。このアドレスは、Url のクエリー引数 wreply に設定されているので、後程、この値を使用します。(今は、下記の通り、コンストラクタで設定可能にしておきます。)
. . .using Microsoft.IdentityModel.SecurityTokenService;using Microsoft.IdentityModel.Claims;using Microsoft.IdentityModel.Configuration;using Microsoft.IdentityModel.Protocols.WSTrust;. . .public class MyIdentitySTS : SecurityTokenService{private string wreply;public MyIdentitySTS( SecurityTokenServiceConfiguration securityTokenServiceConfiguration, string Wreply): base(securityTokenServiceConfiguration){this.wreply = Wreply;}protected override Scope GetScope(IClaimsPrincipal principal, RequestSecurityToken request){Scope scope = new Scope(request.AppliesTo.Uri.AbsoluteUri, this.SecurityTokenServiceConfiguration.SigningCredentials);scope.ReplyToAddress = this.wreply;scope.TokenEncryptionRequired = false;return scope;}protected override IClaimsIdentity GetOutputClaimsIdentity( IClaimsPrincipal principal, RequestSecurityToken request, Scope scope){ClaimsIdentity claimsIdentity = new ClaimsIdentity();// When using WIF 3.5claimsIdentity.Claims.Add( new Claim(System.IdentityModel.Claims.ClaimTypes.Name,principal.Identity.Name));claimsIdentity.Claims.Add( new Claim("http://schemas.example.com/ws/claims/MyName","Steve Demo"));claimsIdentity.Claims.Add( new Claim("http://schemas.example.com/ws/claims/EMailAddress","demouser1@example.com"));// When using WIF 4.5//claimsIdentity.AddClaim(// new Claim(System.IdentityModel.Claims.ClaimTypes.Name,//principal.Identity.Name));//claimsIdentity.AddClaim(// new Claim("http://schemas.example.com/ws/claims/MyName",//"Steve Demo"));//claimsIdentity.AddClaim(// new Claim("http://schemas.example.com/ws/claims/EMailAddress",//"demouser1@example.com"));return claimsIdentity;}protected override string GetIssuerName(){return @"http://localhost:82/CustomSTSWeb/";}}. . .つぎに、上記で作成したカスタムの SecurityTokenService を使用して、Sign In の処理をおこないます。この処理ですが、実際のページ (.aspx) が表示 (ロード) される前におこなう必要があるため、今回は、IIS のモジュール (IHttpModule) としてこの処理を登録します。
そこで、プロジェクトにクラスを追加し、下記の通り実装します。
下記では、上述で作成したカスタムの SecurityTokenService (MyIdentitySTS) のインスタンスを作成し、この作成された STS を使って、Sign In の処理をおこない (ProcessSignInRequest メソッド)、この処理結果を HTTP レスポンスとして返しています (ProcessSignInResponse メソッド)。この処理によって、実際には、Location ヘッダーや JavaScript などを含んだ HTTP レスポンスが返されます。
なお、上記で作成した署名用の .pfx (秘密キーを含む証明書) は、LocalMachine (ローカル コンピューター) の My (個人) に登録し、さらに、このプロジェクトのリソースとして添付しておき、これを下記の通り参照します。(このプロバイダーを Windows Azure に配置する場合は、.pfx ファイルを Hosted Service の証明書フォルダーに登録しておいてください。)
また、Url 引数として渡される「wa」や「wreply」などの値も、下記の通り、WIF のクラスを使って意味的に取得できます。
なお、今回は、Sign In の処理のみ実装していますが、実際の開発では、Sign Out 時の処理 (ProcessSignOutRequest) なども実装しておくと良いでしょう。
. . .using System.Security.Cryptography.X509Certificates;using Microsoft.IdentityModel.SecurityTokenService;using Microsoft.IdentityModel.Protocols.WSFederation;using Microsoft.IdentityModel.Configuration;using Microsoft.IdentityModel.Web;. . .public class CustomHttpModule : IHttpModule{ public void Init(HttpApplication context) { context.PreRequestHandlerExecute +=new EventHandler(context_PreRequestHandlerExecute); } void context_PreRequestHandlerExecute(object sender, EventArgs e) {HttpApplication application = (HttpApplication)sender;HttpContext context = application.Context;if (context.User != null && context.User.Identity.IsAuthenticated){// When using WIF 3.5if (context.Request.QueryString[ WSFederationConstants.Parameters.Action]== WSFederationConstants.Actions.SignIn)// When using WIF 4.5//if (context.Request.QueryString["wa"] == "wsignin1.0"){ SignInRequestMessage reqMsg =(SignInRequestMessage)WSFederationMessage.CreateFromUri( context.Request.Url); X509Certificate2 cert = new X509Certificate2( global::CustomSTSWeb.Properties.Resources.MySTS_Sign, "Password", X509KeyStorageFlags.MachineKeySet); // create STS object SecurityTokenServiceConfiguration config =new SecurityTokenServiceConfiguration( @"http://localhost:82/CustomSTSWeb/", new X509SigningCredentials(cert)); config.SecurityTokenService = typeof(MyIdentitySTS); // This reqMsg.Reply is wreply parameter's value... MyIdentitySTS mySts = new MyIdentitySTS(config, reqMsg.Reply); // process sign in // When using WIF 3.5 SignInResponseMessage resMsg =FederatedPassiveSecurityTokenServiceOperations.ProcessSignInRequest( reqMsg, context.User, mySts); // When using WIF 4.5 //SignInResponseMessage resMsg = // FederatedPassiveSecurityTokenServiceOperations.ProcessSignInRequest( //reqMsg, new ClaimsPrincipal(context.User.Identity), mySts); // output result to HTTP response FederatedPassiveSecurityTokenServiceOperations.ProcessSignInResponse(resMsg, context.Response); }} } public void Dispose() { }}. . .さいごに、上記のカスタム ハンドラーを IIS (Web サーバー) に登録するため、プロジェクトの Web.config を開いて、以下の通り追記します。
<?xml version="1.0"?><configuration> . . . <system.webServer>. . .<modules> . . . <add name="MyWSFedProcessModule" type="CustomSTSWeb.CustomHttpModule" /></modules> </system.webServer> . . .
なお、実際の開発では、許可された RP (Relying Party) 以外からの使用を禁止するなど、さまざまな観点に配慮して機能を設計してください。(今回は、これらの処理については、すべて省略しています。)
メタデータ (FederationMetadata.xml) の作成
つぎに、Windows Azure Active Directory の ACS と交換するメタデータ (FederationMetadata.xml) を作成します。メタデータには、Passive でリダイレクトする Url や、利用可能なクレーム (今回の場合は、ユーザーID、名前、メール アドレス) などの定義をおこないます。
また、メタデータ (FederationMetadata.xml) には、署名 (Signature) を添付する必要があり、XML の内容をエディターで変更すれば良いというわけではありません。
さらに、残念ながら、WIF SDK には、メータデータ作成用のユーティリティ (.exe) などは提供されていません。
しかし、.NET プログラマーの方は、WIF にある MetadataSerializer クラスが使用できます。WIF SDK に入っている下記のサンプル コードには、MetadataSerializer を使用して、プログラム コードから動的にメタデータを作成する方法が紹介されていますので、このコードを使って自前のメタデータを生成させると良いでしょう。(ここでは、このプログラム コードについての説明は省略します。流れとしては、EntityDescriptor インスタンスを作成し、SecurityTokenServiceDescriptor インスタンスを作成して EntityDescriptor インスタンスの RoleDescriptors コレクションに設定し、上記の証明書を EntityDescriptor インスタンスに設定して、MetadataSerializer クラスで EntityDescriptor インスタンスの Serialize をおこなうという簡単なコードで実装できます。また、作成するファイルは、UTF-8 で保存します。)
[WIF SDK] FederationMetadata.xml 作成のサンプル コード
%programfiles%\Windows Identity Foundation SDK\v3.5\Samples\End-to-end\Federation Metadata
補足 : メタデータ作成 / 編集用に、下記のような便利なツールも提供されているようです。(是非 参考にしてみてください。)
http://cicoria.com/cs1/blogs/cedarlogic/archive/2010/08/18/federation-metadata-generation-tool.aspx
繰り返しますが、メタデータには署名が添付されているため、上記のプログラム コードで作成されたメタデータ (FederationMetadata.xml) は、エディターなどで勝手に変更しないよう注意してください。(変更する際は、毎回、上記のプログラムで再作成をおこなってください。)
今回は、下記の通り作成されます。(この内容については、このあと解説します。)
<EntityDescriptor ID="_571b9f12-fdc6-4731-bb68-95738cadfa3f" entityID="http://localhost:82/CustomSTSWeb/" xmlns="urn:oasis:names:tc:SAML:2.0:metadata"> <ds:Signature xmlns:ds="http://www.w3.org/2000/09/xmldsig#"><ds:SignedInfo> <ds:CanonicalizationMethod Algorithm="http://www.w3.org/2001/10/xml-exc-c14n#" /> <ds:SignatureMethod Algorithm="http://www.w3.org/2001/04/xmldsig-more#rsa-sha256" /> <ds:Reference URI="#_571b9f12-fdc6-4731-bb68-95738cadfa3f"><ds:Transforms> <ds:Transform Algorithm="http://www.w3.org/2000/09/xmldsig#enveloped-signature" /> <ds:Transform Algorithm="http://www.w3.org/2001/10/xml-exc-c14n#" /></ds:Transforms><ds:DigestMethod Algorithm="http://www.w3.org/2001/04/xmlenc#sha256" /><ds:DigestValue>xxxxxxxxxxxxxxxxxxxxxxx</ds:DigestValue> </ds:Reference></ds:SignedInfo><ds:SignatureValue>yyyyyyyyyyyyyyyyyyyyyy</ds:SignatureValue><KeyInfo xmlns="http://www.w3.org/2000/09/xmldsig#"> <X509Data><X509Certificate>AAAAAAAAAAAAAAAAA</X509Certificate> </X509Data></KeyInfo> </ds:Signature> <RoleDescriptor xsi:type="fed:SecurityTokenServiceType"protocolSupportEnumeration="http://docs.oasis-open.org/wsfed/federation/200706"xmlns:xsi="http://www.w3.org/2001/XMLSchema-instance"xmlns:fed="http://docs.oasis-open.org/wsfed/federation/200706"><KeyDescriptor use="signing"> <KeyInfo xmlns="http://www.w3.org/2000/09/xmldsig#"><X509Data> <X509Certificate>AAAAAAAAAAAAAAAAA</X509Certificate></X509Data> </KeyInfo></KeyDescriptor><ContactPerson contactType="technical"> <EmailAddress /> <TelephoneNumber /></ContactPerson><fed:TokenTypesOffered> <fed:TokenType Uri="urn:oasis:names:tc:SAML:1.0:assertion" /> <fed:TokenType Uri="urn:oasis:names:tc:SAML:2.0:assertion" /></fed:TokenTypesOffered><fed:ClaimTypesOffered> <auth:ClaimType Uri="http://schemas.xmlsoap.org/ws/2005/05/identity/claims/name"Optional="true"xmlns:auth="http://docs.oasis-open.org/wsfed/authorization/200706"><auth:DisplayName>Name</auth:DisplayName><auth:Description>User unique name</auth:Description> </auth:ClaimType> <auth:ClaimType Uri="http://schemas.example.com/ws/claims/MyName"Optional="true"xmlns:auth="http://docs.oasis-open.org/wsfed/authorization/200706"><auth:DisplayName>DisplayName</auth:DisplayName><auth:Description>Custom Attribute Test 1</auth:Description> </auth:ClaimType> <auth:ClaimType Uri="http://schemas.example.com/ws/claims/EMailAddress"Optional="true"xmlns:auth="http://docs.oasis-open.org/wsfed/authorization/200706"><auth:DisplayName>EMailAddress</auth:DisplayName><auth:Description>Custom Attribute Test 2</auth:Description> </auth:ClaimType></fed:ClaimTypesOffered><fed:SecurityTokenServiceEndpoint> <EndpointReference xmlns="http://www.w3.org/2005/08/addressing"><Address>http://localhost:82/CustomSTSWeb/</Address> </EndpointReference></fed:SecurityTokenServiceEndpoint><fed:PassiveRequestorEndpoint> <EndpointReference xmlns="http://www.w3.org/2005/08/addressing"><Address>http://localhost:82/CustomSTSWeb/</Address> </EndpointReference></fed:PassiveRequestorEndpoint> </RoleDescriptor></EntityDescriptor>
上記の xxxxx, yyyyy, AAAAA などには、署名 (Signature) と証明書 (Certification) に関する文字列が設定されます。(この前半部分は、証明書を使用して、プログラムなどで自動作成されることになるでしょう。)
また、上記の http://localhost:82/CustomSTSWeb は、このアプリケーションが実際に動作する場所 (Url) です。ACS は、上記の <fed:SecurityTokenServiceEndpoint />、<fed:PassiveRequestorEndpoint /> に記載されている Url に、リダイレクトをおこないます。(前者は、Active Authentication の際などに使用されます。)
また、上記の <fed:ClaimTypesOffered /> では、この STS (ID プロバイダー) で使用可能なクレーム情報を定義しています。つまり、今回の場合は、ユーザー ID、ユーザー名、メール アドレスの 3 種類です。(後述しますが、ACS 上で規則 (Rule) の設定をおこなう際に、ここで定義した Claim 情報を扱うことができます。)
なお、ちょっと紛らわしいのですが、Windows Azure Active Directory の ACS で利用可能な ID プロバイダー (IdP) として設定するには、IDPSSODescriptor ではなく、上記の通り、Security Token Service (STS) 型の Descriptor (前述の SecurityTokenServiceDescriptor) を使用します。
IIS への配置
上記のアプリケーションをローカルの IIS に配置します。今回は、上記の FederationMetadata.xml で記述している http://localhost:82/CustomSTSWeb に配置する必要があります。
なお、ここは、特に説明の必要はないと思いますので、今回は、手順の説明を省略します。
もちろん、この Custom STS (ID Provider) を、Windows Azure 上などに配置して、一般の (インターネット上の) 利用者にも公開できます。
以上で、Custom STS の作成・配置は完了です。
Custom STS (ID Provider) の ACS (Windows Azure Active Directory) への登録
では、上記の ID Provider を ACS から使用します。まずは、ACS に、この ID プロバイダーを設定します。
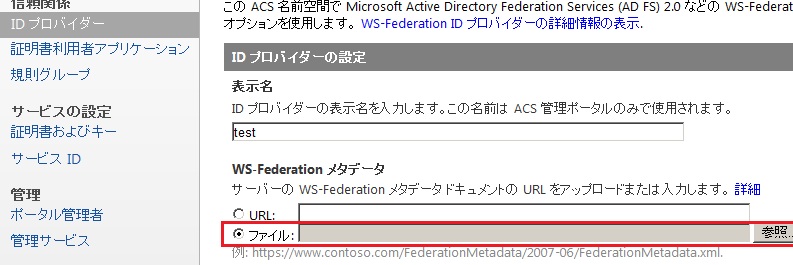
ACS の管理画面で、[ID プロバイダー] (ID Provider) を選択し、「WS-Federation ID プロバイダー」を追加します。ID プロバイダーの追加画面 (下図の囲み) で、メタデータ ファイルとして、上記で作成した FederationMetadata.xml をアップロードします。
RP (Relying Party) の配置と動作確認
では、この ID Provider (Custom STS) を使った Web アプリケーション (RP) を配置して、動作確認をおこないましょう。
RP の作成と登録方法については、「10 行でズバリ!! Windows Azure アクセス コントロール サービス (ACS) を使用する」で解説している方法と同じです。(ここでは、詳細の手順は省略します。)
補足 : RP では、「10 行でズバリ!! Windows Azure アクセス コントロール サービス (ACS) を使用する」に記載している通り、ACS から渡される ClaimType の設定や、web.config の ValidateRequest 属性の設定も忘れずにおこなっておきましょう。また、[STS 参照の追加] (Add STS Reference) メニューが表示されない場合は、%programfiles%\Windows Identity Foundation SDK\v3.5\FedUtil.exe を手動で実行すれば充分です。
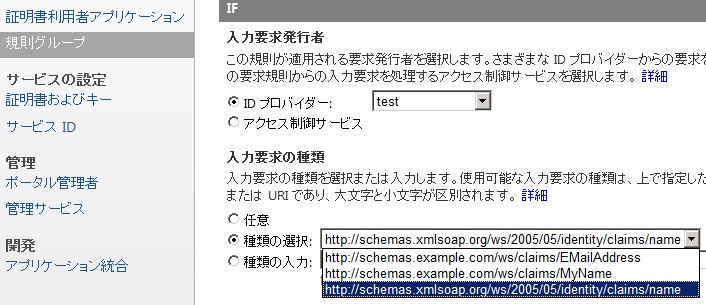
なお、ACS に、上記の RP (証明書利用者アプリケーション) を登録した後で、RP の規則グループのクレーム ルール (Claim Rule) を設定しますが、この際、ID プロバイダー (Idp, 上記の Custom STS) で使用可能なクレームとして、下図の通り、FederationMetadata.xml で定義したクレーム情報 (今回の場合、ユーザー ID、ユーザー名、メール アドレス) が使用できます。クレーム ルールの設定により、IdP のカスタムの Claim を RP (Web アプリケーション側) で処理できる Claim に変換するなど、さまざまなルールの設定が可能です。
すべて設定が完了したら、RP (Web アプリケーション) に接続して動作を確認してみましょう。
アプリケーションは、大ざっぱに書くと、以下の通り動作するはずです。
- Windows Azure 上の Web アプリケーション (RP) にアクセスすると、Windows Azure Active Directory の ACS にリダイレクトされます。
- ACS は、上記で登録した Custom ID Provider (http://localhost:82/CustomSTSWeb/) にリダイレクトします。
- http://localhost:82/CustomSTSWeb/Login.aspx が表示されます。
- 利用者が、ID / パスワードを入力してログインを実行します。認証に成功すると、ACS にリダイレクトされます。(この際、http://localhost:82 ドメインに、フォーム認証用の Cookie が設定されます。また、ACS には、SAML トークンが渡されます。)
- ACS はトークンの妥当性を確認し、問題なければ、呼び出し元の Web アプリケーション (RP) にリダイレクトします。(ACS 上でトークンが発行され、RP に渡されます。)
- トークンが正しければ、Web アプリケーション (RP) が正しく表示されます。
例えば、RP を 2 つ以上登録した場合 (RP-A, RP-B とします)、RP-A で接続した後で、同じクライアント (ブラウザー) を使って RP-B で接続すると、既に http://localhost:82/CustomSTSWeb/ に認証完了の設定 (Cookie への ticket 発行) がおこなわれているため、RP-B ではログイン画面 (Login.aspx) が表示されずに、そのまま Windows Azure 上の RP-B が表示されます。すなわち、SSO (シングル サインオン) が実現されます。
なお、今回は、カスタムの WS-Federation のプロバイダーを実装しましたが、カスタムの Open ID プロバイダーを構築して ACS で使用することもできるようですので、是非 挑戦してみてください。ただし、ACS への設定は管理ポータルではできないようなので、管理 API を呼び出して設定する必要があるようです。(こちら、アークウェイの福井さんに教えて頂きました。。。知りませんでした。)
また、今回は Passive Endpoint を実装しましたが、WIF を使って WS-Federation の Active Endpoint を実装すると、バインド構成を使った WCF サービスの呼び出しや、「AD FS フェデレーションを処理する Client Programming (Active Authentication)」で紹介したようなカスタム クライアントからの呼び出しも可能になります。
[MSDN] 方法:管理サービスを使用して OpenID ID プロバイダーを構成する
http://msdn.microsoft.com/ja-jp/library/gg185935.aspx
※ Windows Azure Programming How-To
Categories: Uncategorized

4 replies»