
By using AZTK (Azure Distributed Data Engineering Toolkit), you can easily deploy and drop your Spark cluster, and you can take agility for parallel programming (say, starting with low-capacity VMs, performance testing with large size or GPU accelerated, etc) with massive cloud computing power.
AZTK has much flexibility, because it uses docker images and built on top of Azure Batch which is based on the Azure Virtual Machine infrastructure (strictly speaking, VMSS infrastructure).
Now let’s take a look at our machine learning tutorials with aztk.
Note : You can also use fully-managed Spark cluster service, such as Azure HDInsight (workload optimized Apache Hadoop clusters, see here) and Azure Databricks (see here). Using AZTK, you can fully customize your infrastructure, such as, cost-effective VMs, GPU-utilization, or VNet integration, etc.
Azure HDInsight uses YARN management, but AZTK doesn’t.
Setup AZTK and your working directory
AZTK is built on python and you can install on all platforms including Windows, Mac, Ubuntu, etc.
Here I show the brief steps for settings in Ubuntu, but please see the official getting-started document for detailed installation steps.
For provisioning Spark cluster, aztk uses the service principal to log-in to Azure. Therefore you need to create your service principal and set permissions for your service principal as follows.
(See my early post about the concept of service principal and RBAC.)
- Create Azure AD service principal
- Create storage account in Azure and add “Contributor” role for your service principal
- Create batch service (batch account) and add “Contributor” role for your service principal
Note : You can automate these preparation for Azure resources using the following script in GitHub.
https://raw.githubusercontent.com/Azure/aztk/v0.10.3/account_setup.py
Setup Python 3.5+ and pip 9.0.1+, and then install AZTK as follows.
pip3 install aztkOnce AZTK is installed, you can manage clusters using “aztk” command.
First of all, please create your working directory on your client (Ubuntu) and run the following command for initializing your project. This command will create “.aztk” folder, in which the related settings are stored. (Of course, you can create multiple working folders and manage multiple clusters.)
aztk spark initNote : If the command is not found, please logout and login again.
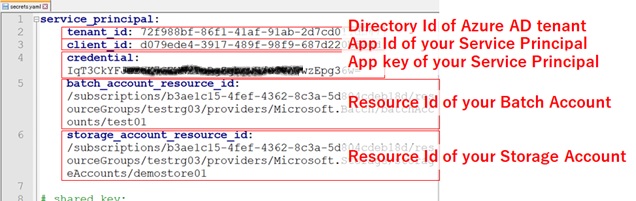
Finally you must edit “.aztk\secrets.yaml” and fill the settings for previously provisioned Azure resources (service principal, batch service, and storage account) as follows.
Create your first Spark cluster in Azure !
Now we can create Spark cluster (master node and slave nodes) using the following command.
AZTK uses Ubuntu 16 image with docker at the bottom. (Later I’ll show more details about provisioning images.) Here we create 3 nodes of Standard D2 v2 Virtual Machines (VMSS) for cluster. Same as Azure Batch, you can also use low-priority VM or spot VM for the cluster.
aztk spark cluster create \ --id test01 \ --vm-size standard_ds2_v2 \ --size 3 \ --username demouser01 \ --password P@ssw0rdNote : To use Spot VM, specify “user subscription mode” in Azure Batch account creation.

The cluster creation is proceeded in background and you can see the provisioning state with “aztk spark cluster get” command as follows.
aztk spark cluster get --id test01output
Cluster test01------------------------------------------State: steadyNode Size: standard_ds2_v2Created:2018-02-18 01:35:15Nodes: 3| Dedicated:3| Low priority: 0| Nodes|State|IP:Port | Dedicated | Master ||------------------------------------|---------------------|----------------------|------------|----------||tvmps_47251b024a4796c64e70afcde40...|idle | 52.224.67.206:50002 | * | ||tvmps_80d4f17e56a06efedd9be9a21dd...|idle | 52.224.67.206:50000 | * |* ||tvmps_be2f4c930fe888b355bed049623...|idle | 52.224.67.206:50001 | * | |With “aztk spark cluster ssh” command, you can login to the master container image (not host machine) using ssh.
Here we’re showing installed python version after logging-in to the master image.
# ssh into container imageaztk spark cluster ssh \ --id test01 \ --username demouser01>> # check version of the installed python>> python -V>> >> Python 3.5.4With --host option, you can also login to the master host (not the container image).
Here we’re showing the running docker instances on the host machine.
# ssh into hostaztk spark cluster ssh \ --id test01 \ --username demouser01 \ --host>> # see running docker instance !>> sudo docker ps>> >> CONTAINER ID IMAGE COMMAND CREATEDSTATUSPORTS NAMES>> 8a2a9e06a1c6 aztk/base:latest "/bin/bash /mnt/batc…" 5 minutes ago Up 5 minutes test01As you can see in the result of “aztk spark cluster get” command (see above output), you can also get each host’s ip-addresses and ports for ssh. Therefore, if you’re using Windows client without ssh, you can also login to the host with your terminal client (PuTTY, etc) and can access to the container instance.
Container Images
Please see the following docker hub directory for available docker images in aztk.
The default docker image used in aztk is aztk/spark:v0.1.0-spark2.3.0-base, and all other images are based on this aztk/spark.
You can also bring your own images, which is based on aztk/spark.
https://hub.docker.com/r/aztk/spark/tags/
aztk/spark (the base image) includes the installation of python version 3 (currently, 3.5.4) and files for Spark configuration (including PySpark, MLlib, etc) on Ubuntu 16. aztk/spark:*.*.*-spark*.*.*-anaconda-* includes the additional installation for anaconda, and aztk/spark:v*.*.*-spark*.*.*-r-* includes R runtime.
Moreover, it has the images for each corresponding purposes along with Spark versions (2.2.0, 2.1.0, or 1.6.3), such as, GPU-accelerated or not, etc. For instance, if you need Spark 1.6.3 with GPU-accelerated, you can use aztk/spark:v0.1.0-spark1.6.3-anaconda-gpu.
Note : You can also use “
aztk spark init --python” or “aztk spark init --R” for corresponding image provisioning.
For configuring images in jobs, you can specify as follows in job.yaml.
job.yaml
# job.yaml (setup image for conda)...job: ... cluster_configuration:...toolkit: docker_repo: aztk/spark:v0.1.0-spark2.3.0-anaconda-base ...Azure Batch configures container images with “docker run” command, which runs on Azure Batch startTask. (See my early post “Azure Batch – Walkthrough and How it works” for startTask.)
With this configuration, AZTK installs and configures Spark master and slaves as standalone mode (without YARN).
Note : You can also configure Spark cluster with HDFS using your own custom script. See the custom script sample “hdfs.sh” for details.
Interactive Analytics with Jupyter
By default, aztk doesn’t include interactive UI like Jupyter or R Server. When you want to configure Jupyter, you can use plugin settings by editing .aztk/cluster.yaml for post-installation tasks.
For instance, the following settings in .aztk/cluster.yaml will start Jupyter server on the master node.
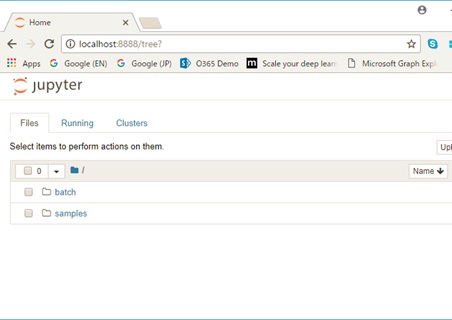
# cluster.yaml (setup for Jupyter UI)...plugins: - name: jupyter ...Using this cluster, you can use Jupyter Notebook with your web browser as follows. (Note that you can also use PySpark console for interactive debugging without GUI.)
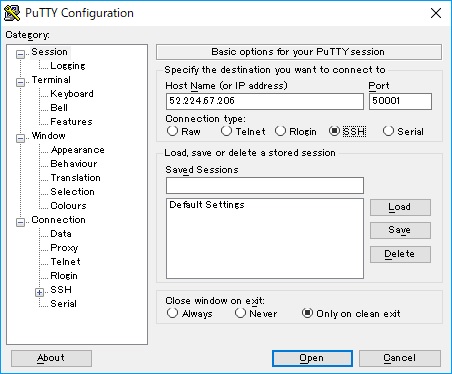
Note : Before connecting to Jupyter Notebook UI (http://localhost:8888/), you must connect to the master node (which is host, not container instance) with SSH tunnel’s port-forwarding configuration (8888 to localhost:8888) using your terminal client (PuTTY, etc).
This setting is different from each terminal client software (see each document for terminal clients) and the following screenshot is the configuration example for PuTTY client.

You can also use your own custom scripts for start-up.
For example, the following script (Jupyter.sh) is the same setup for Jupyter as above and you can set this custom script instead of using built-in plugins in cluster.yaml.
Jupyter.sh
#!/bin/bashif [ "$AZTK_IS_MASTER" = "true" ]; thenpip install jupyter --upgradepip install notebook --upgradePYSPARK_DRIVER_PYTHON="/opt/conda/bin/jupyter"JUPYTER_KERNELS="/opt/conda/share/jupyter/kernels"# disable password/token on jupyter notebookJUPYTER_CONFIG='/root/.jupyter/jupyter_notebook_config.py'rm -f $JUPYTER_CONFIGjupyter notebook --generate-config --allow-rootecho >> $JUPYTER_CONFIGecho -e 'c.NotebookApp.token=""' >> $JUPYTER_CONFIGecho -e 'c.NotebookApp.password=""' >> $JUPYTER_CONFIG# get master ipMASTER_IP=$(hostname -i)# remove existing kernelsrm -rf $JUPYTER_KERNELS/*# set up jupyter to use pysparkmkdir $JUPYTER_KERNELS/pysparktouch $JUPYTER_KERNELS/pyspark/kernel.jsoncat << EOF > $JUPYTER_KERNELS/pyspark/kernel.json{"display_name": "PySpark","language": "python","argv": ["python","-m","ipykernel","-f","{connection_file}"],"env": {"SPARK_HOME": "$SPARK_HOME","PYSPARK_PYTHON": "python","PYSPARK_SUBMIT_ARGS": "--master spark://$AZTK_MASTER_IP:7077 pyspark-shell"}}EOF# start jupyter notebook from /mntcd /mnt(PYSPARK_DRIVER_PYTHON=$PYSPARK_DRIVER_PYTHON PYSPARK_DRIVER_PYTHON_OPTS="notebook --no-browser --port=8888 --allow-root" pyspark &)ficluster.yaml
# cluster.yaml (setup for custom script)...plugins: - name: custom-jupyterscript: ./jupyter.shtarget: spark-containertarget_role: master ...For other custom script’s samples, please refer Github repository. (Make sure you run and debug in your container image before applying custom scripts.)
Install Modules
By configuring cluster.yaml, you can install modules (pip, maven, etc) in your cluster.
In the example in this post, we’ll use numpy and then please set as follows.
# cluster.yaml (pip install numpy)...plugins: - name: pip_installargs: packages:- 'numpy' ...Interactive Programming (PySpark, MLlib)
Now you can start your prototyping with Spark-integrated interactive IDE, such as Jupyter Notebook, RStudio, etc.
Here we use Jupyter Notebook, which is configured in the previous section.
In this post, we apply decision tree algorithms using well-known air-flight history dataset and weather dataset.
Now below is our dataset. To simplify our sample, I transformed the original air-flight dataset by joining weather dataset for both departure’s (origin’s) weather and destination’s weather. (You can download our dataset from here.)
The data size is approximately 500 MB and having approximately 2,000,000 rows.
dataset (flight_weather.csv)
"ID","MONTH","UNIQUE_CARRIER","ORIGIN","DEST","ARR_DEL15","VisibilityOrigin","DryBulbCelsiusOrigin", ...1,1,"AA","JFK","LAX",0,10,-3.9, ...2,3,"AA","SEA","LAX",0,10,0, ...3,9,"FQ","LAX","JFK",0,10,18.3, ...4,2,"FL","LAX","JFK",1,10,15.6, ...5,1,"AA","JFK","SEA",0,10,8.9, ...This dataset includes “ARR_DEL15” which equals to 1 if it’s delayed over 15 minutes, 0 if not delayed. Here we predict this “ARR_DEL15” label with Spark cluster.
Put this dataset in the location (Azure blob, Azure Data Lake store, etc) which cluster can access. In our case, we use Azure blob storage.
For accessing Azure blob storage with WASB (HDFS extension for Azure blob storage), you must uncomment the following settings in .aztk/core-site.xml and fill in this settings.
#core-site.xml...<property> <name>fs.AbstractFileSystem.wasb.Impl</name> <value>org.apache.hadoop.fs.azure.Wasb</value></property><property> <name>fs.azure.account.key.MY_STORAGE_ACCOUNT_NAME.blob.MY_STORAGE_ACCOUNT_SUFFIX</name> <value>MY_STORAGE_ACCOUNT_KEY</value></property>...In my case, I set the following values.
#core-site.xml...<property> <name>fs.AbstractFileSystem.wasb.Impl</name> <value>org.apache.hadoop.fs.azure.Wasb</value></property><property> <name>fs.azure.account.key.demostore01.blob.core.windows.net</name> <value>CdVPm+kNDQ...</value></property>...After that, you must create your cluster with “aztk spark cluster create” command (see above), and you can access your blob storage with WASB in your python code.
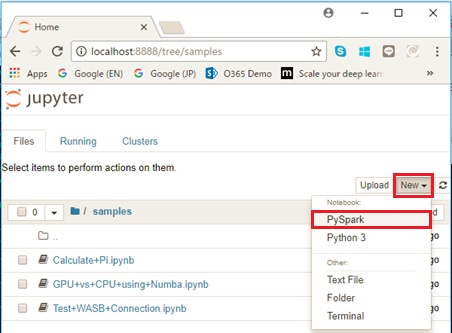
Now let’s create new ipython notebook (.ipynb file) in Jupyter UI.
To read our dataset using WASB, write the following python code in the cell and press “Run”. (Note that the blob url format is wasbs://{storage_container}@{storage_account}.blob.core.windows.net/{blob name}. Please change these to appropriate values.)
# Spark sessionspark# Load data from Azure Storagedf = spark.read.csv( "wasbs://container01@demostore01.blob.core.windows.net/flight_weather.csv", header=True, inferSchema=True, nullValue="NA")
If succeeded, the data is stored as Spark DataFrame. You can show data as table using cache() or toPandas(), because the real data is not transferred till distributed execution using Spark dataframe.

For using decision tree in MLlib (machine learning library for Spark), we must convert categorical data (say, airport code like “LAX”, “SEA”, “JFK”, etc) to numeric integer 0, 1, … The following code is converting each values, such as UNIQUE_CARRIER (carrier code), ORIGIN (airport code), DEST (airport code), etc with pyspark builtin functions.
If you’re not familiar with pyspark, you might think this code for distributed manners (not like Pandas) is so cumbersome. By using pyspark data types and functions, data itself is not extracted until the data is really needed. Of course, these operations would be distributed if available.
Note : See “Apache Spark document – pyspark package” for available functions.
Note : As I mentioned above, here we only use primitive API without ML pipeline, but you can run these operations with a few lines of code using ML pipeline and built-in transformers in MLlib.
from pyspark.sql.functions import whenfrom pyspark.sql.functions import UserDefinedFunctionfrom pyspark.sql.types import IntegerType## Select only label and features#df = df.select( "ARR_DEL15", "MONTH", "DAY_OF_MONTH", "DAY_OF_WEEK", "UNIQUE_CARRIER", "ORIGIN", "DEST", "CRS_DEP_TIME", "CRS_ARR_TIME", "RelativeHumidityOrigin", "AltimeterOrigin", "DryBulbCelsiusOrigin", "WindSpeedOrigin", "VisibilityOrigin", "DewPointCelsiusOrigin", "RelativeHumidityDest", "AltimeterDest", "DryBulbCelsiusDest", "WindSpeedDest", "VisibilityDest", "DewPointCelsiusDest")## Drop rows having null field#df = df.dropna()## Convert categorical value to numeric index (0, 1, ...)## MONTHdf = df.withColumn("MONTH", df.MONTH - 1)# DAY_OF_MONTHdf = df.withColumn("DAY_OF_MONTH", df.DAY_OF_MONTH - 1)# DAY_OF_WEEKdf = df.withColumn("DAY_OF_WEEK", df.DAY_OF_WEEK - 1)# UNIQUE_CARRIERrows_unique_carrier = df.select("UNIQUE_CARRIER").distinct().collect()list_unique_carrier = [i.UNIQUE_CARRIER for i in rows_unique_carrier]convUniqueCarrier = UserDefinedFunction( lambda x: list_unique_carrier.index(x), IntegerType())df = df.withColumn("UNIQUE_CARRIER", when(df["UNIQUE_CARRIER"].isNotNull(), convUniqueCarrier(df.UNIQUE_CARRIER)).otherwise(len(list_unique_carrier)))# ORIGINrows_origin = df.select("ORIGIN").distinct().collect()list_origin = [i.ORIGIN for i in rows_origin]convOrigin = UserDefinedFunction(lambda x: list_origin.index(x), IntegerType())df = df.withColumn("ORIGIN", when(df["ORIGIN"].isNotNull(), convOrigin(df.ORIGIN)).otherwise(len(list_origin)))# DESTrows_dest = df.select("DEST").distinct().collect()list_dest = [i.DEST for i in rows_dest]convDest = UserDefinedFunction(lambda x: list_dest.index(x), IntegerType())df = df.withColumn("DEST", when(df["DEST"].isNotNull(), convDest(df.DEST)).otherwise(len(list_dest)))Training data for MLlib decision tree must be LabeledPoint object, and next code is converting our dataset to LabeledPoint.
Here we’re using “ARR_DEL15” (0 or 1 whether it’s delayed over 15 minutes) as predicted label and other several columns (“DAY_OF_WEEK”, “UNIQUE_CARRIER”, “WindSpeedDest”, etc) as input features (variables).
from pyspark.mllib.regression import LabeledPoint# Create LabeledPoint object (label is "ARR_DEL15")rdd = df.rdd.map( lambda row: LabeledPoint(row.ARR_DEL15,[ row.MONTH, row.DAY_OF_MONTH, row.DAY_OF_WEEK, row.UNIQUE_CARRIER, row.ORIGIN, row.DEST, row.CRS_DEP_TIME, row.CRS_ARR_TIME, row.RelativeHumidityOrigin, row.AltimeterOrigin, row.DryBulbCelsiusOrigin, row.WindSpeedOrigin, row.VisibilityOrigin, row.DewPointCelsiusOrigin, row.RelativeHumidityDest, row.AltimeterDest, row.DryBulbCelsiusDest, row.WindSpeedDest, row.VisibilityDest, row.DewPointCelsiusDest]))
Now let’s train your model (analyze) with our data by decision tree in MLlib as follows !
After the model is generated, we save the model in Azure blob storage with WASB.
# Split data for training (70%) and testing (30%)trainrdd, testrdd = rdd.randomSplit([0.7, 0.3], 17)# Run Decision Tree algorithms in MLlib !# (model is generated)from pyspark.mllib.tree import DecisionTree, DecisionTreeModelmodel = DecisionTree.trainClassifier( trainrdd, numClasses=2, categoricalFeaturesInfo={0: 12,1: 31,2: 7,3: len(list_unique_carrier) + 1,4: len(list_origin) + 1,5: len(list_dest) + 1,6: 24,7: 24}, impurity='entropy', maxDepth=15, maxBins=3000)# save modelmodel.save(sc, "wasbs://container01@demostore01.blob.core.windows.net/model/flightdelay")Note : In this post, I used primitive RDD and MLlib, which is not currently recommended.
By using Spark dataframe instead, you can take the benefit of Catalyst optimizer. Please see here (Databricks example) for the example of Spark dataframe and SparkML.
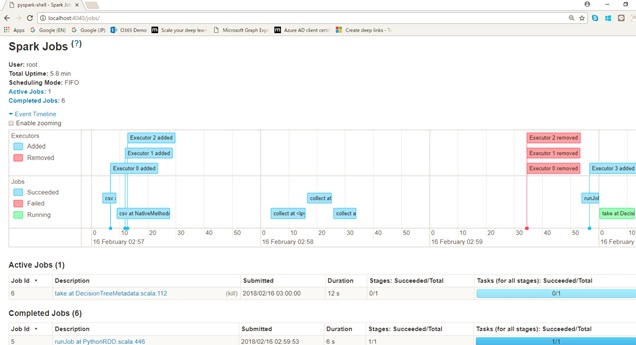
Of course, you can monitor the running job with Spark Web UI (http://localhost:8080/ or http://localhost:4040/) as the following screenshot.
Please make sure that these ports are also configured for SSH tunnel as I previously explained. (See the previous section for setting SSH tunnel’s configuration.)
Job Monitoring on 4040
Now you can predict using generated model.
The following code is predicting with test data, and show the ratio (accuracy) of “how many data is correctly predicted”. Here we just calculate the accuracy, but you can also evaluate more detailed matrices like true/positive, true/negative, false/positive, or false/negative.
# Predict using test data and set row indexpreds = model.predict(testrdd.map(lambda p: p.features))preds = preds.zipWithIndex()preds = preds.map(lambda x: (x[1], x[0]))# Get actual label and set row indexlabels = testrdd.map(lambda x: x.label)labels = labels.zipWithIndex()labels = labels.map(lambda x: (x[1], x[0]))# Join and Get accuracy (%)labels_and_preds = labels.join(preds)accuracy = labels_and_preds.filter( lambda x: x[1][0] == x[1][1]).count() / float(testrdd.count())print("Accuracy is %f" % accuracy) # output accuracySubmit as Spark application
Your code is ready. Next we submit (or schedule) your logic as Spark application.
With aztk, you can submit your application from your working client without spark-submit. Here we submit the previous sample workloads (creating and saving the model for air-flight delay) as Spark python application.
Below is our complete code and almost all is the same as previous pyspark code, except for initializing and stopping the Spark session. (In the previous ipynotebook example, the underlying pyspark shell is doing these initialization tasks.)
We assume that we saved this python code as “test.py” in our working directory on client.
test.py
from __future__ import print_functionfrom pyspark.sql import SparkSessionfrom pyspark.sql.functions import whenfrom pyspark.sql.functions import UserDefinedFunctionfrom pyspark.sql.types import IntegerTypefrom pyspark.mllib.regression import LabeledPointif __name__ == "__main__": spark = SparkSession.builder.appName("jobtest01").getOrCreate() sc = spark.sparkContext # # Load data from Azure Storage # df = spark.read.csv("wasbs://container01@demostore01.blob.core.windows.net/flight_weather.csv",header=True,nullValue="NA",inferSchema=True) # # Select only label and features # df = df.select("ARR_DEL15","MONTH","DAY_OF_MONTH","DAY_OF_WEEK","UNIQUE_CARRIER","ORIGIN","DEST","CRS_DEP_TIME","CRS_ARR_TIME","RelativeHumidityOrigin","AltimeterOrigin","DryBulbCelsiusOrigin","WindSpeedOrigin","VisibilityOrigin","DewPointCelsiusOrigin","RelativeHumidityDest","AltimeterDest","DryBulbCelsiusDest","WindSpeedDest","VisibilityDest","DewPointCelsiusDest") # # Drop rows having null field # df = df.dropna() # # Convert categorical value to numeric index (0, 1, ...) # # MONTH df = df.withColumn("MONTH",df.MONTH - 1) # DAY_OF_MONTH df = df.withColumn("DAY_OF_MONTH",df.DAY_OF_MONTH - 1) # DAY_OF_WEEK df = df.withColumn("DAY_OF_WEEK",df.DAY_OF_WEEK - 1) # UNIQUE_CARRIER rows_unique_carrier = df.select("UNIQUE_CARRIER").distinct().collect() list_unique_carrier = [i.UNIQUE_CARRIER for i in rows_unique_carrier] convUniqueCarrier = UserDefinedFunction(lambda x: list_unique_carrier.index(x), IntegerType()) df = df.withColumn("UNIQUE_CARRIER",when(df["UNIQUE_CARRIER"].isNotNull(), convUniqueCarrier(df.UNIQUE_CARRIER)).otherwise(len(list_unique_carrier))) # ORIGIN rows_origin = df.select("ORIGIN").distinct().collect() list_origin = [i.ORIGIN for i in rows_origin] convOrigin = UserDefinedFunction(lambda x: list_origin.index(x), IntegerType()) df = df.withColumn("ORIGIN",when(df["ORIGIN"].isNotNull(), convOrigin(df.ORIGIN)).otherwise(len(list_origin))) # DEST rows_dest = df.select("DEST").distinct().collect() list_dest = [i.DEST for i in rows_dest] convDest = UserDefinedFunction(lambda x: list_dest.index(x), IntegerType()) df = df.withColumn("DEST",when(df["DEST"].isNotNull(), convDest(df.DEST)).otherwise(len(list_dest))) # # Create LabeledPoint object (label is "ARR_DEL15") # rdd = df.rdd.map(lambda row: LabeledPoint( row.ARR_DEL15, [row.MONTH,row.DAY_OF_MONTH,row.DAY_OF_WEEK,row.UNIQUE_CARRIER,row.ORIGIN,row.DEST,row.CRS_DEP_TIME,row.CRS_ARR_TIME,row.RelativeHumidityOrigin,row.AltimeterOrigin,row.DryBulbCelsiusOrigin,row.WindSpeedOrigin,row.VisibilityOrigin,row.DewPointCelsiusOrigin,row.RelativeHumidityDest,row.AltimeterDest,row.DryBulbCelsiusDest,row.WindSpeedDest,row.VisibilityDest,row.DewPointCelsiusDest ])) # # Split data for training (70%) and testing (30%) # trainrdd, testrdd = rdd.randomSplit([0.7, 0.3], 17) # # Run Decision Tree algorithms in MLlib ! # (model is generated) from pyspark.mllib.tree import DecisionTree, DecisionTreeModel model = DecisionTree.trainClassifier(trainrdd,numClasses=2,categoricalFeaturesInfo={ 0: 12, 1: 31, 2: 7, 3: len(list_unique_carrier) + 1, 4: len(list_origin) + 1, 5: len(list_dest) + 1, 6: 24, 7: 24},impurity='entropy',maxDepth=15,maxBins=3000) # # save model # model.save(sc, "wasbs://container01@demostore01.blob.core.windows.net/model/flightdelay") # # Predict using test data and set row index # preds = model.predict(testrdd.map(lambda p: p.features)) preds = preds.zipWithIndex() preds = preds.map(lambda x: (x[1], x[0])) # # Get actual label and set row index # labels = testrdd.map(lambda x: x.label) labels = labels.zipWithIndex() labels = labels.map(lambda x: (x[1], x[0])) # # Join and Get accuracy # labels_and_preds = labels.join(preds) accuracy = labels_and_preds.filter(lambda x: x[1][0] == x[1][1]).count() / float(testrdd.count()) print("Accuracy is %f" % accuracy) # output accuracy spark.stop()Submit this python application (test.py) to our Spark cluster with the following command. After the application is done, you would be able to view the generated model in your Azure blob storage.
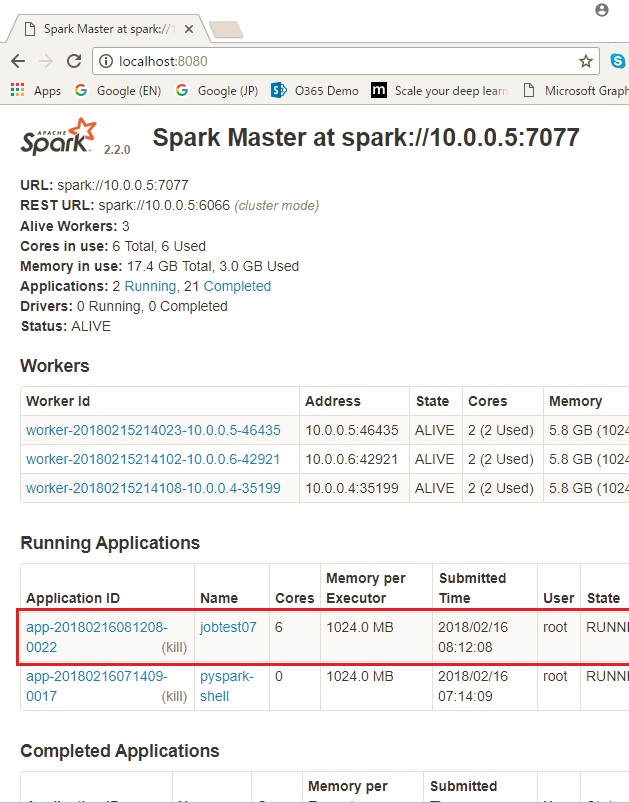
aztk spark cluster submit \ --id test01 \ --name jobtest01 \ test.pySame as previous job in pyspark shell, you can monitor this application using Spark Web UI as follows. (Note that the following “pyspark-shell” is the interactive process in Jupyter Notebook.)
Application Monitoring on 8080 (resource manager UI for standalone mode)
When you have all done, you can delete the cluster (computing nodes) with the following command for saving your money !
# delete clusteraztk spark cluster delete --id test01
In this post we used python for our tutorial, but you can also use R with aztk, in which you can use SparklyR instead of using PySpark, R Studio Server for interactive UI. Of course, you can also use your cluster for Scala and Java workloads with aztk. (Use “aztk spark init --scala” or “aztk spark init --java“.)
Update History :
Sep 06, 2018 – Updated for aztk 0.9.0 breaking changes
Dec 2020 – Updated for latest release
Categories: Uncategorized

Hi, Have you been able to successfully run more than one Notebook on AZTK from Jupyter without having to shut down the kernel for the previous notebook. To elaborate, assume you have two notebooks. You open the first one. jupyter autostarts the PySpark kernel to enable runs on AZTK. You run that notebook. Before you run the second notebook (assume that the second has some dependencies on the first notebook), are you forced to shut down the kernel for the first notebook.
LikeLike
Awesome tutorial.
Is there any documentation where a comparison between AZTK and Data Factory is made?
Thanks a lot.
LikeLike