
As you know, you can build your own custom functions (UDF) with VBA since long before. It’s so convenient for end-users, but it requires to be installed in each devices and it doesn’t matter for ISV folks.
With new capability in Excel Web Add-in, you can deliver your functions using JavaScript all over the world through marketplace.
For instance, you can deliver your own Excel functions – such as, accessing data in ISV software, AI-integrated functions, and so on.

New JavaScript custom functions can also run on multiple platforms like Excel in Mac, Excel Online, etc. (For currently available platforms, see “Custom functions requirements“.)
Let’s dive into 5 minutes’ example for JavaScript custom functions !
Note : Currently (May 2019) you cannot run custom functions without early builds of Office (Excel). Especially, for commercial users, you should use Office Insider channel. (See “Custom functions requirements” for details.)
Create JavaScript Excel Function
First you must create assets – html page (.html) and script file (.js) – and expose in the public site.
In this example, I create custom function to generate random values for phone number and zip code.
The following is our example.
mypage.html
<!DOCTYPE html><html><head> <meta charset="UTF-8" /> <meta http-equiv="X-UA-Compatible" content="IE=Edge" /> <meta http-equiv="Expires" content="0" /> <title></title> <script src="https://appsforoffice.microsoft.com/lib/1.1/hosted/custom-functions-runtime.js" type="text/javascript"></script></head><body></body></html>
myfunc.js
function getrandom(x) { if (x == "phone") {var n1 = Math.floor(Math.random() * 1000);var n2 = Math.floor(Math.random() * 1000);var n3 = Math.floor(Math.random() * 10000);return "(" + ("000" + n1).slice(-3) + ") " + ("000" + n2).slice(-3) + "-" + ("0000" + n3).slice(-4); } else if (x == "zip") {var n1 = Math.floor(Math.random() * 1000);var n2 = Math.floor(Math.random() * 10000);return ("000" + n1).slice(-3) + "-" + ("0000" + n2).slice(-4); } else {return "not supported"; }}CustomFunctions.associate("RANDOM", getrandom);The above getrandom() is the function’s logic and here I create the various random values for phone numbers and zip codes.
In the final step, your custom function should be registered by CustomFunctions.associate() function in Office add-in. This function is then exposed by the name of “{Your Namespace}.RANDOM“. (The name of namespace will be defined later.)
Unlike other Office Add-ins, custom functions run on the separated runtime, not on browser engine runtime. Then you cannot include external references as you do in normal html page.
If you want to interact with external resources, you can request data through XMLHttpRequest() or fetch() in your custom functions.
The above HTML page (mypage.html) is used only on loading-time.
Next we expose the function’s spec as JSON file.
In this example, we create the following myfunc.json and expose this JSON in the public site.
myfunc.json
{ "functions": [{ "id": "RANDOM", "name": "RANDOM", "description": "Create various random data (phone, zip)", "result": {"type": "string","dimensionality": "scalar" }, "parameters": [{ "name": "type of data", "description": "Which type of data (\"phone\" or \"zip\")", "type": "string", "dimensionality": "scalar"} ]} ]}Note : By default, JSON files are not exposed in Azure web app. (Make sure to configure to expose JSON files in your website.)
The above descriptions (such as, function’s description and parameter’s description) in JSON file will be displayed as hints for end users when using this function in Excel.
Here I have used primitive scalar values for inputs and outputs, but you can also use matrix dimensions in parameters.
Create Manifest and Install
Now it’s ready to register your custom functions in Excel.
In this example, I install my add-in by side-loading installation.
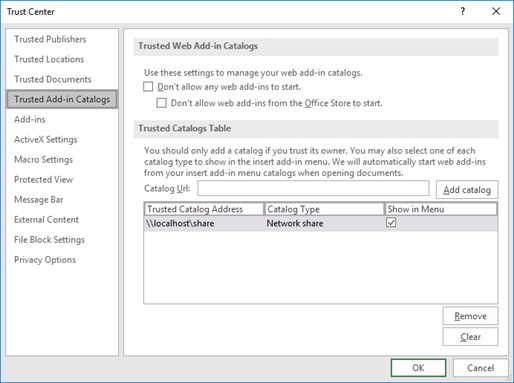
First create the shared folder (in this example, //localhost/share) and set this folder as trusted add-in catalogs by the following steps.
- Open Excel
- Select “File” – “Options” menu.
- Select “Trust Center” tab and click “Trust Center Settings” button.
- Add your shared folder in Trusted Catalogs Table. (See the following screenshot.)
Next please create the following manifest file (UTF-8 encoding file) in your shared folder.
<?xml version="1.0" encoding="UTF-8"?><OfficeApp xmlns="http://schemas.microsoft.com/office/appforoffice/1.1" xmlns:xsi="http://www.w3.org/2001/XMLSchema-instance" xmlns:bt="http://schemas.microsoft.com/office/officeappbasictypes/1.0" xmlns:ov="http://schemas.microsoft.com/office/taskpaneappversionoverrides" xsi:type="TaskPaneApp"> <Id>bdb0c148-86d1-4789-ae6a-3e5fb97a61b5</Id> <Version>1.0.0.0</Version> <ProviderName>Tsuyoshi Matsuzaki</ProviderName> <DefaultLocale>en-US</DefaultLocale> <DisplayName DefaultValue="My test functions" /> <Description DefaultValue="Generate random sample data"/> <Hosts><Host Name="Workbook" /> </Hosts> <Requirements><Sets DefaultMinVersion="1.1"> <Set Name="CustomFunctionsRuntime" MinVersion="1.1"/></Sets> </Requirements> <DefaultSettings><SourceLocation DefaultValue="https://localhost:44301/welcome_page.html" /> </DefaultSettings> <Permissions>ReadWriteDocument</Permissions> <VersionOverrides xmlns="http://schemas.microsoft.com/office/taskpaneappversionoverrides" xsi:type="VersionOverridesV1_0"><Hosts> <Host xsi:type="Workbook"><AllFormFactors> <ExtensionPoint xsi:type="CustomFunctions"><Script> <SourceLocation resid="Funcjs" /></Script><Page> <SourceLocation resid="Funchtml"/></Page><Metadata> <SourceLocation resid="Funcmeta"/></Metadata><Namespace resid="Funcns" /> </ExtensionPoint></AllFormFactors> </Host></Hosts><Resources> <bt:Urls><bt:Url id="Funcjs" DefaultValue="https://localhost:44301/asset/myfunc.js" /><bt:Url id="Funchtml" DefaultValue="https://localhost:44301/asset/mypage.html" /><bt:Url id="Funcmeta" DefaultValue="https://localhost:44301/asset/myfunc.json" /> </bt:Urls> <bt:ShortStrings><bt:String id="Funcns" DefaultValue="TEST" /> </bt:ShortStrings></Resources> </VersionOverrides></OfficeApp>
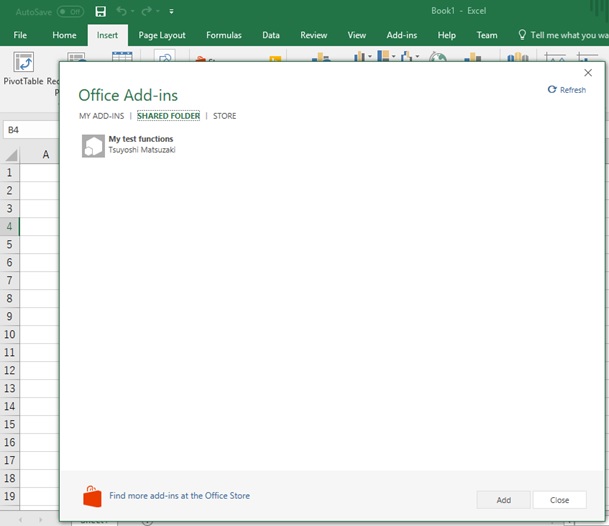
Open Excel and select “Home”-“Add-ins”. Push “More Add-ins” button and open “Shared Folder” tab.
You can then find your custom add-in as follows.
As I have mentioned above, custom functions run on the separated runtime in Excel, not on the browser runtime.
Because of this mechanism, your custom function can also run offline, once it’s installed in your Excel application.
Run !
After you add (install) this add-in in your Excel, you can use your custom functions with auto-complete suggestions or hints.
Please type :
=TEST.RANDOM(“phone”)


You can also use your function with productive Excel built-in capabilities !
For example, by dragging your mouse in the range of sheet as follows, you can fill with your function by “auto-fill” capability in Excel.

For JavaScript custom function, all functions are invoked simultaneously and then executed one at a time. (Because JavaScript runs on single-threading.)
By applying batch calling in custom function’s runtime, you can aggregate multiple calls into one function and then improve the performance.
Let’s enjoy Excel with JavaScript !
Update History :
May 2019 Custom functions has reached GA (generally available). Updated source code for the latest GA release
Categories: Uncategorized

whoa! sweet!
the reference to https://appsforoffice.edog.officeapps.live.com/lib/beta/hosted/office.js is critical, right? What’s in there?
LikeLike
How can I call API in the function as API when I call external API then it is giving me #BUSY!.
I want to return API response as string. Even I tried async – false (giving me – #VALUE!). but nothing worked
LikeLike
Hi There, after implementing this, I am getting “An unknown error has occurred while downloading this resource. Please re-load your add-in.” Please suggest
LikeLike
Thank you for your feedback.
Make sure that myfunc.json is exposed in your web site. (By default, JSON file is not exposed in Azure web app. I have added this note in the post.)
P.S.
The reference for myfunc.js in mypage.html is not required and I also have removed this reference. (Sorry for my mistake.)
But this might not be the cause for your error.
LikeLike
Thanks for your reply, I am trying to build simple excel custom functions add-in without using yeoman and not for Azure. I checked, the JSON file is exposed still the custom function is not appearing in Excel. Would it be possible for you to upload a zip file with complete project. Thank you very much.
LikeLike
I share my manifest (.xml) which works for me.
I will continue to run the hosted website (https://tsmatsuz1215.azurewebsites.net/) in this manifest and please check if it works.
https://1drv.ms/u/s!AuopXnMb-AqcgeZQAZqj3O3o-fq4nA?e=y6sf8j
You can download all source code – index.html, mypage.html, myfunc.js, myfunc.json – by accessing with your browser.
I will delete this website one month later, and please download source code till then.
When you host your Azure web site by your own, please use the following web.config to expose JSON file.
https://stackoverflow.com/questions/48137750/azure-web-app-does-not-load-json-file
LikeLike
Thanks for your help, its working now. My SSL certificate was not valid.
LikeLiked by 1 person