
This post is about one of frequently asked questions by developers and just tips for Azure programming.
A long ago, I have introduced how to use Azure REST API (in resource manager mode) and role model called RBAC (Role Based Access Control). (See my old post “Manage your Azure resource with REST API (ARM)“.)
In usual cases, API is called with HTTP Authorization header with Azure AD user token, which is retrieved by the OAuth and user’s interactive login activity.
But, what if your application is some kind of the backend process like daemon or services ?
In this post I explain about this scenario as follows.
Note : If you want to run some kind of automation jobs (both scheduled and triggered) for Azure resources, you can also register your job (scripts) in Azure Automation. With Automation, you don’t need to login using interactive UI for running the Automation job.
In this post, I assume that we access Azure resources from outside of Azure.
What is our concerns ?
In perspective of AuthN/AuthZ flow in Azure Active Directory (Azure AD), you can use Azure AD Application Permissions in order to access some API protected by Azure AD from the backend service or daemon. For more details about application permissions, see “Backend (Daemon) App calling API protected by Azure AD“.
For example:
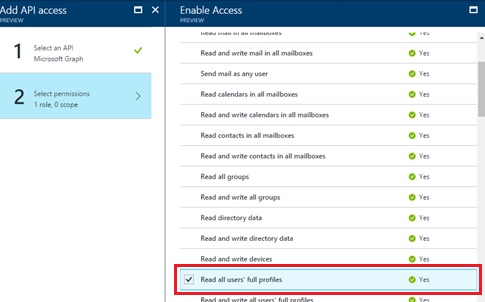
If you want to create your backend application which sync all users’ information (in some specific tenant) periodically, you can set the application permission like the following screenshot.
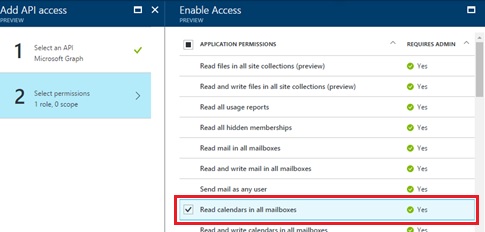
If you want to sync all users’ calendar data in some tenant, select the following application permission. (See the following screenshot.)
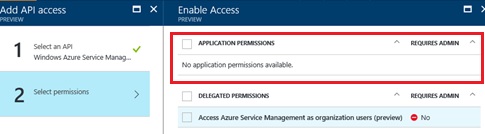
But unfortunately there’s no application permission for Azure Management. (Look at the following screenshot.)
So, what should we do ?
The answer is “to use Service Principal and RBAC” (not Azure AD permissions).
Microsoft Azure doesn’t use Azure AD permissions, because Azure subscription has a different management scope with Azure AD tenant unlike Microsoft 365. To say more clearly, an administrator in Azure subscription will not be an administrator in Azure AD tenant, and vice versa.
For this reason, Microsoft Azure has its own management framework called role-based access control (shortly, RBAC).
What is RBAC in Azure (Revisit)
As we saw in my old post (see “Manage your Azure resource with REST API (ARM)“), RBAC is used for the access permissions in Microsoft Azure (strictly speaking, in resource manager (ARM) mode in Microsoft Azure).
“Role” (e.g, Reader, Contributor, Backup Operator, so on and so forth) is a set of Azure permissions, and you can assign roles to users or groups in the scope of some specific Azure resources. With this manner of settings, RBAC provides the granular permissions for Azure resources.
For instance, if you have assigned (granted) Reader role to Scott (Azure AD user) in the scope of some virtual machine resource, Scott can see the resource configuration for this virtual machine resource, but he cannot operate or manage for this resource. (See here for built-in roles.)
You can assign roles not only to each resources (such as, a storage, a virtual machine, network, …), but also to the entire subscription or resource groups in Azure. If some role is assigned in the scope of resource group level, the user can have permissions for all the resources in this resource group.
The assignment is inherited through 3 levels of hierarchy – Azure subscription, resource groups, and each resources.
The roles can be assigned not only to users (user principals) but also to the applications (service principals).
Next I’ll show you how you can create / use a service principal in RBAC.
Note : For a lot of Azure resources (such as, Virtual Machine resource, App Services resource, Function resource, Data Factory resource, …), you can use a Managed Identity (or system-assigned service principal), which is a service principal automatically provisioned and managed inside Microsoft Azure and is used for communicating across other Azure resources.
By using a managed identity, you don’t need to hold a secure information (such as, secrets or credentials) in your app, and securely access from one endpoint to another.
In this post, I’ll focus on user-assigned service principal.
How to use a Service Principal in Azure
Let’s proceed and see the configuration of these combination with service principals and RBAC.
Step1 – Register a service principal
Here I describe how to configure a service principal.
First you add a new service principal in Azure AD tenant as follows.
Login to Azure Portal (https://portal.azure.com), click “Azure Active Directory” on the left navigation, and click “App registrations” menu.
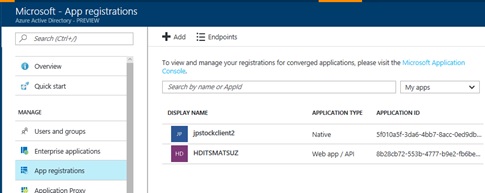
Press “New registration” button, and register a new app (together with a service principal object) by pushing “Create” button.
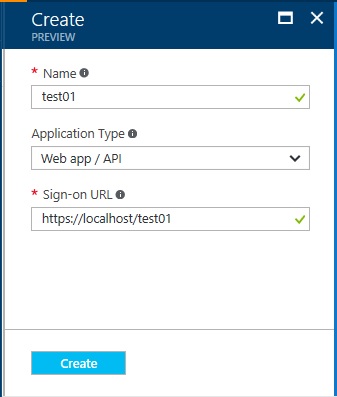
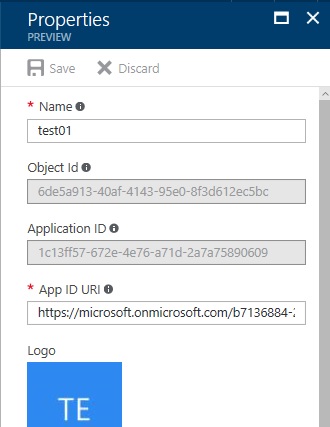
Now the service principal is successfully generated.
In Azure Portal, please copy the Application ID (Client ID) and App ID URI of this service principal (application). These values will be used later in steps.
Step2 – Assign roles (permissions) for service principal
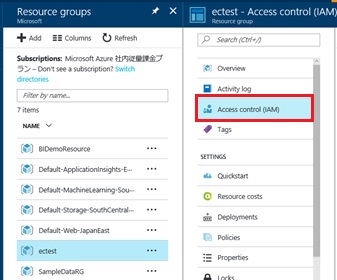
Next, please assign some role to this service principal in Azure Portal.
Here in this post, I’ll set the read permission (set “Reader” role) for all the resources in some specific resource group.
- Pick up some resource group in Azure Portal.
- Press “Access control (IAM)” in this resource group blade.
- Press “Add” button and select “Add role assignment”.
Select “Reader” as role and select the previous service principal as members.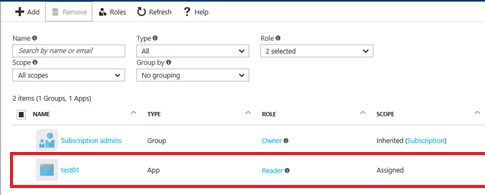
- Press “Save” button.
Next you should retrieve an access token and then call Azure REST endpoint.
In order to retrieve access token, there exists either of the following two ways and please take one of these two options (either Step3A or Step3B).
Step3A – Retrieve access token with a secret of service principal
You can retrieve access token (which is required for calling Azure Rest API) by either of a secret (app key, app password) or a certificate.
First we explain the case of using a secret.
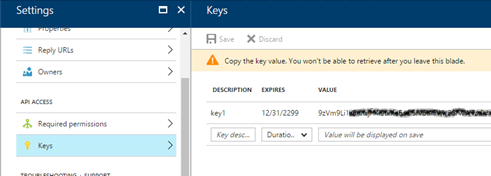
To create a secret for your service principal, you just create a key (client secret) of your service principal (application) in Azure Portal.
After you’ve created a client secret (key), please copy this value.
For generating and retrieving access token, you just post the following HTTP request.
In this request, you must use the tenant-aware url instead of using common endpoint “https://login.microsoftonline.com/common/oauth2/token“.
https://management.azure.com/is the resource id of the Azure REST API (a fixed value). This value (string) ofresourcemust be url-encoded.1c13ff57-672e-4e76-a71d-2a7a75890609is the application ID (client id) of your service principal, which is previously copied.9zVm9Li1...is a client secret which is previously copied.
HTTP Request (Get access token)
POST https://login.microsoftonline.com/yourtenant.onmicrosoft.com/oauth2/tokenAccept: application/jsonContent-Type: application/x-www-form-urlencodedresource=https%3A%2F%2Fmanagement.azure.com%2F&client_id=1c13ff57-672e-4e76-a71d-2a7a75890609&client_secret=9zVm9Li1...&grant_type=client_credentialsHTTP Response (Get access token)
HTTP/1.1 200 OKContent-Type: application/json; charset=utf-8{ "token_type": "Bearer", "expires_in": "3600", "ext_expires_in": "10800", "expires_on": "1488429872", "not_before": "1488425972", "resource": "https://management.azure.com/", "access_token": "eyJ0eXAiOi..."}The returned access_token attribute’s value in HTTP response (see above) is an access token for your Azure REST API calls. Later we use this token value.
Step3B – Retrieve access token with a certificate of service principal
Note (Added) : Now you can easily generate certificates with Azure Portal ! You don’t need to use
makecertcommand, which is used in this post.
If you want to use a certificate (instead of a secret), first you must create and register a certificate into your service principal.
Here we create a self-signed certificate for test purpose with the following command. (We use makecert utility in Windows SDK.)
3 files (“server.pvk”, “server.cer”, and “server.pfx”) will be generated with this command.
rem -- create self signed CA certs (CA.pvk and CA.cer)makecert -r -pe -n "CN=My Root Authority" -ss CA -sr CurrentUser -a sha1 -sky signature -cy authority -sv CA.pvk CA.cerrem -- create self signed server certs (server.pvk, server.cer, and server.pfx)makecert -pe -n "CN=DemoApp" -a sha1 -sky Exchange -eku 1.3.6.1.5.5.7.3.1 -ic CA.cer -iv CA.pvk -sp "Microsoft RSA SChannel Cryptographic Provider" -sy 12 -sv server.pvk server.cerpvk2pfx -pvk server.pvk -spc server.cer -pfx server.pfx -pi {password}The generated “server.cer” file includes public key. Now you can get this encoded raw data and base64 encoded thumbprint by the following PowerShell command, and please copy these strings. (The result is written in raw.txt and thumbprint.txt.)
Note that the base64 encoded thumbprint is not the familiar hexadecimal thumbprint string. If you want to have the hexadecimal thumbprint, you can get this string by converting to the binary and encoding with base64. (You can also use online site like here for this encoding tasks …)
$cer = New-Object System.Security.Cryptography.X509Certificates.X509Certificate2$cer.Import("C:\Demo\test\server.cer")# Get encoded raw$raw = $cer.GetRawCertData()$rawtxt = [System.Convert]::ToBase64String($raw)echo $rawtxt > raw.txt# Get thumbprint$hash = $cer.GetCertHash()$thumbprint = [System.Convert]::ToBase64String($hash)echo $thumbprint > thumbprint.txtNote : You can also get key pair and .pfx with
opensslas follows.openssl req -x509 -newkey rsa:4096 -keyout key.pem -out cert.pem -days 365 -config "C:\Program Files (x86)\Git\ssl\openssl.cnf"openssl pkcs12 -export -out server.pfx -inkey key.pem -in cert.pem
You can also get the hexadecimal thumbprint as follows, and convert to base64 encoded thumbprint.openssl x509 -in cert.pem -fingerprint -noout
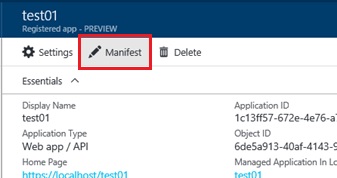
In Azure Portal, please go to the previously registered app (your service principal) in Azure AD, and press “Manifest” button to show the application manifest in the editor.
Using the manifest editor, please add the following key value (bold fonts) in the manifest. Here customKeyIdentifier is the base64 encoded thumbprint of certificate (which was retrieved by the previous command), and value is the raw data. Furthermore you must create unique GUID for the following keyId.
After editing, please press “Save” button to save and apply this manifest.
{ "appId": "1c13ff57-672e-4e76-a71d-2a7a75890609", "appRoles": [], "availableToOtherTenants": false, "displayName": "test01", "errorUrl": null, "groupMembershipClaims": null, "homepage": "https://localhost/test01", "identifierUris": ["https://microsoft.onmicrosoft.com/b71..." ], "keyCredentials": [{ "customKeyIdentifier": "CTTz0wG...", "keyId": "9de40fd2-9559-4b52-b075-04ab17227411", "type": "AsymmetricX509Cert", "usage": "Verify", "value": "MIIDFjC..."} ], "knownClientApplications": [], "logoutUrl": null, ...}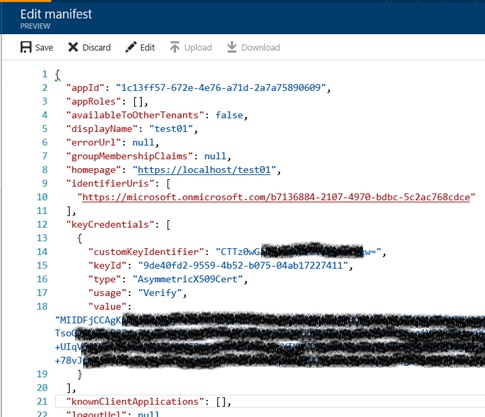
Now you start to build your backend (daemon) application.
Before you connect to the Azure resources using REST API, your program must take the access token, which is required for the REST API calls.
First you must create the RS256 digital signature using the previous private key (server.pfx).
The input string (payload) for this signature must be the base64 uri encoded string with the following 2 tokens delimited by dot ( . ) character.
Now let’s assume that the base64 uri encoded string of {"alg":"RS256","x5t":"CTTz0..."} (the following 1st token) is eyJhbGciOi*** (it’ll be more larger string and here we’re omitting…) and the base64 uri encoded string of {"aud":"https:...","exp":1488426871,"iss":"1c13f...",...} (the following 2nd token) is eyJhdWQiOi***. Then the input string must be eyJhbGciOi***.eyJhdWQiOi***.
x5tis the certificate thumbprint which is previously retrieved by PowerShell command.nbfis the start time (epoch time) of this token expiration, andexpis the end time.issandsubis your application id (client id).jtiis the arbitary GUID which is used for protecting reply attacks.
1st token
{ "alg": "RS256", "x5t": "CTTz0wGaBvl1qhHEmVdw04vExqw"}2nd token
{ "aud": "https://login.microsoftonline.com/microsoft.onmicrosoft.com/oauth2/token", "exp": 1488426871, "iss": "1c13ff57-672e-4e76-a71d-2a7a75890609", "jti": "e86b1f2b-b001-4630-86f5-5f953aeec694", "nbf": 1488426271, "sub": "1c13ff57-672e-4e76-a71d-2a7a75890609"}Now you create RS256 digital signature using this generated input string (payload).
To create a digital signature by handcrafting is non-trivial and then you can use several existing libraries. For example: you can use openssl_sign (which needs pem format private key) for PHP programmers, or you might be able to use jsjws for JavaScript. For C# (.NET), I’ll show the complete code later in this chapter.
Here we assume that we prepared a RS256 digital signature, and proceed.
After you’ve created a signature, you can now get a client assertion as follows. This format is the standardized JWT format (see RFC 7519).
For more details about this format, please see “How to verify id token in Azure AD“.
{base64 uri encoded string of 1st token}.{base64 uri encoded string of 2nd token}.{base64 uri encoded of generated signature}Now you can get access token for Azure REST API using a generated client assertion ! Get access token by the following HTTP request.
Note that you must use the tenant-aware url instead of using “https://login.microsoftonline.com/common/oauth2/token”.
https://management.azure.com/is the resource id of the Azure REST API (fixed value). The value ofresourcemust be url-encoded string.1c13ff57-672e-4e76-a71d-2a7a75890609is the application id of your service principal.eyJhbGciOi...is a generated client assertion. (See above)
HTTP Request (Get access token)
POST https://login.microsoftonline.com/yourtenant.onmicrosoft.com/oauth2/tokenAccept: application/jsonContent-Type: application/x-www-form-urlencodedresource=https%3A%2F%2Fmanagement.azure.com%2F&client_id=1c13ff57-672e-4e76-a71d-2a7a75890609&client_assertion_type=urn%3Aietf%3Aparams%3Aoauth%3Aclient-assertion-type%3Ajwt-bearer&client_assertion=eyJhbGciOi...&grant_type=client_credentialsAzure AD internally checks whether this client assertion is valid or not using a stored raw key (public key) in this app’s manifest.
If it’s verified, the result is successfully returned as follows.
HTTP Response (Get access token)
HTTP/1.1 200 OKContent-Type: application/json; charset=utf-8{ "token_type": "Bearer", "expires_in": "3600", "ext_expires_in": "10800", "expires_on": "1488429872", "not_before": "1488425972", "resource": "https://management.azure.com/", "access_token": "eyJ0eXAiOi..."}The returned value of access_token attribute is the access token for your Azure REST API calls.
Here I described how to use a certificate using raw HTTP by handcrafting for your understanding.
Using a programming language, you might be able to mitigate these workload with a variety of libraries. For instance, if you’re using C# (.NET), you can get access token by a few lines of code as follows with ADAL (Active Directory Authentication Library).
Note (Added) : ADAL is no longer supported. Please use MSAL (Microsoft Authentication Library) instead.
...using Microsoft.IdentityModel.Clients.ActiveDirectory;using System.Security.Cryptography.X509Certificates;...AuthenticationContext ctx = new AuthenticationContext( "https://login.microsoftonline.com/yourtenant.onmicrosoft.com/oauth2/authorize", false);X509Certificate2 cert = new X509Certificate2( @"C:\tmp\server.pfx", "P@ssw0rd", // password of private key X509KeyStorageFlags.MachineKeySet);ClientAssertionCertificate ast = new ClientAssertionCertificate( "1c13ff57-672e-4e76-a71d-2a7a75890609", // application id cert);var res = await ctx.AcquireTokenAsync( "https://management.azure.com/", // resource id ast);MessageBox.Show(res.AccessToken);Step4 – Connect to Azure resources !
Once you have taken an access token, you can connect to Azure resources using Azure REST API (or SDK).
In this example, we will get (read) a Virtual Machine resource using Azure REST API.
As you can see below, you just set the value of access token in HTTP Authorization header in HTTP requests.
HTTP Request (Azure REST API)
GET https://management.azure.com/subscriptions/b3ae1c15-... /resourceGroups/TestGroup01 /providers/Microsoft.Compute/virtualMachines /testmachine01?api-version=2017-03-30Accept: application/jsonAuthorization: Bearer eyJ0eXAiOi...Microsoft Azure will verify this token (see here for how to verify Azure AD token) and check permissions in RBAC.
When this request is valid, Azure will return the following HTTP response.
HTTP Response (Azure REST API)
HTTP/1.1 200 OKContent-Type: application/json; charset=utf-8{ "properties": {"vmId": "525f07f9-d4e9-40dc-921f-6adf4ebb8f21","hardwareProfile": { "vmSize": "Standard_A2"},"storageProfile": { "imageReference": {"publisher": "MicrosoftWindowsServer","offer": "WindowsServer","sku": "2012-R2-Datacenter","version": "latest" }, "osDisk": {"osType": "Windows","name": "testmachine01","createOption": "FromImage","vhd": { "uri": "https://test01.blob.core.windows.net/vhds/testvm.vhd"},"caching": "ReadWrite" }, "dataDisks": []},"osProfile": { "computerName": "testmachine01", "adminUsername": "tsmatsuz", "windowsConfiguration": {"provisionVMAgent": true,"enableAutomaticUpdates": true }, "secrets": []},"networkProfile": { "networkInterfaces":[{ "id":"..."} ]},"diagnosticsProfile": { "bootDiagnostics": {"enabled": true,"storageUri": "https://test01.blob.core.windows.net/" }},"provisioningState": "Succeeded" }, "resources": [{ "properties": {"publisher": "Microsoft.Azure.Diagnostics","type": "IaaSDiagnostics","typeHandlerVersion": "1.5","autoUpgradeMinorVersion": true,"settings": { "xmlCfg":"PFdhZENmZz...", "StorageAccount":"test01"},"provisioningState": "Succeeded" }, "type": "Microsoft.Compute/virtualMachines/extensions", "location": "japaneast", "id": "...", "name": "Microsoft.Insights.VMDiagnosticsSettings"} ], "type": "Microsoft.Compute/virtualMachines", "location": "japaneast", "tags": {}, "id": "...", "name": "testmachine01"}You can also perform management operations (create/update/delete) or some other actions (start, stop, etc) corresponding with the roles assigned in Azure resources.
Categories: Uncategorized

I receive this error when I’m following all your steps : AADSTS50027: Invalid JWT token. AADSTS50027: Invalid JWT token. No certificate thumbprint specified in token header
Can you please help me with this.
LikeLike
It says that your provided JWT is invalid. Can you please check your JWT with JWT decoder (like https://www.jsonwebtoken.io/ ), and can you check that x5t (X.509 thumbprint) surely exists in header ?
LikeLike
I think this article is out of date. I attempted the same procedure but I cannot use https://management.core.windows.net/ for the resource on the authorization request because if I do I get an error stating that the “resource principal named https%3A%2F%2Fmanagement.core.windows.net%2F was not found in the tenant”. However, if I use the app ID URI then it’ll work but the resource request will fail with “The access token has been obtained for wrong audience or resource”
LikeLike
Sorry, but this is old post and this resource id (https://management.core.windows.net/) is for Azure classic management.
Please use “https://management.azure.com/” for current Azure resource management.
LikeLike
Now I’ve changed resource id (changed to meet the current spec) in my post.
LikeLike
Thanks so much for the update. I discovered that the problem was with my account not having the requisite permissions.
LikeLike
Can I simply just say what a relief tto uncover someone that geenuinely
knows whzt they’re taljing about on the net. You certainly realize how to
bring a problem to light and make it important.
A lot more people really need tto read this and understand thi side of the story.
I wass surprised you aren’t more popular
given that you certainly have the gift.
LikeLike
Nice answer back in return of this question with solid arguments
and describing all on the topic of that.
LikeLike
It was very helpful. It seems a little old.
I needed to add /v2.0/ to the url
POST https://login.microsoftonline.com/yourtenant.onmicrosoft.com/oauth2/v2.0/token
see the powershell script here:
LikeLike