
In my previous post, I described about featurizing (vectorizing) text by the sentiment analysis example.
In this post, I describe about the featurizing (vectorizing) image, and explain how you can apply in your real application.
As you can see here, you can take insights for images without any labeling or training yourself.
What is “featurizeImage” transformation in R
MicrosoftML package in the latest Microsoft R Client and Server (version 9.1 and later) includes some new functionalities with the pre-trained models. The new transform named “featurizeImage” is one of these.
This “featurizeImage” vectorizes the image by the model which is trained by the famous ImageNet dataset. As you know, the ImageNet is having the huge images including the labels of so many features like the name of objectives with boundary boxes, gestures, species, and other annotations. When using “featurizeImage”, you can select the residual network (ResNet) or convolutional network (AlexNet) for the pre-trained model. (In-effect, you cannot analyze with “featurizeImage” by the labels or attributes which is not in ImageNet dataset. For example, facial recognition with some unknown faces, etc)
You can download the nice sample code for this “featurizeImage” transformation from the GitHub (see here), and here I show you how you can use along with this sample code. (But I changed several lines of code for my example …)
Our Sample
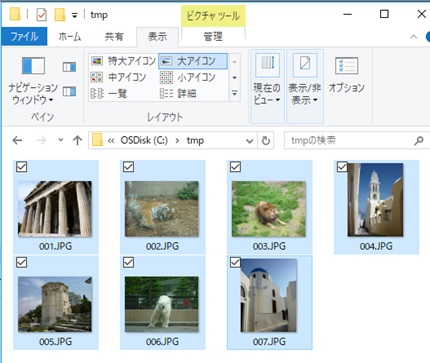
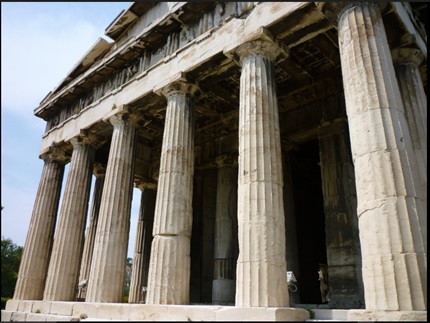
Now here we use the following pictures which I’ve taken during my vacations before.
The picture #1 and #5 are the landmarks of ancient Greece. #4 and #7 are the house in shiny Santorini island. #2, #3, and #6 are the animals in the zoological park (in Tokyo) near my home town.
Vectorizing (Featurizing) Images
First, let’s just see the vectorized (featurized) results of these images. (In new MicrosoftML package, you can just transform and see the result.)
Please see the following code.
library("MicrosoftML")orgdat <- data.frame( Image = c("C:\tmp\001.JPG","C:\tmp\002.JPG","C:\tmp\003.JPG","C:\tmp\004.JPG","C:\tmp\005.JPG","C:\tmp\006.JPG","C:\tmp\007.JPG"), stringsAsFactors = FALSE)vecdat <- rxFeaturize( data = orgdat, mlTransforms = list(loadImage(vars = list(Features = "Image")),resizeImage(vars = "Features", width = 224, height = 224),extractPixels(vars = "Features"),featurizeImage(var = "Features", dnnModel = "resnet101") ))As you can see, transformation steps are the followings :
- loadImage – loading images from each path name (in “Image” column)
- resizeImage – resizing all images to 244 X 244. Later I explain this background.
- extractPixels – extracting pixels (vector of number) from the loaded binary images.
- featurizeImage – vectorizing with pre-trained model. (CNTK wrapper seems to be used in the model evaluation.)
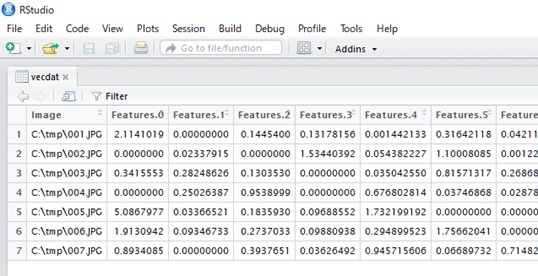
The result (“vecdat”) is having 2048 featurized columns (vectors), and these values are numeric like following.
In this example we’re using ResNet-101 network for the pre-trained model. In this case, the image size must be 244 X 244.
You can see the table of the input image size for each available networks in the blog post “Microsoft R blog : Image featurization with a pre-trained deep neural network model“.
| ResNet-18 | 224 X 224 |
| ResNet-50 | 224 X 224 |
| ResNet-101 | 224 X 224 |
| AlexNet | 227 X 227 |
Image Classification with unsupervised classifier (Clustring)
You can use this featurized image vector for the various learnings. One good example is image classification. (Here we use clustring approach.)
Here, we now classify images using k-means clustering without any labeling or training.
That is, we take the unsupervised classifying approach. All you need is only vectorized features previously generated !
Note : In the GitHub example (ImageFeaturizer_TrainAndClassifyImage.R), it is taking the approach of labeling images (“Fish”, “Helicopter”, etc), training images, and finally getting the model for classification using the vectorized features. Here, we take another approach (clustering algorithm).
Let’s see the following example.
This code classifies by 3 classes depending on the distance of each image vectors (features).
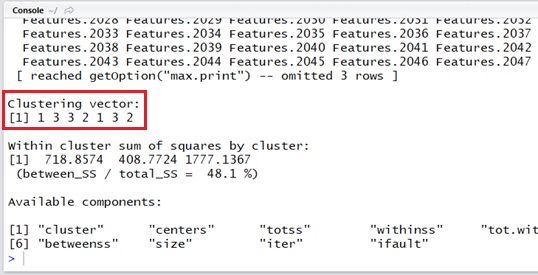
library("MicrosoftML")orgdat <- data.frame( Image = c("C:\tmp\001.JPG","C:\tmp\002.JPG","C:\tmp\003.JPG","C:\tmp\004.JPG","C:\tmp\005.JPG","C:\tmp\006.JPG","C:\tmp\007.JPG"), stringsAsFactors = FALSE)vecdat <- rxFeaturize( data = orgdat, mlTransforms = list(loadImage(vars = list(Features = "Image")),resizeImage(vars = "Features", width = 224, height = 224),extractPixels(vars = "Features"),featurizeImage(var = "Features", dnnModel = "resnet101") ))result <- kmeans(vecdat[, -1], 3, nstart = 20)The result (the variable “result”) is as follows.
As you can see, each images are fairly well-classified along with your willings. (class #1 = ancient Greek landmarks, class #2 = the house of Santorini, class #3 = animals)
Now you can classify your albums (your real photos) without any labeling and training by yourself ! The pre-trained model makes you free from all these difficult works.
Image Matching (Image Search)
The GitHub sample code (ImageFeaturizer_FindMatchingImage.R) is also having the example for image matching (search). This sample also doesn’t need any labeling and training.
Let’s follow this sample code.
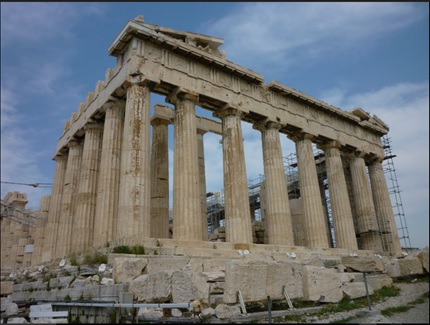
Before running, we prepare another Parthenon photo for search target as follows.
First, we use “dist” function and calculate the euclidean distance for each other.
library("MicrosoftML")orgdat <- data.frame( Image = c("C:\tmp\001.JPG","C:\tmp\002.JPG","C:\tmp\003.JPG","C:\tmp\004.JPG","C:\tmp\005.JPG","C:\tmp\006.JPG","C:\tmp\007.JPG"), stringsAsFactors = FALSE)vecdat <- rxFeaturize( data = orgdat, mlTransforms = list(loadImage(vars = list(Features = "Image")),resizeImage(vars = "Features", width = 224, height = 224),extractPixels(vars = "Features"),featurizeImage(var = "Features", dnnModel = "resnet101") ))fnddat <- data.frame( Image = c("C:\Users\tsmatsuz\Desktop\searching.JPG"), stringsAsFactors = FALSE)vec2dat <- rxFeaturize( data = fnddat, mlTransforms = list(loadImage(vars = list(Features = "Image")),resizeImage(vars = "Features", width = 224, height = 224),extractPixels(vars = "Features"),featurizeImage(var = "Features", dnnModel = "resnet101") ))distVals <- dist( rbind(vecdat, vec2dat)[,-1], "euclidean")The result (distVals) is like following. This result is including all distance for 8 images (7 original images + 1 search target) each other. :

Here we just want the result of comparison with the search target (“searching.JPG”). That is, we need the result only on 8th row.
i <- attr(distVals, "Size") # value of "Size" must be 8eucDist <- as.matrix(distVals)[i, -i]The retrieved result (“eucDist”) is like following :
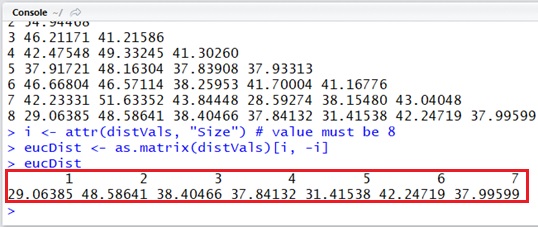
As you can see, the photo #1 (the following picture) is having the minimum distance with the search target (“searching.JPG”), because these 2 photos are resembling several features.
Another approach for classification or matching is one class support vector (OC-SVM). For example, if you want to identify whether the image is the animal or not, first you collect a lot of animal’s images, second you vectorize these images, and then you might get the appropriate model with one class SVM. (But you must carefully select the kernel function and parameters in this case.)
As you see here, you can apply the featurized image data for the various scenarios.
Categories: Uncategorized
