
Azure Machine Learning (Azure Machine Learning service) – which consists of cloud workspace UI, CLI commands, and Python SDK – is used to make your works more productive in machine learning lifecycle, such as, pre-processing, training, evaluation, deployment, monitoring, and so forth.
In this post, I’ll show you how Azure ML helps your ML/AI workloads with overall features and code examples.
You will find why Azure Machine Learning is the most highly evaluated ML developer services, compared with other platforms in public cloud vendors. (See GigaOm benchmark or 2022 Gartner magic quadrant for cloud AI developer services.)
Manage Data
Generally speaking, data is so critical in machine learning.
Using Azure Machine Learning, data is consistently used and managed without specific configuration or modification in your code.
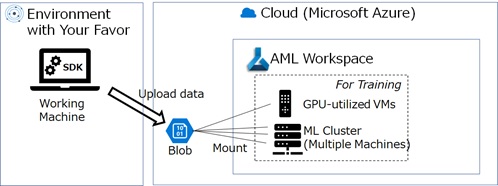
The following command uploads local data in ./data folder into Azure Machine Learning workspace. (See exercise02 in my repo.)
Create data in AML
az ml data create --file file_upload.yml \ --resource-group $my_resource_group \ --workspace-name $my_workspacefile_upload.yml
$schema: https://azuremlschemas.azureedge.net/latest/data.schema.jsonname: mnist_datadescription: This is example.type: uri_folderpath: dataOnce data is registered in Azure Machine Learning workspace, data can be mounted and used (i.e, shared) in any ML experiments on cloud. As you will see in later examples, data in Azure Machine Learning can be used with familiar Linux path string and without hard-coded connection information, such as, secret or key. (See below.)
The duplication of data (such as, copying data in each ML experiments) will risk your team, but Azure Machine Learning will prevent from this risk and data is well governed in your team without changing your Python code.
Note : Each AML workspace has built-in default datastore. (If you don’t specify any datastore, this default datastore will be used.) You can also use your own provisioned datastore.
Azure Machine Learning supports a variety of data sources, such as, Azure Blob, Data Lake Storage, File Share or SQL Database.
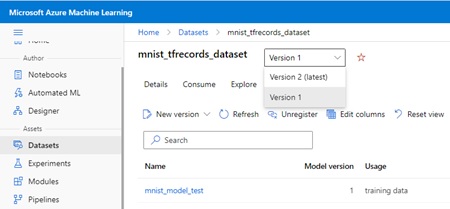
The data version is also tracked in Azure Machine Learning.
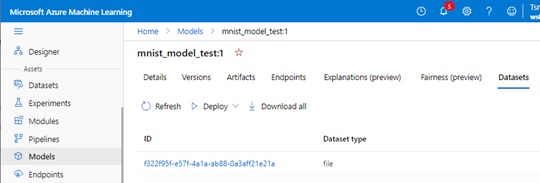
The version of ML assets – such as, data, code, and generated models – are always tracked in job history, and you can trace “which version of model is generated by which version of data” or “which version of data is used in which version of model”.
Customer data is also sensitive and you sometimes need to restrict data access securely.
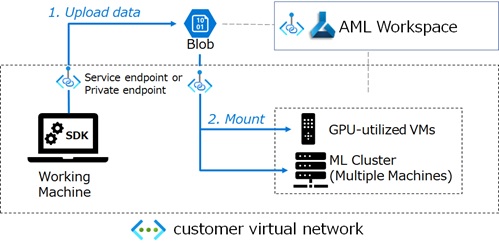
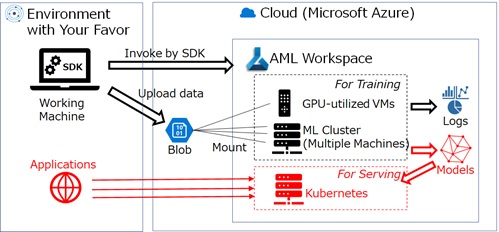
With Azure Machine Learning, you can also operate data (blob storage) behind Azure virtual network (VNet) and data won’t then face to public internet. (See below.)
Productive Training on Cloud
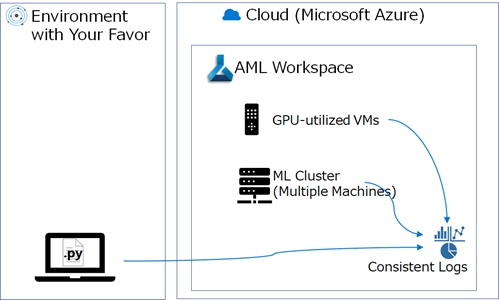
After you have completed initial development for Python code on-premise, you might explorer ML workloads in a lot of cloud resources – such as a variety of GPUs, distributed clusters, so on and so forth.
With Azure Machine Learning,
- You can explore ML workloads in cloud without changing any code which worked on-premise.
- You can explore ML workloads in cloud without any additional Azure ML surcharge. (i.e, It will cost for only computing and storage infrastructures in Azure.)
Note : In initial developments, you can also use Azure Machine Learning Notebook, which is the managed notebook environment in Azure Machine Learning studio. (Or you can seamlessly run workloads on Azure Machine Learning from Visual Studio Code UI.)
Now let’s dive into code.
Suppose, we build the following trivial code for hand-writing digit’s prediction (MNIST) in your local machine environment. (See exercise03 in my repo.)
As you can see below, the code doesn’t depend on Azure Machine Learning at all.
train.py
import osimport argparseimport tensorflow as tf# parse argumentsparser = argparse.ArgumentParser()parser.add_argument( "--data_folder", type=str, default="./data/train", help="Folder path for input data")parser.add_argument( "--model_folder", type=str, default="./outputs", # AML experiments outputs folder help="Folder path for model output")parser.add_argument( "--learning_rate", type=float, default="0.001", help="Learning Rate")parser.add_argument( "--first_layer", type=int, default="128", help="Neuron number for the first hidden layer")parser.add_argument( "--second_layer", type=int, default="64", help="Neuron number for the second hidden layer")parser.add_argument( "--epochs_num", type=int, default="6", help="Number of epochs")FLAGS, unparsed = parser.parse_known_args()# build modelmodel = tf.keras.models.Sequential([ tf.keras.layers.Flatten(input_shape=(28, 28)), tf.keras.layers.Dense(FLAGS.first_layer, activation="relu"), tf.keras.layers.Dense(FLAGS.second_layer, activation="relu"), tf.keras.layers.Dense(10)])model.compile( optimizer=tf.keras.optimizers.Adam(FLAGS.learning_rate), loss=tf.keras.losses.SparseCategoricalCrossentropy(from_logits=True), metrics=[tf.keras.metrics.SparseCategoricalAccuracy()],)# run trainingtrain_data = tf.data.experimental.load(FLAGS.data_folder)model.fit( train_data.shuffle(1000).batch(128).prefetch(tf.data.AUTOTUNE), epochs=FLAGS.epochs_num)# save model and variablesmodel_path = os.path.join(FLAGS.model_folder, "mnist_tf_model")model.save(model_path)print("current working directory : ", os.getcwd())print("model folder : ", model_path)After we’ve completed initial development, now we’ll try a variety of exploration – such as, seeking optimal number of iterations, seeking optimal hardware (such as, NVIDIA Tesla K80, T4, P40, …) for blancing trade-off between cost and performance.
To create GPU compute in Azure Machine Learning, you can remotely run the following command.
Create GPU cluster
az ml compute create --name myvm01 \ --resource-group $my_resource_group \ --workspace-name $my_workspace \ --type amlcompute \ --min-instances 0 \ --max-instances 3 \ --size Standard_NC4as_T4_v3Note : If your team has in-house GPU resources, you can bring your own on-premise Kubernetes cluster into Azure Machine Learning. (See here for details.)
You can also attach an existing Azure virtual machine as a compute target in Azure Machine Learning.
After the compute is ready, you can now run Python script (train.py) on this cloud GPU cluster (myvm01) with the following command and YAML configuration. (See exercise04 in my repo.)
Submit training job
az ml job create --file mnist_train_job.yml \ --resource-group $my_resource_group \ --workspace-name $my_workspacemnist_train_job.yml
$schema: https://azuremlschemas.azureedge.net/latest/commandJob.schema.jsoncode: scriptcommand: >- python train.py --data_folder ${{inputs.mnist_tf}}/traininputs: mnist_tf:type: uri_folderpath: azureml:mnist_data@latestenvironment: azureml:AzureML-tensorflow-2.7-ubuntu20.04-py38-cuda11-gpu@latestcompute: azureml:myvm01display_name: tf_remote_experimentexperiment_name: tf_remote_experimentdescription: This is example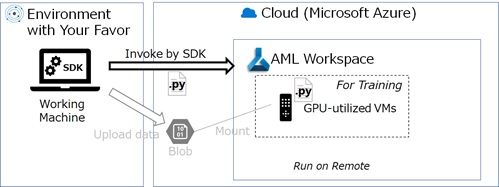
Note : In the first run, docker image is created and registered in Azure Container Registry (ACR). It will then take a long time in the first run.
In this experiments, the training data on cloud (mnist_data which is previously uploaded) is automatically mounted on remote compute, and your code can access this data using familiar Linux path string. (See --data_folder argument in above YAML definition.)
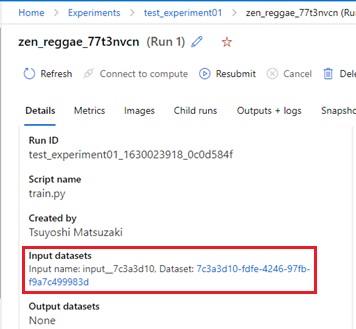
By running jobs on AML, the mounted data (used data) is also tracked and you can easily trace the relationship between job (job’s run) and data. (See below.)
Mounted data is tracked in AML jobs
In this example, I’m using AML built-in environment AzureML-tensorflow-2.7-ubuntu20.04-py38-cuda11-gpu, which is pre-configured environment for running TensorFlow on GPU device.
However, you can also build and bring your own environment in AML – such as, bringing your own container image, specifying specific version of Python runtime, or installing specific framework and libraries, etc. (See exercise04 for example of custom environment.)
See here for a variety of customization in AML (such as, running other distributed frameworks, distributed reinforcement learning, etc).
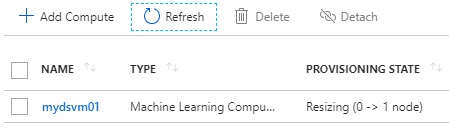
As you’ll find, we have created GPU compute with minimum number of node=0 and maximum number of node=3. (See above.)
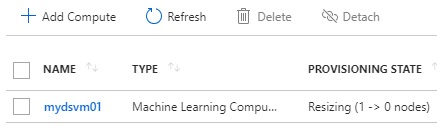
If team members submit a lot of jobs and a machine resource becomes very busy, the node will be automatically scaled out (increased) in the cluster. On contrary, when it’s inactive for a while, the node is automatically terminated (reduced to 0).
With Azure Machine Learning, the expensive resources (such as, GPU devices) are well governed and controlled in your team.
Increasing the number of nodes (when starting to run a script)
1 node is running (when script is running)
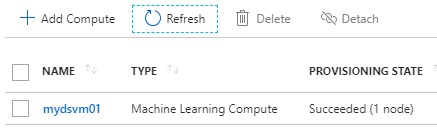
Decreasing the number of nodes (when the script is finished)
No running node (when it’s in idle)
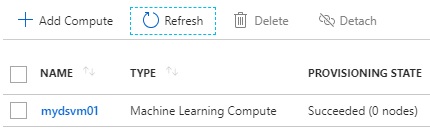
Note : By default, the number of nodes will scale down after 3 minutes idle.
To avoid frequent resizing, please set appropriateidle_seconds_before_scaledownparameter.
You can also easily configure for distributed training (including MPI settings) in Azure Machine Learning.
Here I don’t show distributed training example, but see exercise05 in my repo.

Track Logs and Metrics integrated with MLflow
Logs, metrics, and outputs in jobs are all tracked by Azure Machine Learning, and you can extract these artifacts in any time you need.
MLflow is open-source machine learning lifecycle management, which can be installed and can run on-premise.
Logging in Azure Machine Learning is integrated with MLflow and works as MLflow backend. The logs and metrics are seamlessly integrated with open-source MLflow API.
Note : See here for features about MLflow and Azure ML integration.
The following code is our modified source code to track logs and metrics with MLflow API. (The gray-highlighted lines are added or modified.)
By autolog() function, logs and metrics are automatically tracked by MLflow API.
Logs and metrics in training script (train.py)
import osimport argparseimport tensorflow as tfimport mlflowmlflow.tensorflow.autolog()### You can also manually log as follows (Here we use autolog())# mlflow.log_params({# 'learning_rate': FLAGS.learning_rate,# '1st_layer': FLAGS.first_layer,# '2nd_layer': FLAGS.second_layer})# mlflow.log_metrics(# {'training_accuracy': result_accuracy, 'training_loss': result_loss},# step=result_step)# parse argumentsparser = argparse.ArgumentParser()parser.add_argument( "--data_folder", type=str, default="./data/train", help="Folder path for input data")parser.add_argument( "--model_folder", type=str, default="./outputs", # AML experiments outputs folder help="Folder path for model output")parser.add_argument( "--learning_rate", type=float, default="0.001", help="Learning Rate")parser.add_argument( "--first_layer", type=int, default="128", help="Neuron number for the first hidden layer")parser.add_argument( "--second_layer", type=int, default="64", help="Neuron number for the second hidden layer")parser.add_argument( "--epochs_num", type=int, default="6", help="Number of epochs")FLAGS, unparsed = parser.parse_known_args()# build modelmodel = tf.keras.models.Sequential([ tf.keras.layers.Flatten(input_shape=(28, 28)), tf.keras.layers.Dense(FLAGS.first_layer, activation="relu"), tf.keras.layers.Dense(FLAGS.second_layer, activation="relu"), tf.keras.layers.Dense(10)])model.compile( optimizer=tf.keras.optimizers.Adam(FLAGS.learning_rate), loss=tf.keras.losses.SparseCategoricalCrossentropy(from_logits=True), metrics=[tf.keras.metrics.SparseCategoricalAccuracy()],)# run trainingtrain_data = tf.data.experimental.load(FLAGS.data_folder)model.fit( train_data.shuffle(1000).batch(128).prefetch(tf.data.AUTOTUNE), epochs=FLAGS.epochs_num)# save model and variablesmodel_path = os.path.join(FLAGS.model_folder, "mnist_tf_model")model.save(model_path)print("current working directory : ", os.getcwd())print("model folder : ", model_path)When you submit a job, MLflow tracking URI and experiment’s name are automatically set in AML job, and it then redirect the logging from MLflow to your Azure Machine Learning workspace.
No extra setting is needed for tracking logs and metrics. (See exercise06 in my repo.)
While enabling this code to work on-premise with locally installed MLflow, it also runs on cloud jobs in Azure Machine Learning.
After the job is completed, you can see logs and metrics in Azure Machine Learning studio UI. (See “Jobs” in AML studio.)

You can also query metric’s raw and analyze with MLflow API.
For instance, you can extract the best model by querying the accuracy in a lot of runs in history. (See here for details.)
You can also set tags in job and then query expected scope of logs, such as, “logs in unit test stage”, “logs submitted by some team”, “logs more than some threshold”, so on and so forth.
Note : You can also transfer your TensorBoard logs into Azure Machine Learning.
Another practical benefit of logging is for hyperparameter tuning.
In the next section, I’ll show you how logging is used in sweep jobs.
Quick Insights
In ordinary ML/AI works, data scientists or engineers should know a lot of techniques, such as, detecting data bias, featurizing inputs, a variety of algorithms, model explainability (interpretability), so on and so forth.
Azure Machine Learning will help these simplify by automating a part of tasks.
In this section, I’ll show you hyper-parameter tuning and automated machine learning (Auto ML) among these capabilities.
These tasks will often consume a lot of time and computing resources. I emphasize that the cloud computing power in Azure Machine Learning will also address these time-consuming concerns.
1. Parameter Search (Hyper-Parameter Tuning) for Any Frameworks
In machine learning, there exist a lot of parameters to improve model performance. Data scientists should then seek appropriate parameters by running the training multiple times.
Let’s see how Azure Machine Learning simplifies and speeds up this task.
The following command and configuration (YAML) runs hyper-parameter search for the previous source code (train.py) with MLflow tracking in Azure Machine Learning. (See exercise07 in my repo.)
Run sweep job (hyper-parameter tuning)
az ml job create --file hyperparam_job.yml \ --resource-group $my_resource_group \ --workspace-name $my_workspacehyperparam_job.yml
$schema: https://azuremlschemas.azureedge.net/latest/sweepJob.schema.jsontype: sweeptrial: code: script command: >-python train.py--data_folder ${{inputs.mnist_tf}}/train--learning_rate ${{search_space.learning_rate}}--first_layer ${{search_space.first_layer}}--second_layer ${{search_space.second_layer}} environment: azureml:AzureML-tensorflow-2.7-ubuntu20.04-py38-cuda11-gpu@latestinputs: mnist_tf:type: uri_folderpath: azureml:mnist_data@latestcompute: azureml:myvm01sampling_algorithm: randomsearch_space: learning_rate:type: choicevalues: [0.001, 0.005, 0.009] first_layer:type: choicevalues: [100, 125, 150] second_layer:type: choicevalues: [30, 60, 90]objective: goal: maximize primary_metric: sparse_categorical_accuracylimits: max_total_trials: 20 max_concurrent_trials: 4display_name: hyperdrive_testexperiment_name: hyperdrive_testdescription: This is exampleAbove YAML configuration defines 3 search values in each 3 parameters (--learning_rate, --first_layer, and --second_layer), and totally it will then seek 3 x 3 x 3 = 27 combination for parameter’s search. (However, this configuration limits to maximum 20 iterations randomly.)
Here I set random sampling, but you can also apply more intelligent Bayesian sampling in YAML configuration.
Note : Bayesian optimization in sampling runs mathematical steps called Gaussian processes, which guesses possibilities for objective function using Gaussian distribution with the observed results, and it then decides the following point to seek using acquisition function.
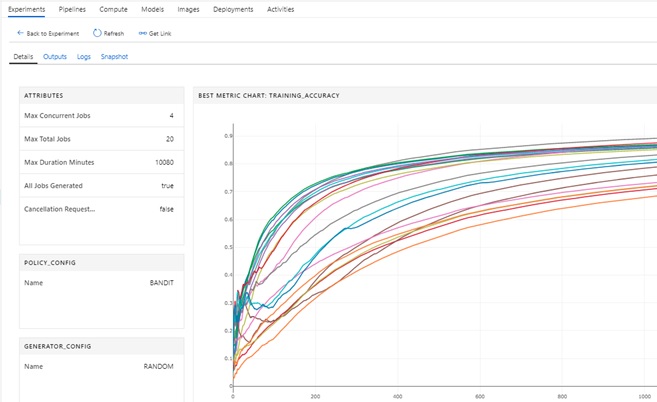
You can also configure the bandit policy setting, which is an early termination policy and stops training when primary metric (training_accuracy) falls outside of the threshold. (In this configuration example, I didn’t apply bandit policy.)
When you run above command, primary metrics (sparse_categorical_accuracy) is traced for each script’s arguments and you can view how accuracy is improved for each arguments. (See the following screen in AML studio UI.)
View traced metric in hyper-parameter tuning
When you scale compute cluster to multiple nodes in this job, all experiments will be run in parallel and you can then quickly get results.
For instance, when you set 50 nodes for 50 training iterations (50 parameter’s search), it will run 1 iteration in each node.
In the cloud, the cost of computing is based on {number of machines} x {time consumption}, and the computing cost by parallel iterations in multiple machines will then be almost the same as sequential one in a single machine. (Remind that nodes in cluster will soon terminate after completion.)
That is, you can speed up these heavy exploration also with cost effectiveness.
2. Built-in Automated ML (AutoML) Capability
Azure Machine Learning also provides automated machine learning capability (called Automated ML or Auto ML), in which the algorithms are automatically picked up and explored in training.
This functionality automates 3 of the following workloads :
- Feature engineering (Preprocessing Data)
- Algorithm selection
- Parameter search (Hyper-parameter tuning)
Auto ML currently covers the following ML training tasks :
- Tabular
- Regression
- Classification
- Time-series forecasting
- Image
- Classification
- Object detection
- Segmentation
- NLP (Language)
- Classification (Single Label / Multi Label)
- Named Entity Recognition (NER)
Note : In image (computer vision) training, you should specify model to train (such as, YOLO v5 in object detection). When you don’t specify model, the default model (depending on tasks) will be used.
In NLP training, model is also determined depending on tasks.
(i.e, The algorithm will not be sought in image and NLP training.)Note : Azure Machine Learning also provide labeling project, which helps you to label data in image and language (NLP). The output in labeling project (labeled data) can be used in automated machine learning.
This Auto ML feature is based on meta-learning technique with collaborative filtering and Bayesian optimization. (See the paper for details.)
Note : Here I don’t show example of command and configuration (yaml) for Auto ML jobs, but please see here. (You can also invoke Auto ML jobs in Azure Machine Learning studio UI without writing any code.)
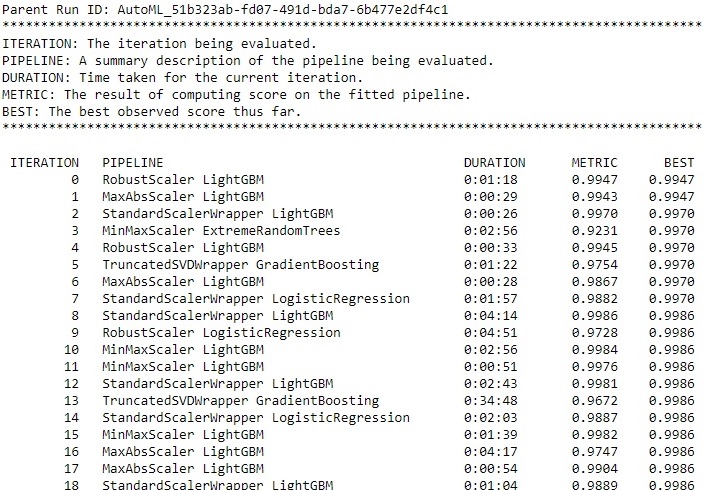
The following is the output’s example for Auto ML tabular classification task.
The “PIPELINE” column indicates which preprocessing and which algorithm are used in each iteration. The “METRIC” column indicates the accuracy of evaluation.
As I have mentioned above, parameters are also automatically tuned. Thus the training for some algorithm (preprocessor + classifier) will be repeated several times by different parameters.
Note : You can also exclude some algorithms with
blacklist_modelsoption, or run only the selected algorithms withwhitelist_modelsoption in tabular training.
You can extract the best model and export model as ONNX format. (You can then use model in various platforms, such as, NVIDIA optimized devices or Intel optimized devices.)
Similar to hyper-parameter tuning job (sweep jobs), you can also speed up Auto ML jobs with scaled computes in Azure Machine Learning.
Serving and Operationalize (MLOps)
After you’ve completed your exploration (training jobs), now you can deploy your model for serving.
Azure Machine Learning has a refined deployment topology with 2 building blocks called “endpoint” and “deployment”.
First, the following command and configuration (YAML) creates an endpoint (called “managed online endpoint”) for deployment target. (See exercise08 in my repo.)
In this stage, the endpoint doesn’t have any deployments and cannot process any requests.
Create endpoint
az ml online-endpoint create --file managed_endpoint.yml \ --resource-group $my_resource_group \ --workspace-name $my_workspacemanaged_endpoint.yml
$schema: https://azuremlschemas.azureedge.net/latest/managedOnlineEndpoint.schema.jsonname: my-test-endpoint123auth_mode: keyEach endpoint has a unique endpoint’s address (URI) as follows.
az ml online-endpoint show \ --name my-test-endpoint123 \ --query scoring_uri \ --resource-group $my_resource_group \ --workspace-name $my_workspacehttps://my-test-endpoint123.eastus.inference.ml.azure.com/scoreEach endpoint can have multiple deployments.
By running the following command, you can now deploy a model in this endpoint.
(Note that the following score.py is the entry (scoring) script which I have built. See exercise08.)
Deploy model (Create a deployment)
az ml online-deployment create --file deployment.yml \ --resource-group $my_resource_group \ --workspace-name $my_workspace \ --all-trafficdeployment.yml
$schema: https://azuremlschemas.azureedge.net/latest/managedOnlineDeployment.schema.jsonname: my-mnist-deployment-v1endpoint_name: my-test-endpoint123model: azureml:test_model@latestcode_configuration: code: ./ scoring_script: score.pyenvironment: conda_file: conda_env.yml image: mcr.microsoft.com/azureml/openmpi4.1.0-ubuntu20.04instance_type: Standard_DS2_v2instance_count: 1conda_env.yml
name: serving_exampledependencies:- python=3.8- pip: - azureml-defaults - tensorflow==2.10.0 - numpychannels:- anaconda- conda-forgeBy --all-traffic flag (see above), 100% of requests for this endpoint is assigned into this deployment.
When you need to change implementation (such as, model update), you can add another deployment in the same endpoint, and re-assign traffic for these 2 deployments without stopping current deployment. (So called, blue-green deployment)

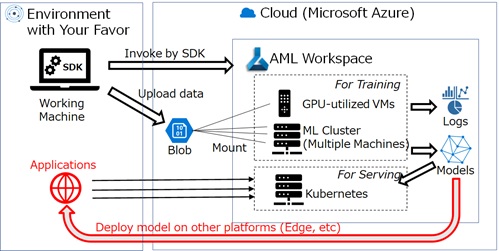
Of course, you can also deploy model for other platforms, such as, on-premise IoT devices, Azure App Service, or 3rd party cloud platforms.
In Azure Machine Learning, you can also build and composite the building blocks in ML and AI.
Using pipeline in Azure Machine Learning, you can build ML workflow, in which each component works on independent docker container.
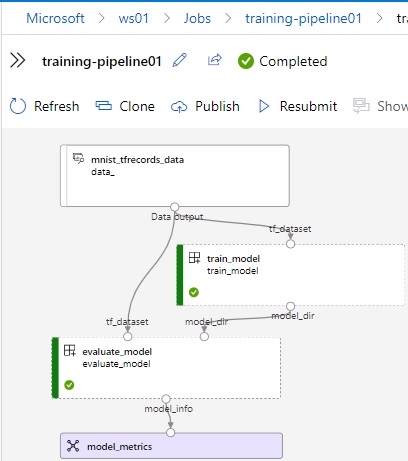
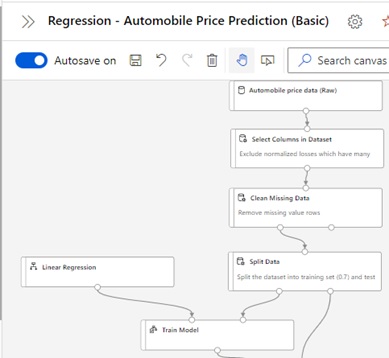
The below is a pipeline example, in which the training job is executed and the generated model is used in the subsequent evaluation job. (See exercise 09 for the command and configuration for pipeline.)
After you have published a pipeline, you can invoke pipeline with REST endpoint anywhere.
You can build your own component, which is a reusable custom logic (building block) across pipelines – such as, custom pre-processing, custom training, custom deployment, and so on.
Once you have generated your own reusable component, you can use it in both code (YAML) and UI (called Azure ML Designer).
Note : Using Azure Machine Learning Designer, you can build and debug a pipeline with graphical interface.
You can use Designer, when you want to minimize code writing.
The responsible AI (RAI) capability in Azure Machine Learning is also built as pluggable components.
Note : With responsible AI (RAI) capability, you can soon find important features for trained model and drill into the explanation of a prediction for a specific data point.
As you saw above, you can automate a variety of ML process using code or commands (YAML) in Azure Machine Learning.
You will also be able to build a process in GitHub workflow.
Note : The following custom actions are already registered in GitHub, and you can then reuse these actions in your GitHub workflow.
However, these built-in GitHub actions use Python SDK v1 (not v2) as container actions.
- Azure/aml-workspace (Connect to or create a new Azure ML workspace)
- Azure/aml-compute (Connect to or create a new compute target in Azure ML)
- Azure/aml-run (Submit a ScriptRun or a Pipeline to Azure ML)
- Azure/aml-registermodel (Register a model to Azure ML)
- Azure/aml-deploy (Deploy a model and create an endpoint for the model in Azure ML)
With Azure Machine Learning, you will be able to seamlessly integrate with ML process in your favorite CI/CD tools, such as, Flux or Jenkins.
[Reference]
Azure Machine Learning End-to-end Tutorial (CLI and YAML / Python SDK)
https://github.com/tsmatz/azureml-tutorial
Azure Machine Learning Official example
https://github.com/Azure/azureml-examples
MLflow Tutorial with Azure ML backend
https://github.com/tsmatz/mlflow-azureml/
Azure Machine Learning Release Note
https://docs.microsoft.com/en-us/azure/machine-learning/azure-machine-learning-release-notes-cli-v2
[Change Logs]
Nov 2018 Modified for GA release (changing batch AI compute to AML compute, and others)
May 2019 Following changes for the latest SDK update
- change “distributed_backend” to “distributed_training” parameter in Estimator
- add “framework_version” parameter in TensorFlow Estimator
- change “HyperDriveRunConfig” to “HyperDriveConfig”
Sep 2019 Added data profiling in new AML UI.
Nov 2019 Updated to meet with Ignite 2019 announcement
- Name change : Azure Machine Learning service -> Azure Machine Learning
- R support
- Edition and pricing change
- Support for no-code deployment etc
Apr 2021 Change code with AML Estimator (deprecated) to AML curated environments
June 2022 Updated for API (CLI) v2 GA release
Categories: Uncategorized

12 replies»