
Skype for Business API 開発
- UCWA (Unified Communications Web API) 開発入門
- Skype Web SDK 紹介
- Skype Web SDK の Audio / Video プログラミング
- Skype Meeting (Online Meeting) を使った処理
- Skype for Business App SDK 紹介
こんにちは。
「UCWA (Unified Communications Web API) 開発入門」で紹介した REST などの処理をラッピングした Web 用の API (つまり、JavaScript API) として Skype Web SDK が提供されています。BUILD 2016 にあわせ、 この Skype Web SDK が Skype for Business Online (Office 365) で利用可能になりました。(これまで、Skype for Business Server でのみ使用可能でした。)
今回は、 この Skype Web SDK の利用方法を紹介します。
サーバーを立てる必要はなく、Office 365 試用版 (Trial) などですぐに試せるので、このあとのプログラミング例を参考に、是非、いろいろと遊んでみてください。
補足 : 事前知識として、UCWA の投稿 にも、Skype for Business Online を使ったケースを追記しました。Audio / Video ミーティング、今回追加された新機能など、順次紹介していきたいと思います。
事前のセットアップ (Skype for Business Online)
Skype for Business Online (Office 365) の場合は、プログラミングの前に、まず、「[Skype] UCWA (Unified Communications Web API) 開発入門」で記載している手順で、Azure Active Directory (Azure AD) への Application 追加、Permission 設定などをおこなってください。(ここでは手順は解説しませんので、この UCWA の投稿を参照してください。)
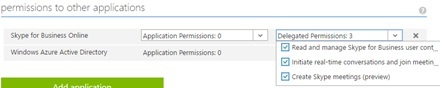
また、Skype Web SDK (JavaScript ライブラリー) は、内部で CORS を使用しています。
このため、上記の設定に加え、「JavaScript による Azure AD 連携 (OAuth Implicit Grant)」で紹介した手順で、登録した Application の oauth2AllowImplicitFlow を true に設定してください。
Authentication (Skype for Business Online)
Skype for Business Online (Office 365) の場合は、まずはじめに、Web Browser を Redirect して、OAuth 2.0 フローによる認証処理をおこないます。(ここは、Skype Web SDK がやってくれるわけではありません。)
特に、OpenID Connect や SAML を使用して既に連携しているアプリケーションなどでは注意が必要です。
利用者は、動作させる前に、必ず一度、ブラウザーで下記の Url にアクセスして、Consent をおこなう必要があるためです。(Consent の詳細は「Azure Active Directory の Common Consent Framework」を参照してください。)
このあと見ていくように、Skype Web SDK では、iframe による Sign In の処理が SDK で隠ぺいされているため、Skype Web SDK 内部でこのコンセントはできません。
https://login.microsoftonline.com/common/oauth2/authorize?response_type=code&client_id={your app's client id}&redirect_uri={your app's redirect url}&resource=https%3A%2F%2Fwebdirjp1.online.lync.com%2Fこの Authentication の HTTP Flow は「[Skype] UCWA (Unified Communications Web API) 開発入門」で解説した通りで、使用しているプログラミング言語にあわせて、この HTTP Flow を処理すれば OK です。
例えば、下記は、PHP を使ったサンプル プログラムです。
この方法以外にも、「JavaScript による Azure AD 連携 (OAuth Implicit Grant)」で紹介したサンプル コードのように、Front End の JavaScript (AngularJS など) を使って認証処理をおこなっても構いません。(上述の通り、Skype Web SDK 自身が CORS を使っていますので、このほうが統一感があって美しいかもしれませんね。。。)
<?php// (Please change this in-memory session, if production. because not scaling)session_start();if(isset($_GET['code'])) { // // When auth code is supplied, get access token // $authreq = curl_init();curl_setopt($authreq, CURLOPT_URL,'https://login.microsoftonline.com/common/oauth2/token'); curl_setopt($authreq, CURLOPT_POST, true);curl_setopt($authreq, CURLOPT_HTTPHEADER,array('Content-Type: application/x-www-form-urlencoded')); // (Please do the admin consent first, if production) curl_setopt($authreq, CURLOPT_POSTFIELDS, http_build_query(array('grant_type' => 'authorization_code','code' => $_GET['code'],'client_id' => '205de2e9-6fbc-40ec-aed9-9da7b48bee21','client_secret' => 'WaBfOMLgHG...','redirect_uri' => 'http://localhost/test.php', ))); curl_setopt($authreq, CURLOPT_RETURNTRANSFER, true); // (Please change the following SSL verify mode, if production) curl_setopt($authreq, CURLOPT_SSL_VERIFYPEER, false); $authres = json_decode(curl_exec($authreq)); curl_close($authreq); $_SESSION['access_token'] = $authres->access_token;}//// If initial access, redirect page to get auth code//if(!isset($_SESSION['access_token'])) header('Location: https://login.microsoftonline.com/common/oauth2/authorize'.'?response_type=code'.'&client_id='.'205de2e9-6fbc-40ec-aed9-9da7b48bee21'.'&resource='.urlencode('https://webdir.online.lync.com').'&redirect_uri='.urlencode('http://localhost/test.php'));// (Please check token, if production)// see /2015/02/17/azure-ad-service-access-token-validation-check/?><!DOCTYPE html><html><head><meta http-equiv="Content-Type" content="text/html; charset=utf-8"/> <title></title> <meta charset="utf-8" /></head><body> Signed In ! We implement here, later ...</body></html>なお、上記では、いろいろと大事な処理を省略していますので注意してください。(サンプルが複雑にならないよう、動作確認できる最低限のコードに絞って記載しています。)
例えば、「[Skype] UCWA (Unified Communications Web API) 開発入門」で解説したように、最初の Consent のみ Admin Consent で (管理者で) ログインさせて、以降は一般ユーザーでログインできるよう、実際のプログラミング (Production) では、入り口を分けておくと良いでしょう。(上記のプログラミングでは、管理者のみしかログインできません。)
また、普通のアプリなら、受け取った token に基づく身元の確認や改竄チェックなどの検証処理をおこないますが、こうした処理も記述していません。これについては「Azure AD を使った Service (API) 開発 (access token の verify)」を参照してください。
初期化と SignIn (Skype for Business Online)
あとは、Skype Web SDK の JavaScript API を使ってプログラミングします。
まずは、SDK の初期化とサインインをプログラミングしてみましょう。
例えば、下記では、ボタンを押すと、順番に、SDK の初期化、SDK への SignIn をおこないます。(太字が追加したコードです。特に、Edge, IE を使う場合は、このあとの注記も参照してください。)
ライブラリーとして使用している SkypeBootstrap.min.js は、その名の通り、関連する JavaScript ライブラリーを読み込む Bootstrapper としてのライブラリーであり、内部では RequireJS (almond) を使った動的ロードをおこなっています。(デバッグなどの際は、この SkypeBootstrap.min.js ではなく、ブラウザーの開発ツールなどを使って動的ロードされたライブラリーを参照してください。)
<?php// (Please change this in-memory session, if production. because not scaling)session_start();if(isset($_GET['code'])) { // // When auth code is supplied, get access token // $authreq = curl_init();curl_setopt($authreq, CURLOPT_URL,'https://login.microsoftonline.com/common/oauth2/token'); curl_setopt($authreq, CURLOPT_POST, true);curl_setopt($authreq, CURLOPT_HTTPHEADER,array('Content-Type: application/x-www-form-urlencoded')); // (Please do the admin consent first, if production) curl_setopt($authreq, CURLOPT_POSTFIELDS, http_build_query(array('grant_type' => 'authorization_code','code' => $_GET['code'],'client_id' => '205de2e9-6fbc-40ec-aed9-9da7b48bee21','client_secret' => 'WaBfOMLgHG...','redirect_uri' => 'http://localhost/test.php', ))); curl_setopt($authreq, CURLOPT_RETURNTRANSFER, true); // (Please change the following SSL verify mode, if production) curl_setopt($authreq, CURLOPT_SSL_VERIFYPEER, false); $authres = json_decode(curl_exec($authreq)); curl_close($authreq); $_SESSION['access_token'] = $authres->access_token;}//// If initial access, redirect page to get auth code//if(!isset($_SESSION['access_token'])) header('Location: https://login.microsoftonline.com/common/oauth2/authorize'.'?response_type=code'.'&client_id='.'205de2e9-6fbc-40ec-aed9-9da7b48bee21'.'&resource='.urlencode('https://webdir.online.lync.com').'&redirect_uri='.urlencode('http://localhost/test.php'));// (Please check token, if production)// see /2015/02/17/azure-ad-service-access-token-validation-check/?><!DOCTYPE html><html><head><meta http-equiv="Content-Type" content="text/html; charset=utf-8"/> <title></title> <meta charset="utf-8" /></head><body> <script src="https://swx.cdn.skype.com/shared/v/1.2.15/SkypeBootstrap.min.js"></script> <button id="btnInit">1.Initialize</button> <button id="btnSignIn">2.Sign In</button> <script>(function () { var Application; var app; // // 1.Initialize Skype Web SDK // document.getElementById('btnInit').onclick = function () {Skype.initialize({ apiKey: 'a42fcebd-5b43-4b89-a065-74450fb91255',}, function (api) { Application = api.application; app = new Application(); alert('initialize succeed');}, function (err) { alert('initialize error: ' + err);}); } // // 2.SignIn // document.getElementById('btnSignIn').onclick = function () {app.signInManager.signIn({ "client_id": "205de2e9-6fbc-40ec-aed9-9da7b48bee21", "origins": ["https://webdir.online.lync.com/autodiscover/autodiscoverservice.svc/root"], "cors": true, "version": 'SkypeOnlinePreviewApp/1.0.0', "redirect_uri": 'http://localhost/test.php'}).then(function () { alert('signed in');}).then(null, function (err) { alert('signin error: ' + err);}); }}()); </script></body></html>SDK 内部では、「JavaScript による Azure AD 連携 (OAuth Implicit Grant)」で解説した hidden iframe を使った方法 (OAuth Implicit Grant Flow による token の再取得) で token の取得をおこない、受け取った token を使って UCWA の REST API を呼び出しています。この REST API 呼び出しでは、CORS が使用されています。
このため、SignIn をしていない別の Web Browser で上記と同じ JavaScript を実行しても、SDK の SignIn 処理 (上記サンプル コードの app.signInManager.signIn) に失敗するはずです。(もちろん、そのあとの、User の取得や、IM の送信などもできません。) 必ず、一度 SignIn をおこなった同じ Web Browser (Page) 内で、Skype Web SDK の処理を記述してください。(上記のサンプル コードでは、PHP で SignIn を処理して、SignIn 後に Skype Web SDK の JavaScript のコードを実行しています。)
なお、上記ソースコードの apiKey は、SDK を識別する ID なので、常に、この固定値を設定してください。この値は、現 Preview 版 (2016/04 時点) での SDK ID です。
補足 : 現時点 (Preview) での制約だと思いますが、Edge や Internet Explorer (IE) を使う場合で、Azure AD アカウント (もしくは、Azure AD と Federation された AD アカウント) で Windows にログインしている場合や、複数の Azure AD アカウントでログインしている場合は、SignIn Error となります。(複数の Credential でログインしている場合は signInManager.signIn がエラーとなります。)
InPrivate ブラウズや、マシンの Local Account で Windows にログインしなおすなどして実行してください。
Skype for Business Server の場合 (初期化と SignIn)
ご参考までに、Skype for Business Server (On-Premise) をお使いの方は、下記のようなコードになります。
<!DOCTYPE html><html><head><meta http-equiv="Content-Type" content="text/html; charset=utf-8"/> <title></title> <meta charset="utf-8" /></head><body> <script src="https://swx.cdn.skype.com/shared/v/1.2.15/SkypeBootstrap.min.js"></script> <button id="btnSignIn">Sign In</button> <script>(function () { var Application; var app; // Initialize skype web sdk Skype.initialize({apiKey: 'SWX-BUILD-SDK', }, function (api) {Application = api.application;app = new Application();alert('initialize succeed'); }, function (err) {alert('initialize error: ' + err); }); // Sign In document.getElementById('btnSignIn').onclick = function () {app.signInManager.signIn({ username: 'demouser03@example.com', password: 'P@ssw0rd'}).then(function () { alert('Signin as ' +app.personsAndGroupsManager.mePerson.displayName());}).then(null, function (err) { alert('signin error: ' + err);}); } . . .}()); </script></body></html>内部では、OAuth の password 方式によるログインがおこなわれるため、上述のような OAuth によるリダイレクトなども不要です。(ログインのプログラミングについては、Skype for Business Online よりも、Skype for Business Server のほうが簡単ですね。)
Skype Web SDK による Messaging
では、Skype Web SDK を使って、Chat (Text Messaging) の処理を追加してみましょう。(以降は、Skype for Business Online も Skype for Business Server も共通です。)
例えば、下記太字は、User の取得 (検索)、取得した User との Conversation の開始、User への Instant Messaging (IM) の送信をおこなうサンプル コードです。
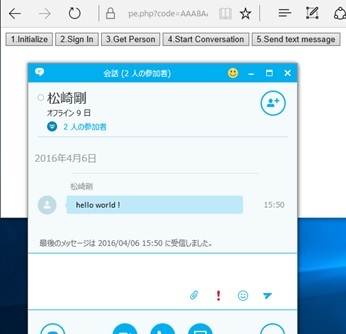
<?php// (Please change this in-memory session, if production. because not scaling)session_start();if(isset($_GET['code'])) { // // When auth code is supplied, get access token // $authreq = curl_init();curl_setopt($authreq, CURLOPT_URL,'https://login.microsoftonline.com/common/oauth2/token'); curl_setopt($authreq, CURLOPT_POST, true);curl_setopt($authreq, CURLOPT_HTTPHEADER,array('Content-Type: application/x-www-form-urlencoded')); // (Please do the admin consent first, if production) curl_setopt($authreq, CURLOPT_POSTFIELDS, http_build_query(array('grant_type' => 'authorization_code','code' => $_GET['code'],'client_id' => '205de2e9-6fbc-40ec-aed9-9da7b48bee21','client_secret' => 'WaBfOMLgHG...','redirect_uri' => 'http://localhost/test.php', ))); curl_setopt($authreq, CURLOPT_RETURNTRANSFER, true); // (Please change the following SSL verify mode, if production) curl_setopt($authreq, CURLOPT_SSL_VERIFYPEER, false); $authres = json_decode(curl_exec($authreq)); curl_close($authreq); $_SESSION['access_token'] = $authres->access_token;}//// If initial access, redirect page to get auth code//if(!isset($_SESSION['access_token'])) header('Location: https://login.microsoftonline.com/common/oauth2/authorize'.'?response_type=code'.'&client_id='.'205de2e9-6fbc-40ec-aed9-9da7b48bee21'.'&resource='.urlencode('https://webdir.online.lync.com').'&redirect_uri='.urlencode('http://localhost/test.php'));// (Please check token, if production)// see /2015/02/17/azure-ad-service-access-token-validation-check/?><!DOCTYPE html><html><head><meta http-equiv="Content-Type" content="text/html; charset=utf-8"/> <title></title> <meta charset="utf-8" /></head><body> <script src="https://swx.cdn.skype.com/shared/v/1.2.15/SkypeBootstrap.min.js"></script> <button id="btnInit">1.Initialize</button> <button id="btnSignIn">2.Sign In</button> <button id="btnGetPerson">3.Get Person</button> <button id="btnStartIM">4.Start Conversation</button> <button id="btnSendIM">5.Send text message</button> <script>(function () { var Application; var app; var person; var conver; // // 1.Initialize Skype Web SDK // document.getElementById('btnInit').onclick = function () {Skype.initialize({ apiKey: 'a42fcebd-5b43-4b89-a065-74450fb91255',}, function (api) { Application = api.application; app = new Application(); alert('initialize succeed');}, function (err) { alert('initialize error: ' + err);}); } // // 2.SignIn // document.getElementById('btnSignIn').onclick = function () {app.signInManager.signIn({ "client_id": "205de2e9-6fbc-40ec-aed9-9da7b48bee21", "origins": ["https://webdir.online.lync.com/autodiscover/autodiscoverservice.svc/root"], "cors": true, "version": 'SkypeOnlinePreviewApp/1.0.0', "redirect_uri": 'http://localhost/test.php'}).then(function () { alert('signed in');}).then(null, function (err) { alert('signin error: ' + err);}); } // // 3.Get Person to communicate (Show status) // document.getElementById('btnGetPerson').onclick = function () {var personSearchQuery = app.personsAndGroupsManager.createPersonSearchQuery();personSearchQuery.text('Demo Taro');personSearchQuery.limit(50);personSearchQuery.getMore().then(function (results) { person = results[0].result; person.status.get().then(function (status) {alert('Status is: ' + status); });}).then(null, function (err) { alert('Search error: ' + err);}); } // // 4.Start conversation // document.getElementById('btnStartIM').onclick = function () {conver = app.conversationsManager.getConversation(person);conver.selfParticipant.chat.state.changed(function (state) { if (state == 'Connected') {alert('connected'); }});conver.chatService.start();// (receiving message !)conver.historyService.activityItems.added(function (item) { if (item.type() == 'TextMessage') {if (item.direction() == 'Incoming') { alert('received message: ' + item.text());} };});alert('set-up finished'); } // // 5.Send text message // document.getElementById('btnSendIM').onclick = function () {conver.chatService.sendMessage('hello world !'); }}()); </script></body></html>Web Browser に表示される下図のボタンを順番に押すと処理がおこなわれ、最後の [5.Send text message] のボタンを押すと、Web Browser から「hello world!」と書かれた Text Message (Instant Messaging) が送信されます。
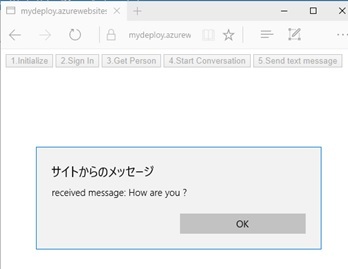
その結果、下図の通り、受信側 (相手) では、Skype for Business のクライアントを使って Message が受信されるはずです。(もし、受信側も Skype Web SDK を使った Web アプリの場合には、Skype クライアントは使わず、Web Browser どうしの通信となります。)
なお、この Web アプリが Message を受信した場合は、alert で受信テキストを表示します。(上記ソースコードを参照。)
Conversation Control
(2016/04/22 : パートナー様よりご質問あったため追記しました。。。)
Skype Web SDK で Chat (Text Messaging) を処理する場合、上記のように Text Message をプログラムで処理する方法以外に、Skype Web SDK Conversation Control という UI 部品をそのまま添付する方法もあります。
Video の処理も含め、こうした UI と一体になった処理の簡素化ができるという点は、UCWA / User API にはない SDK のメリットの 1 つです。
まず、Conversation Control を使用する際には、上述の apiKey が変わるので注意してください。(上述の通り、これは Preview 期間中の暫定の ID です。)
使用するオブジェクトも、上記では api.application として API Manager から Application オブジェクトを取得して使用しましたが、Conversation Control では UIApplicationInstance という別のオブジェクトのインスタンスを使用します。
下記は、Conversation Control を表示する単純なサンプル コードです。
Conversation Control は、下記の renderConversation という関数で表示されます。
<?php// (Please change this in-memory session, if production. because not scaling)session_start();if(isset($_GET['code'])) { // // When auth code is supplied, get access token // $authreq = curl_init();curl_setopt($authreq, CURLOPT_URL,'https://login.microsoftonline.com/common/oauth2/token'); curl_setopt($authreq, CURLOPT_POST, true);curl_setopt($authreq, CURLOPT_HTTPHEADER,array('Content-Type: application/x-www-form-urlencoded')); // (Please do the admin consent first, if production) curl_setopt($authreq, CURLOPT_POSTFIELDS, http_build_query(array('grant_type' => 'authorization_code','code' => $_GET['code'],'client_id' => '205de2e9-6fbc-40ec-aed9-9da7b48bee21','client_secret' => 'WaBfOMLgHGuwCVdpD4HEqJDxfvp09Fn84CW99NgVJeg=','redirect_uri' => 'https://mydeploy.azurewebsites.net/skype_cc.php', ))); curl_setopt($authreq, CURLOPT_RETURNTRANSFER, true); // (Please change the following SSL verify mode, if production) curl_setopt($authreq, CURLOPT_SSL_VERIFYPEER, false); $authres = json_decode(curl_exec($authreq)); curl_close($authreq); $_SESSION['access_token'] = $authres->access_token;}//// If initial access, redirect page to get auth code//if(!isset($_SESSION['access_token'])) header('Location: https://login.microsoftonline.com/common/oauth2/authorize'.'?response_type=code'.'&client_id='.'205de2e9-6fbc-40ec-aed9-9da7b48bee21'.'&resource='.urlencode('https://webdir.online.lync.com').'&redirect_uri='.urlencode('https://mydeploy.azurewebsites.net/skype_cc.php'));// (Please check token, if production)// see /2015/02/17/azure-ad-service-access-token-validation-check/?><!DOCTYPE html><html><head><meta http-equiv="Content-Type" content="text/html; charset=utf-8"/> <title></title> <meta charset="utf-8" /></head><body> <script src="https://swx.cdn.skype.com/shared/v/1.2.15/SkypeBootstrap.min.js"></script> <button id="btnInit">1.Initialize</button> <button id="btnSignIn">2.Sign In</button> <button id="btnStartCC">3.Conversation using Control</button> <p><div id="render-conversation" style="height:500px;"></div> </p> <script>(function () { var api, app; // // 1.Initialize Skype Web SDK // document.getElementById('btnInit').onclick = function () {Skype.initialize({ apiKey: '9c967f6b-a846-4df2-b43d-5167e47d81e1'}, function (arg) { api = arg; app = api.UIApplicationInstance; alert('initialize succeed');}, function (err) { alert('initialize error: ' + err);}); } // // 2.SignIn // document.getElementById('btnSignIn').onclick = function () {app.signInManager.signIn({ "client_id": "205de2e9-6fbc-40ec-aed9-9da7b48bee21", "origins": ["https://webdir.online.lync.com/autodiscover/autodiscoverservice.svc/root"], "cors": true, "version": 'SkypeOnlinePreviewApp/1.0.0', "redirect_uri": 'https://mydeploy.azurewebsites.net/skype_cc.php'}).then(function () { alert('signed in');}).then(null, function (err) { alert('signin error: ' + err);}); } // // 3.Start conversation using control // document.getElementById('btnStartCC').onclick = function () {var container = document.getElementById('render-conversation');var promise = api.renderConversation(container, {modalities: ['Chat'],participants: ['sip:demouser01@o365directory.onmicrosoft.com']});alert('started conversation control'); }}()); </script></body></html>「1. Initialize」、「2. Sign In」、「3. Conversation using Control」のボタンを順番に押すと、下図の通り、Instant Messaging (Chat) の UI が表示されて、ここで Conversation をおこなうことができます。(もちろん、今回も、Skype for Business クライアントは不要です。)
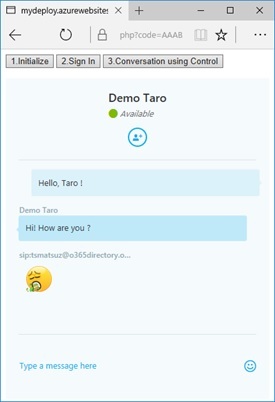
Conversation Control の対応ブラウザーは、Internet Explorer 10 以上、Safari 8 以上、FireFox 40 以上、Chrome 43 以上です。
Categories: Uncategorized
