
Current cryptographic technologies protect data both in the rest and in transit, but confidential computing technology protects data in use.
Azure Confidential computing encrypts your data on the isolated portion in memory (which is called an enclave) and protects against low-level attacks (kernel-level malwares). Hardware-based trusted module will protect your data in your sensitive workloads – such as, governmental, financial, or healthcare applications.
Microsoft also invests this secure platform in various services, products, and features – such as, Confidential Containers (AKS), Azure Attestation (which is out-of-the-box remote attestation provider in Azure), Azure Trusted Launch, Confidential Inference ONNX Runtime, Always Encrypted in Azure SQL Database / SQL Server, Azure Confidential Ledger (including CCF framework) and SQL Ledger.
In this post, to demystify confidential computing, I’ll explorer how it’s secured using a “Hello World” example.
Install Intel SGX software
First, create a Intel SGX based confidential computing VM in Microsoft Azure.
In my case, I have used Standard DC2s v3 with Ubuntu Server 20.04 LTS image.
Before building your application, see installation document (see here for software v2.16) and then install Intel SGX drivers, runtime, and SDKs.
For instance, the following script is for v2.16 installation in Ubuntu Server 20.04 LTS.
## Setup for platform driver## update systemsudo apt updatesudo apt upgrade# install Intel SGX driver# (use out-of-tree platform's driver for Azure VM image)sudo apt-get install build-essential ocaml automake autoconf libtool wget python libssl-dev dkmswget https://download.01.org/intel-sgx/latest/linux-latest/distro/ubuntu20.04-server/sgx_linux_x64_driver_2.11.054c9c4c.binchmod 777 sgx_linux_x64_driver_2.11.054c9c4c.binsudo ./sgx_linux_x64_driver_2.11.054c9c4c.bin## Setup for application users## add repositoryecho 'deb [arch=amd64] https://download.01.org/intel-sgx/sgx_repo/ubuntu focal main' | sudo tee /etc/apt/sources.list.d/intel-sgx.list# add keywget -qO - https://download.01.org/intel-sgx/sgx_repo/ubuntu/intel-sgx-deb.key | sudo apt-key add# install packagessudo apt-get updatesudo apt-get install libsgx-epid libsgx-quote-ex libsgx-dcap-ql# install DCAP QPL packagesudo apt-get install libsgx-dcap-default-qpl## Setup for application developers## install required packagessudo apt-get install build-essential python# download sdkwget https://download.01.org/intel-sgx/latest/linux-latest/distro/ubuntu20.04-server/sgx_linux_x64_sdk_2.16.100.4.bin# install sdkchmod +x sgx_linux_x64_sdk_2.16.100.4.binsudo ./sgx_linux_x64_sdk_2.16.100.4.bin --prefix /opt/intel# set environmentsource /opt/intel/sgxsdk/environment# install other dev packagessudo apt-get install libsgx-enclave-common-dev libsgx-dcap-ql-dev libsgx-dcap-default-qpl-devRun Application with Enclave and Memory Scraping Test
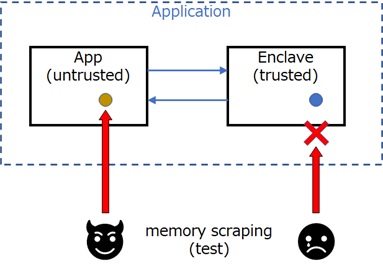
In this post, we’ll create a simple application with both trusted code and untrusted code, and perform memory scraping against native variables in both workloads. (See below for the outline of this application.)
First, clone my repository to download source code.
git clone https://github.com/tsmatz/intel-sgx-enclave-ubuntu-tutorialcd intel-sgx-enclave-ubuntu-tutorialIn this source code, trusted_func01() in Enclave.cpp will perform as a trusted operation and the others (functions in App.cpp) will perform as untrusted operations (normal operations).
Keep in mind that the value of variable (untrusted_x) in untrusted code is 123456789 and the value of trusted one (trusted_x) is 987654321 in this source code. (See the following source code.)
As you can see in Enclave.cpp below, you can also invoke untrusted function (ocall_wait_keyinput() function) within the trusted code.
App.cpp
#include <stdio.h>#include <string.h># define ENCLAVE_FILENAME "enclave.signed.so"#include "sgx_urts.h"#include "App.h"#include "Enclave_u.h"sgx_enclave_id_t global_eid = 0;void ocall_wait_keyinput(const char *str){ printf("%s", str); getchar();}int SGX_CDECL main(int argc, char *argv[]){ (void)(argc); (void)(argv); sgx_status_t ret = SGX_ERROR_UNEXPECTED; int untrusted_x = 123456789; // initialize enclave ret = sgx_create_enclave(ENCLAVE_FILENAME, SGX_DEBUG_FLAG, NULL, NULL, &global_eid, NULL); if (ret != SGX_SUCCESS) {printf("Enclave init error\n");getchar();return -1; } // invoke trusted_func01(); int returned_result; ret = trusted_func01(global_eid, &returned_result); if (ret != SGX_SUCCESS) {printf("Enclave call error\n");return -1; } // destroy the enclave sgx_destroy_enclave(global_eid); printf ("X (untrusted): %d\n", untrusted_x); printf ("X (trusted): %d\n", returned_result); return 0;}Enclave.cpp
#include "Enclave_t.h"#include <stdio.h>#include <string.h>int trusted_func01(){ int trusted_x = 987654321; ocall_wait_keyinput("Please enter keyboard to show variables in memory ..."); return trusted_x;}The border for these workload’s segments (trusted or untrusted) is defined in Enclave.edl and will be compiled with Intel SGX Edger8r tool (sgx_edger8r) to generate edge routines.
Enclave.edl
enclave { trusted {public int trusted_func01(void); }; untrusted {void ocall_wait_keyinput([in, string] const char *str); };};Now let’s build this application.
The trusted trusted_func01() is then compiled as a shared library enclave.signed.so. As you can see in above source code (App.cpp), this library is used for enclave creation in main().
# read environment settings for SDKsource /opt/intel/sgxsdk/environment# buildmakeWhen you run this application, it will wait your keyboard input and then show current variable’s values in both trusted code (trusted_x in Enclave.cpp) and untrusted code (untrusted_x in App.cpp) as follows.
# run application./app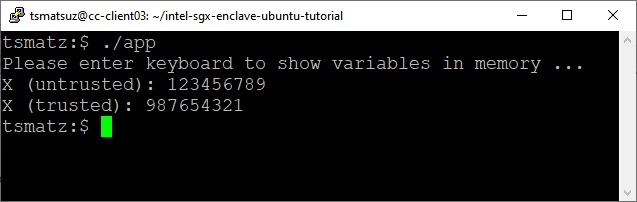
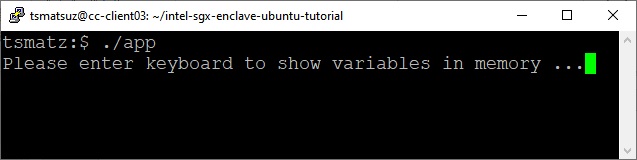
Now let’s run this application again, and pause in keyboard input.
In another terminal, run the following command and check the application’s process id.
(Here I assume that process id is 16154.)
ps -ax | grep app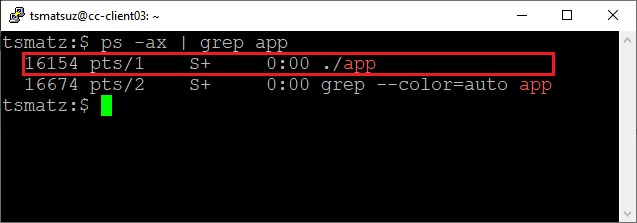
Now let’s scrape memory with scanmem tool.
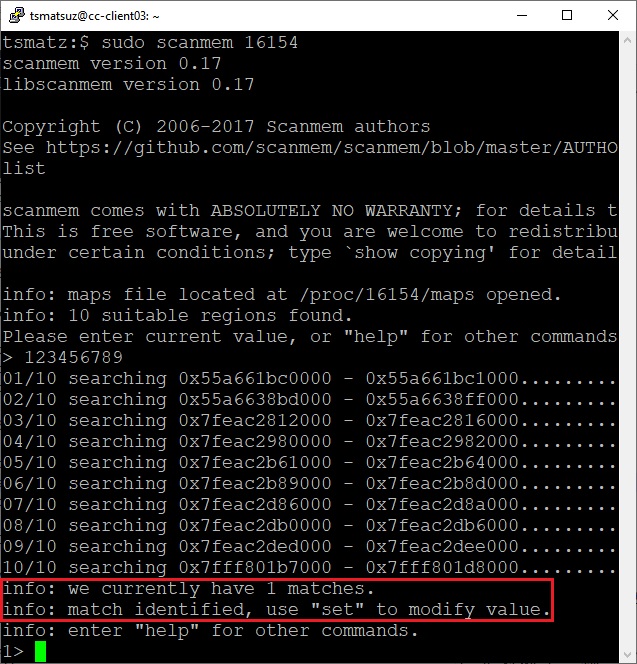
Install scanmem tool, and start to scan for the above process (with process id 16154).
# install scanmemsudo apt-get install scanmem# scan processsudo scanmem 16154Type “123456789” in scanmem console to search current value in memory on this process.
You would then get 1 match in memory. (See the following screenshot.)
As you can see in above source code, this might be untrusted_x in App.cpp.
Type “set 33333” in scanmem console to set a new value in this memory.
set 33333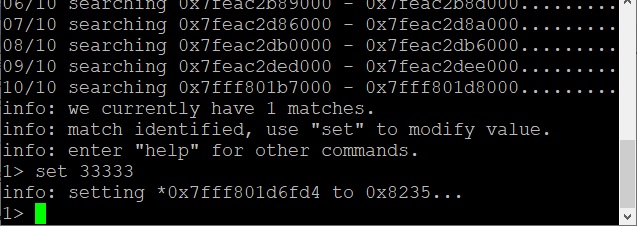
Now go back to the application and proceed (resume) by typing any keyboard.
You will then find that untrusted_x is modified as follows. (See the following screenshot.)
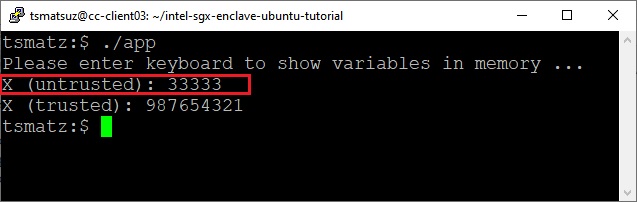
As you can see above, the privileged process (external application) will easily be able to scan and change memory.
Note : You can also dump all memories using scrape_data.sh and
scanmemtool.
On contrary, run application again and please search memory with the value 987654321 (the value of trusted_x in Enclave.cpp) instead.
This time, you won’t then be able to get any variables. (As you can see in below screenshot, it will get no match.)
This shows that the trusted memory cannot be reached (and, of course, not modified) from non-privileged process which doesn’t have key, because it’s protected by secure hardware enclave.

Here I have shown an example to briefly see the secure platform, confidential computing in Microsoft Azure, with Intel SGX SDK.
With confidential containers and open-source SGX wrappers, you can also run existing applications of most common programming language runtimes (such as, Python, Node.js, Java, etc) in containers without any source-code modification, and it will then be the fastest method to run your existing applications in enclaves.
For AI engineers or data scientists, the trusted operation can soon be available on NVDIA GPUs in Microsoft Azure. (I note that it’s not currently available in Japan region. See here.)
Note : In SDK samples (in
{SGX SDK installation directory}/SampleCode), there exist other sample source-codes for a variety of techniques, such as, attestation, seal/unseal, etc.
GitHub : Intel SGX Enclave Tutorial (Ubuntu)
https://github.com/tsmatz/intel-sgx-enclave-ubuntu-tutorial
Categories: Uncategorized

1 reply»